
msi MPG B560I GAMING EDGE WIFI
MSI MPG B560I Gaming Edge WiFi Motherboard User Manual
Model: MPG B560I GAMING EDGE WIFI
1. Introduction
This manual provides detailed instructions for the installation, operation, and maintenance of the MSI MPG B560I Gaming Edge WiFi motherboard. Please read this manual thoroughly before proceeding with installation to ensure correct setup and optimal performance.
The MSI MPG B560I Gaming Edge WiFi is a mini-ITX motherboard designed to support 11th and 10th Generation Intel Core, Pentium, and Celeron processors for the LGA 1200 socket. It features DDR4 memory support up to 5200(OC) MHz, PCIe 4.0, Lightning Gen 4 x4 M.2 slots, USB 3.2 Gen 2 connectivity, 2.5G LAN with LAN Manager, and Intel Wi-Fi 6E for robust performance and connectivity.
2. Package Contents
Verify that all items listed below are present in your motherboard package. If any items are missing or damaged, contact your retailer.

Image: Overview of the MSI MPG B560I Gaming Edge WiFi motherboard package contents, including the motherboard, Wi-Fi antennas, user manual, quick installation guide, M.2 screws, screwdrivers, driver DVD, cleaning brush, SATA cables, and RGB extension cable.
- MSI MPG B560I Gaming Edge WiFi Motherboard
- Wi-Fi Antenna (2x)
- User Manual
- Quick Installation Guide
- M.2 Screw / Standoff Sets
- Screwdrivers
- Driver DVD
- Cleaning Brush
- SATA Cables (2x)
- Rainbow RGB LED Extension Cable
- MPG Stickers
- Case Badge
- Reward Program / Shout Out Flyer
- Registration Card
- Product Catalog
3. Motherboard Layout
Familiarize yourself with the key components and connectors on the motherboard before installation.

Image: Top-down view of the MSI MPG B560I Gaming Edge WiFi motherboard, highlighting the LGA 1200 CPU socket, DDR4 memory slots, M.2 slots, and various headers.

Image: Close-up view of the rear I/O panel of the MSI MPG B560I Gaming Edge WiFi motherboard, showing DisplayPort, HDMI, USB ports (including USB 3.2 Gen 2 Type-C), 2.5G LAN, Wi-Fi 6E antenna connectors, and audio jacks.
4. Setup and Installation
Follow these steps carefully to install your motherboard and its components.
4.1. Processor (CPU) Installation
- Ensure the motherboard is placed on a non-conductive surface.
- Open the LGA 1200 CPU socket lever.
- Carefully align the CPU with the socket, matching the triangular mark on the CPU to the mark on the socket.
- Gently place the CPU into the socket without forcing it.
- Close the socket lever to secure the CPU.

Image: Close-up of the LGA 1200 CPU socket on the MSI B560I motherboard, indicating where the Intel Core processor is installed.
4.2. Memory (RAM) Installation
- Open the clips on both ends of the DDR4 memory slots.
- Align the notch on the DDR4 memory module with the key in the slot.
- Press down firmly on both ends of the memory module until the clips snap into place.
- The motherboard supports DDR4 memory up to 5200(OC) MHz.

Image: Diagram showing the DDR4 memory slots on the MSI B560I motherboard, highlighting support for speeds up to 5200MHz and XMP Profile 1.
4.3. M.2 SSD Installation
The motherboard includes Lightning Gen 4 x4 M.2 slots for high-speed storage.
- Locate the M.2 slot(s) on the motherboard. One slot is typically under a heatsink (M.2 Shield Frozr).
- Remove the M.2 Shield Frozr heatsink if present.
- Insert the M.2 SSD into the slot at an angle.
- Gently push down the M.2 SSD and secure it with the provided M.2 screw/standoff.
- Reattach the M.2 Shield Frozr heatsink for optimal cooling.

Image: Diagram illustrating the M.2 Shield Frozr heatsink on the MSI B560I motherboard, designed to cool M.2 SSDs and prevent thermal throttling.
4.4. Power Connections
- Connect the 24-pin ATX main power connector from your power supply to the motherboard.
- Connect the 8-pin CPU power connector to the designated socket near the CPU.
- Ensure all power cables are securely seated.
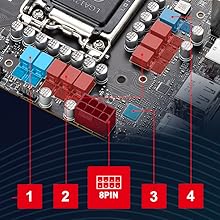
Image: Diagram highlighting the enhanced power design of the MSI B560I motherboard, showing the 8-pin CPU power connector and VRM components.
4.5. Front Panel Connectors
Connect the front panel cables (power button, reset button, USB ports, audio jacks, etc.) from your PC case to the corresponding headers on the motherboard. Refer to the user manual for detailed pinout diagrams. Due to the mini-ITX form factor, cable management in this area may require careful attention.
4.6. Wi-Fi Antenna Installation
Screw the two included Wi-Fi antennas onto the connectors on the rear I/O panel for optimal wireless performance.
5. Operating Instructions
5.1. Initial Boot and BIOS Setup
- After assembling all components, connect your monitor, keyboard, and mouse.
- Power on your system.
- Press the DEL key during startup to enter the BIOS (Basic Input/Output System) setup.
- The BIOS interface is designed for straightforward navigation. You can configure boot order, system time, and various hardware settings here.
- Save changes and exit the BIOS to continue with operating system installation.
5.2. Network Connectivity
- Wired LAN: Connect an Ethernet cable to the 2.5G LAN port on the rear I/O panel for a high-speed wired network connection.
- Wireless LAN: Ensure Wi-Fi antennas are connected. The integrated Intel Wi-Fi 6E solution provides advanced wireless connectivity. You can connect to available Wi-Fi networks through your operating system settings.
5.3. USB Connectivity
The motherboard offers various USB ports, including USB 3.2 Gen 2, for connecting peripherals and external devices. Refer to the motherboard layout section for port locations.
5.4. Audio Configuration
Connect your audio devices (speakers, headphones, microphone) to the corresponding audio jacks on the rear I/O panel. For optimal audio experience, ensure the latest audio drivers are installed. Some users have reported issues with the Realtek console software; if you encounter audio problems, consider uninstalling this software and using default Windows audio drivers or alternative Realtek drivers.
6. Maintenance
Proper maintenance ensures the longevity and stable operation of your motherboard.
- Cleaning: Regularly clean dust from the motherboard and components using compressed air or a soft brush. Ensure the system is powered off and unplugged before cleaning. The included cleaning brush can be used for delicate areas.
- Driver Updates: Keep your motherboard drivers (chipset, LAN, Wi-Fi, audio) updated to the latest versions available from the MSI website.
- BIOS Updates: Periodically check the MSI support website for BIOS updates. BIOS updates can improve compatibility, stability, and performance. Follow the instructions provided by MSI carefully when updating the BIOS.
7. Troubleshooting
This section addresses common issues you might encounter.
- No Power/No Boot:
- Verify all power cables (24-pin ATX, 8-pin CPU) are securely connected.
- Ensure the power supply is functional and switched on.
- Check front panel power button connection.
- Display Issues:
- Ensure the monitor cable is connected to the correct port (either motherboard's integrated graphics or dedicated graphics card).
- Reseat the graphics card and memory modules.
- RAM Training Loop:
- This can occur during initial boot or after memory changes. Allow the system time to complete memory training.
- If persistent, try reseating RAM modules or testing with one module at a time.
- Clear CMOS (refer to motherboard manual for jumper location).
- Audio Problems:
- Ensure audio drivers are correctly installed.
- If using the Realtek console, consider uninstalling it and using default Windows drivers if issues persist.
- Check physical connections of audio devices.
- System Instability/Crashes:
- Ensure all components are properly seated.
- Check CPU and GPU temperatures.
- Update drivers and BIOS.
- Run memory diagnostic tools.
For more advanced troubleshooting, consult the full user manual or MSI's official support resources.
8. Specifications
| Feature | Detail |
|---|---|
| Brand | MSI |
| Model Name | MPG B560I GAMING EDGE WIFI |
| CPU Socket | LGA 1200 |
| Compatible Processors | 11th/10th Gen Intel Core, Pentium, Celeron |
| Chipset Type | Intel B560 |
| RAM Memory Technology | DDR4 |
| Max Memory Storage Capacity | 128 GB |
| Memory Speed | Up to 5200(OC) MHz |
| PCIe Slots | PCIe 4.0 x16 |
| M.2 Slots | Lightning Gen 4 x4 M.2 |
| USB Ports | USB 3.2 Gen 2 (Type-A & Type-C), USB 2.0 (internal headers and rear I/O) |
| LAN | 2.5G LAN with LAN Manager |
| Wireless Connectivity | Intel Wi-Fi 6E Solution |
| Video Output | DisplayPort, HDMI |
| Form Factor | m-ITX |
| Product Dimensions (LxWxH) | 6.7 x 6.7 x 2 inches |
| Item Weight | 2.29 pounds |
| Platform | Windows 10 |
9. Warranty and Support
MSI provides a limited warranty for its motherboards. Please refer to the warranty card included in your package or visit the official MSI website for detailed warranty terms and conditions specific to your region.
For technical support, driver downloads, BIOS updates, and further assistance, please visit the official MSI support website:
Related documentsMPG B560I GAMING EDGE WIFI


Ask a question about this manual
Ask about setup, troubleshooting, compatibility, parts, safety, or missing instructions. Manuals+ will review the question and use this page’s manual context to help answer it.