1. Introduction
This manual provides essential information for the safe and efficient installation, operation, and maintenance of your HOFTRONIC LED Light Strips. These ultra-slim LED strips are designed for various indoor applications, offering bright, energy-efficient illumination.
Each light strip features 20W power consumption, producing 2400 lumens of 3000K warm white light. They are flicker-free, have a wide 110-degree beam angle, and a Color Rendering Index (CRI) of over 80, ensuring realistic color representation. The product is supplied as a 6-pack, model number 4409500.
2. Safety Instructions
- Always disconnect the power supply before installation, maintenance, or cleaning.
- This product has an IP20 rating, meaning it is protected against solid objects larger than 12.5mm but has no protection against water. It is suitable for indoor use only and must not be installed in wet or damp environments (e.g., bathrooms without proper ventilation, outdoor areas).
- Ensure the voltage of your electrical supply matches the product's specified voltage (230 Volts).
- Installation should be performed by a qualified electrician if you are unsure about electrical wiring.
- Do not modify the product in any way. Unauthorized modifications may void the warranty and pose safety risks.
- Keep packaging materials out of reach of children.
3. Package Contents
Verify that all components are present and undamaged before proceeding with installation.
- 6 x HOFTRONIC LED Light Strips (Model 4409500)
- Mounting clips (quantity sufficient for 6 units)
- Instruction Manual
4. Setup and Installation
The HOFTRONIC LED Light Strips are designed for easy ceiling mounting using the provided clips. Follow these steps for a secure installation:
- Step 1: Preparation
Before starting, ensure the main power supply to the installation area is switched off at the circuit breaker. This prevents electrical shock. - Step 2: Mark Mounting Points
Choose the desired location for your LED light strip. Use the light strip itself or the mounting clips as a template to mark the drilling points on the ceiling or wall. Ensure the marked points are level and adequately spaced for secure mounting. - Step 3: Install Mounting Clips
Drill holes at the marked points. Insert appropriate wall plugs (not always included, depending on surface type) and then secure the mounting clips to the surface using screws. Ensure the clips are firmly attached. - Step 4: Electrical Connection
Connect the light strip's electrical wiring to your main power supply. The product features a quick connection system. Ensure all connections are secure and comply with local electrical codes. If in doubt, consult a qualified electrician. - Step 5: Mount the Light Strip
Carefully align the LED light strip with the installed mounting clips and snap it into place. Ensure it is securely seated in all clips. - Step 6: Test
Once the light strip is securely mounted and all electrical connections are made, restore power to the circuit. Test the light strip by switching it on.

Figure 1: Detailed view of the HOFTRONIC LED light strip, showing its slim profile and integrated LED components.
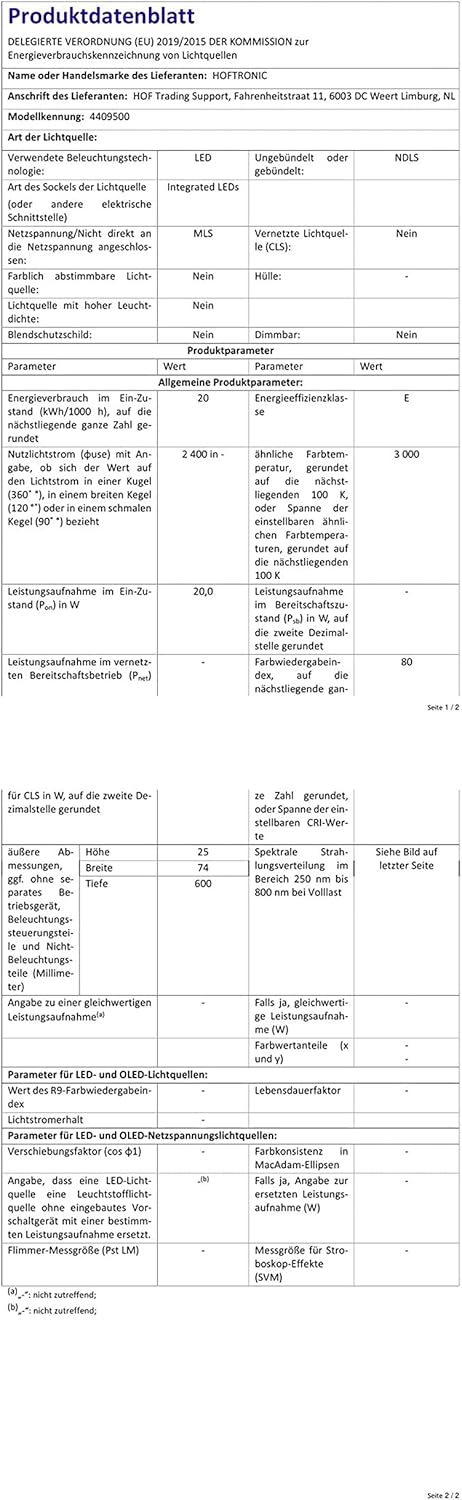
Figure 2: Rear view of the HOFTRONIC LED light strip, illustrating the mounting points and electrical connection area.
5. Operating Instructions
The HOFTRONIC LED Light Strip operates via a standard wall switch connected to its power supply. Simply toggle the switch to turn the light on or off.
6. Maintenance
- Cleaning: Ensure the power is off before cleaning. Use a soft, dry, or slightly damp cloth to wipe the surface of the light strip. Do not use abrasive cleaners, solvents, or harsh chemicals, as these can damage the finish or electrical components.
- No User-Serviceable Parts: The LED light strip contains no user-serviceable parts. Do not attempt to open or repair the unit. Contact customer support if the product requires service.
- Regular Inspection: Periodically check the mounting clips and electrical connections to ensure they remain secure.
7. Troubleshooting
| Problem | Possible Cause | Solution |
|---|---|---|
| Light does not turn on | No power supply Loose electrical connection Faulty switch | Check if the main power supply is on. Verify all electrical connections are secure. Test the wall switch with another device. |
| Light is flickering | Unstable power supply Loose connection | Ensure stable power. Consult an electrician if power fluctuations persist. Check all electrical connections for tightness. |
| Reduced brightness | Incorrect voltage Dust accumulation | Ensure the voltage matches the product specification (230V). Clean the light strip as per maintenance instructions. |
If you encounter problems not listed here or if the suggested solutions do not resolve the issue, please contact HOFTRONIC customer support.
8. Specifications
| Feature | Specification |
|---|---|
| Brand | HOFTRONIC |
| Model Number | 4409500 |
| Dimensions (L x W x H) | 60 x 7.4 x 2.5 cm |
| Weight | 5 kg (for 6 units) |
| Power Consumption | 20 Watts |
| Luminous Flux | 2400 lumens |
| Color Temperature | 3000 Kelvin (Warm White) |
| Color Rendering Index (CRI) | 80.0 |
| Beam Angle | 110 Degrees |
| Voltage | 230 Volts |
| IP Rating | IP20 |
| Lifespan | 30,000 hours |
| Shade Material | Plastic |
| Installation Type | Ceiling Mounting |
| Number of Items | 6 |

Figure 3: EU Energy Label for the HOFTRONIC LED Light Strip, indicating energy efficiency class E and consumption of 20 kWh/1000h.
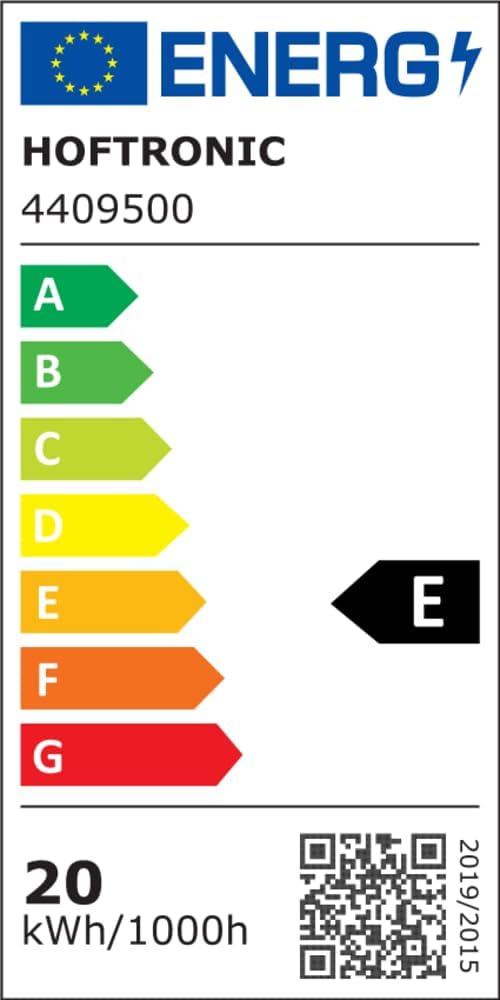
Figure 4: Product data sheet providing detailed technical specifications and compliance information for the HOFTRONIC LED Light Strip. For more information, scan the QR code or visit eprel.ec.europa.eu/qr/1547939.
9. Warranty and Support
HOFTRONIC products are manufactured and tested with the utmost care and attention to quality. This product comes with a HOFTRONIC quality guarantee.
If you have any questions, require technical assistance, or need to report an issue, please contact HOFTRONIC customer service. Our professional customer advisors are available to assist you.


