Introduction
This manual provides comprehensive instructions for the operation and maintenance of your BaoFeng UV-5R 8 Watt Ham Radio. Please read thoroughly before use to ensure proper functionality and safety.
What's Included
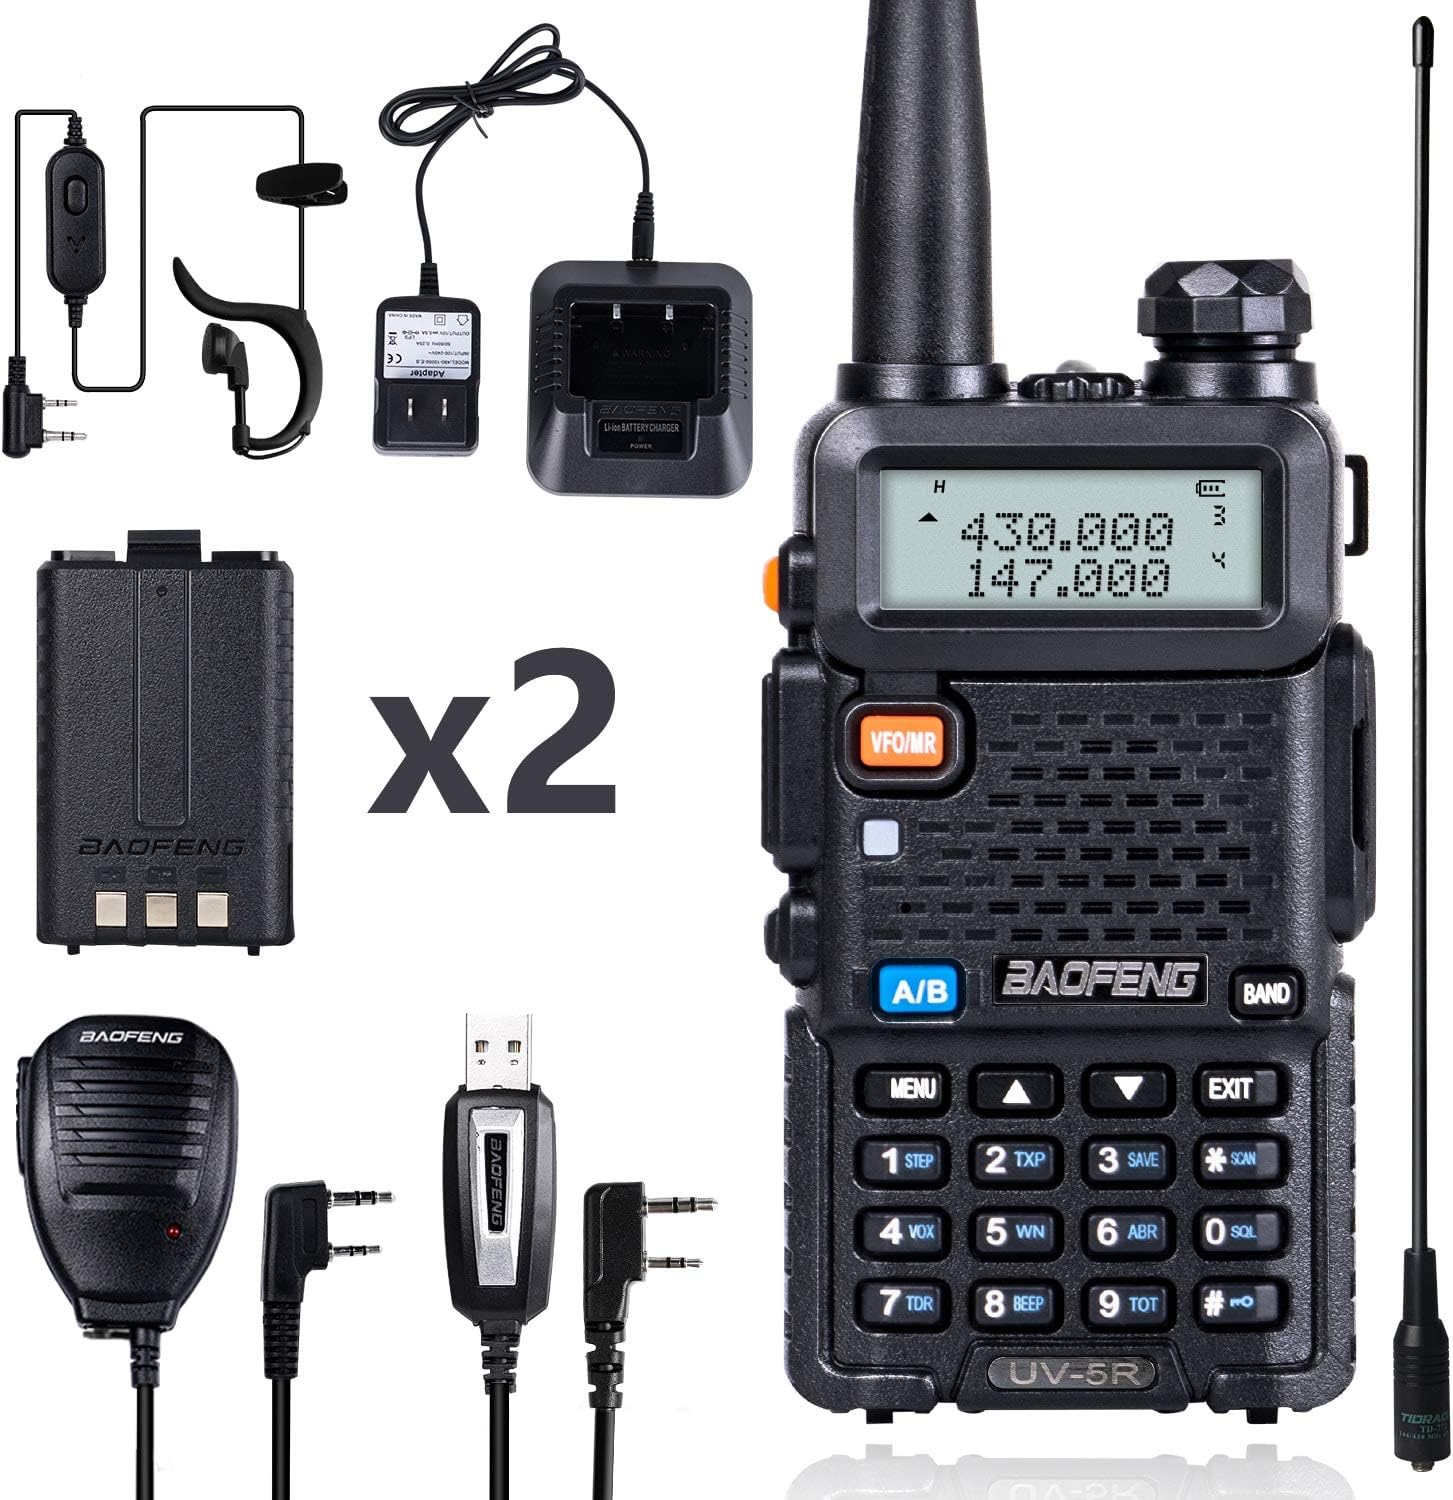
Image: The full kit includes the BaoFeng UV-5R radio, two 1800mAh batteries, a long TD-771 antenna, a standard antenna, a speaker mic, a programming cable, a walkie-talkie earpiece, a desktop charger, a hand strap, and a belt clip.
- 1 X BAOFENG UV-5R Ham Radio
- 2 X 1800mAh Batteries
- 1 X Hand Speaker Mic
- 1 X Long Antenna (TD-771)
- 1 X Standard Antenna
- 1 X Baofeng Programming Cable
- 1 X Walkie Talkie Earpiece
- 1 X Baofeng Desktop Charger
- 1 X Hand strap
- 1 X Belt clip
Safety Information
Important Safety Guidelines
- Do not operate the radio in explosive atmospheres.
- Use only manufacturer-approved batteries and chargers.
- Do not disassemble or modify the radio.
- Avoid prolonged exposure to direct sunlight or extreme temperatures.
- Keep out of reach of children.
Components Overview
Radio Components

Image: A detailed diagram showing the various components of the BaoFeng UV-5R radio, including the antenna, knob (ON/OFF, volume), LCD, Call (FM/alarm) button, PTT (push to talk) button, Moni (flashlight/monitor) button, VFO/MR (frequency mode/channel mode) button, A/B key (frequency display switches), BAND key (band switches), and Keypad.
- Antenna: For transmitting and receiving signals.
- Knob (ON/OFF, Volume): Powers the radio on/off and adjusts volume.
- LCD: Displays frequency, channel, and status icons.
- Call (FM/Alarm) Button: Activates FM radio or emergency alarm.
- PTT (Push to Talk) Button: Press to transmit, release to receive.
- Moni (Flashlight/Monitor) Button: Activates the built-in LED flashlight or monitors the current channel.
- VFO/MR Button: Switches between Frequency Mode (VFO) and Channel Mode (MR).
- A/B Key: Switches between the upper and lower frequency displays.
- BAND Key: Switches between VHF and UHF bands.
- Keypad: For manual frequency entry and menu navigation.
Setup
1. Battery Installation

Image: Shows the back of the radio with the battery compartment and the 1800mAh battery, indicating how to attach and detach the battery.
- Align the battery with the grooves on the back of the radio.
- Slide the battery upwards until it clicks into place.
- To remove, press the release latch at the bottom of the battery and slide it downwards.
2. Antenna Attachment

Image: Displays both the standard and the longer TD-771 high-gain antenna, highlighting their sizes and the connection point.
- Screw the desired antenna clockwise into the connector on top of the radio until it is finger-tight. Do not overtighten.
3. Charging the Battery

Image: Shows the radio with the battery inserted, placed in the desktop charging cradle.
- Connect the AC adapter to the desktop charger.
- Place the radio (with battery installed) or just the battery into the charging cradle.
- The indicator light will show charging status (typically red for charging, green for fully charged).
Operating
Power On/Off and Volume
Rotate the Knob clockwise to power on the radio and adjust the volume. Rotate counter-clockwise until it clicks to power off.
Selecting Frequency/Channel Mode (VFO/MR)
Press the VFO/MR button to switch between Frequency Mode (VFO) for direct frequency input and Channel Mode (MR) for selecting pre-programmed channels.
Transmitting and Receiving (PTT)
To transmit, press and hold the PTT button on the left side of the radio. Speak clearly into the microphone. Release the PTT button to receive.
Dual-Band Display and Switching (A/B, BAND)
The radio features a dual-band display. Press the A/B key to switch the active frequency between the upper and lower displays. Use the BAND key to switch between VHF (136-174MHz) and UHF (400-480MHz) bands.
VOX Function
Voice Operated Transmit (VOX) allows hands-free operation. When VOX is enabled, the radio will transmit automatically when it detects your voice. Adjust VOX sensitivity in the menu.
Scan Function
To activate scanning, press the SCAN button (key 6). The radio will scan through active channels or frequencies. Press SCAN again to stop.
Built-in LED Flashlight
Press the MONI button briefly to turn the LED flashlight on/off.
Emergency Alarm
Press and hold the CALL button to activate the emergency alarm.
Programming
The BaoFeng UV-5R can be programmed via the keypad or using a computer with the included CH340 Programming Cable.
Video: This video demonstrates how to program the BaoFeng UV-5R Ham Radio using a computer. It covers the steps for connecting the radio and using programming software to manage channels and settings.
Keypad Programming
Basic settings like frequency, CTCSS/DCS codes, and power levels can be adjusted directly from the radio's keypad using the MENU button and numerical keys. Refer to the detailed programming guide (PDF) for specific menu options.
CHIRP Software Programming

Image: Shows the BaoFeng UV-5R connected to a computer via the CH340 programming cable, illustrating the setup for software programming.
For advanced programming and managing 128 channels, it is highly recommended to use CHIRP software.
- Install the necessary drivers for the CH340 Programming Cable on your computer.
- Download and install CHIRP software from its official website.
- Connect the programming cable to your radio and computer.
- In CHIRP, select your radio model and the correct COM port.
- Download data from the radio, make desired changes (e.g., add frequencies, set privacy codes), and then upload the data back to the radio.
Maintenance
Care and Maintenance
- Keep the radio clean by wiping it with a soft, damp cloth. Do not use harsh chemicals.
- Ensure the battery contacts are clean and free of debris.
- Store the radio in a dry, cool place when not in use.
- Fully charge batteries before long-term storage and recharge every 3-6 months to maintain battery health.
Troubleshooting
Common Issues and Solutions
| Problem | Possible Cause | Solution |
|---|---|---|
| Radio won't power on | Low battery; Incorrect battery installation | Charge battery; Reinstall battery correctly |
| No signal reception | Antenna not attached; Wrong frequency/channel; Out of range | Attach antenna; Verify frequency/channel; Move closer to transmitting radio |
| Poor audio quality | Low volume; Speaker mic issue; Weak signal | Adjust volume; Check speaker mic connection; Improve signal strength |
| Cannot transmit | PTT not pressed; Frequency/channel not set for transmit; Battery low | Press PTT firmly; Ensure transmit frequency is valid; Charge battery |
Specifications
Technical Specifications
| Feature | Detail |
|---|---|
| Model | BF-UV5R |
| Brand | BAOFENG |
| Frequency Range | VHF 136-174MHz / UHF 400-480MHz (Transmit: VHF 144-148MHz, UHF 420-450MHz) |
| Number of Channels | 128 |
| Power Output | 8 Watt |
| Battery Type | 1800mAh Lithium Polymer (x2 included) |
| Voltage | 7.4 Volts |
| Dimensions | 1 x 2 x 5 inches |
| Weight | 0.01 ounces (radio only) |
| Water Resistance Level | Water Resistant |
| Special Features | Long Range, Dual Band, Keypad Lock, Dust Proof, Emergency Alarm, Built-in LED Flashlight |
| FCC ID | 2AJGM-UV5R |
Warranty and Support
This product comes with a 30-day hassle-free return policy.
For further assistance, please refer to the official User Guide (PDF) available online: User Guide (PDF).
For technical support or service inquiries, please contact BAOFENG customer service.


