
Explore Scientific WSH0002
Explore Scientific Wireless Weather Station WSH0002 Instruction Manual
1. Product Overview
The Explore Scientific Wireless Weather Station (Model WSH0002) is a compact and versatile device designed to monitor indoor and outdoor temperatures. It features a clear display, an integrated alarm clock with snooze function, and the ability to connect with up to three outdoor sensors for comprehensive temperature monitoring.
Key Features:
- Simultaneous display of indoor and outdoor temperatures.
- Temperature trend indicator for quick reference.
- Integrated clock with date display.
- Alarm clock with snooze function.
- Stores minimum and maximum temperature values for the past 24 hours.
- Expandable system supporting up to three wireless outdoor sensors.
- Compact and portable design, ideal for various placements.

2. Setup Guide
2.1 Package Contents
- 1 x Explore Scientific Wireless Weather Station (Base Unit)
- 1 x Wireless Outdoor Sensor
- 1 x Instruction Manual
2.2 Battery Installation
The weather station and outdoor sensor require batteries for operation. Batteries are not included in the package.
- Base Unit: Locate the battery compartment on the back of the main unit. Open the cover and insert 4 x AAA batteries, ensuring correct polarity (+/-). Close the battery cover securely.
- Outdoor Sensor: Locate the battery compartment on the back of the outdoor sensor. Open the cover and insert 2 x AAA batteries, ensuring correct polarity (+/-). Close the battery cover securely.

2.3 Initial Setup and Sensor Pairing
- Place the base unit and the outdoor sensor close to each other (within 1 meter) during initial setup.
- Once batteries are inserted, the base unit will automatically begin searching for the outdoor sensor. This process may take a few minutes.
- The outdoor temperature reading should appear on the base unit's display once pairing is successful.
- If the outdoor temperature does not appear, ensure both units have fresh batteries and are within range. You may need to press the reset button (if available, typically a small hole requiring a pin) on both units and try again.
- Once paired, place the outdoor sensor in a suitable location, protected from direct sunlight and rain, and within the wireless range of the base unit (433 MHz).
3. Operating Instructions
3.1 Display Overview
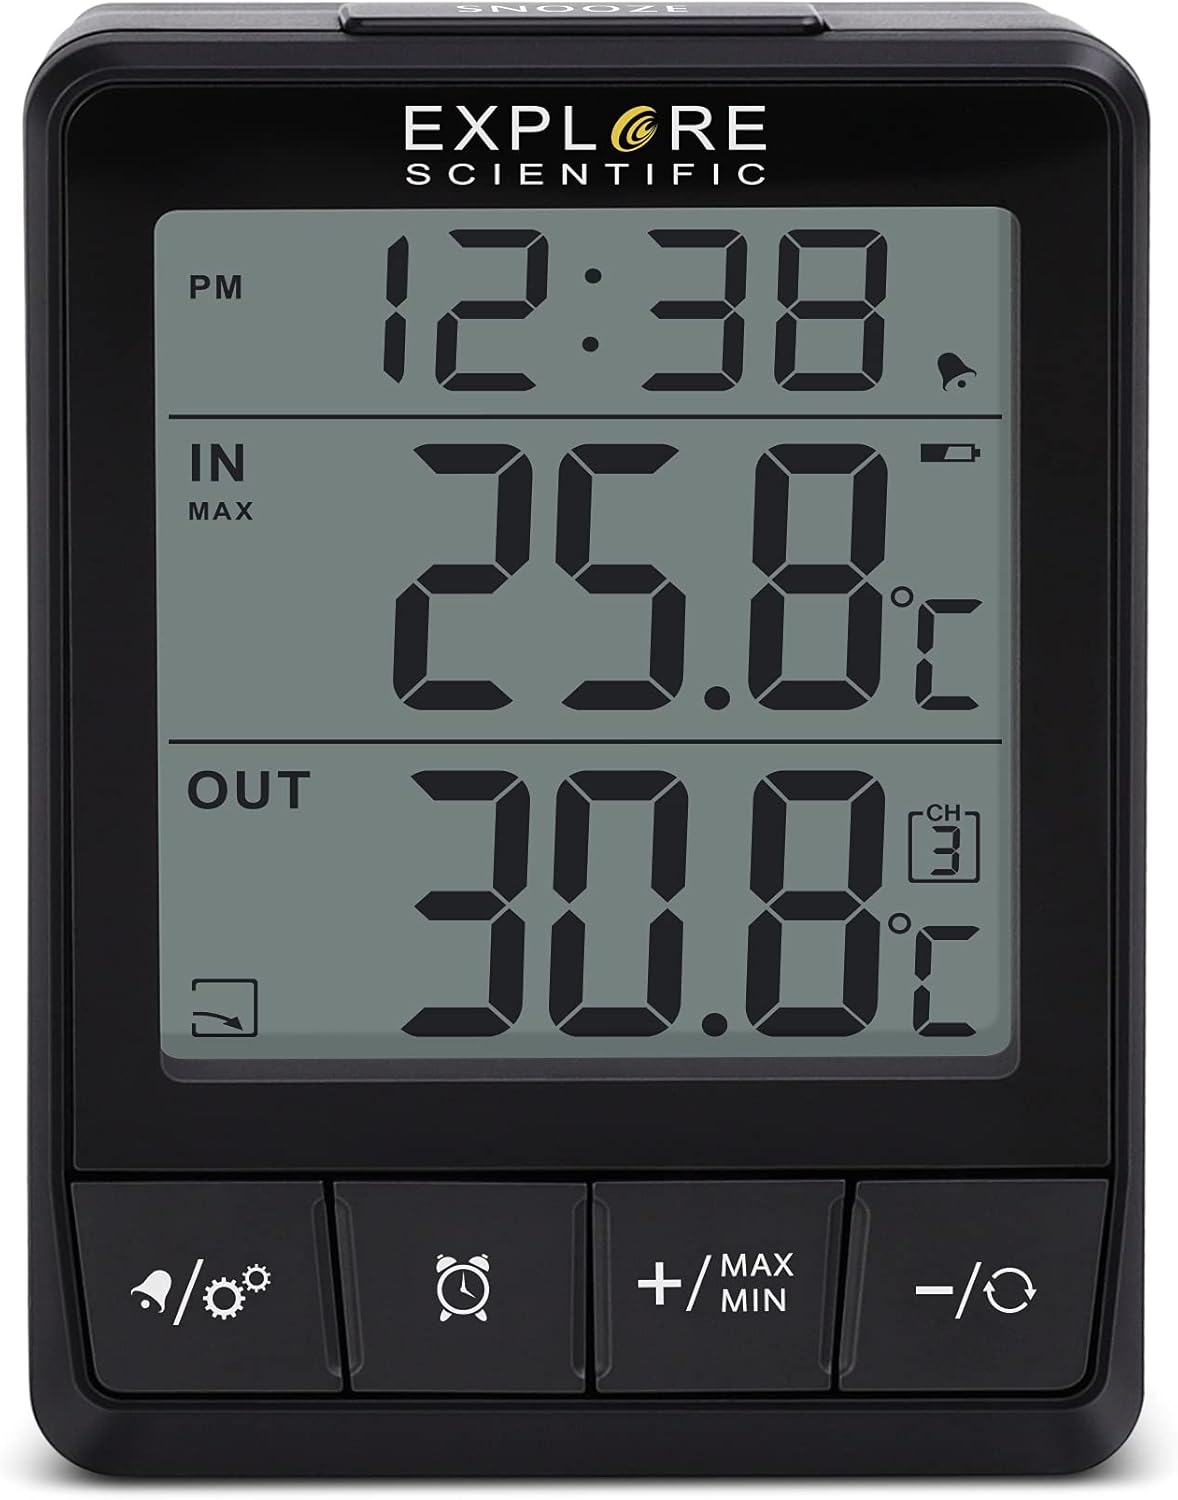
The clear LCD display is divided into three main sections:
- Upper Area: Displays the current time or date.
- Middle Area: Shows the indoor temperature measured by the base unit's integrated thermometer.
- Lower Area: Displays the outdoor temperature received from the wireless sensor. If multiple outdoor sensors are connected, you can cycle through their readings.
3.2 Setting Time and Date
Refer to the buttons on the front of the unit (e.g., 'MODE', '+/MAX MIN', '-/C/F').
- Press and hold the 'MODE' button (or similar) to enter time/date setting mode.
- Use the '+/MAX MIN' or '-/C/F' buttons to adjust the flashing value (e.g., hour, minute, year, month, day).
- Press 'MODE' again to confirm the setting and move to the next parameter.
- Repeat until all settings are complete. The unit will automatically exit setting mode after a period of inactivity or by pressing 'MODE' one last time.
- To switch between 12-hour and 24-hour format, or Celsius and Fahrenheit, briefly press the appropriate button (e.g., '-/C/F').
3.3 Alarm Clock Function
- Press the 'ALARM' button (or button with alarm icon) to view the alarm time.
- Press and hold the 'ALARM' button to enter alarm setting mode.
- Use the '+/MAX MIN' or '-/C/F' buttons to set the desired alarm time.
- Press 'ALARM' to confirm each setting.
- To activate/deactivate the alarm, briefly press the 'ALARM' button. An alarm icon will appear/disappear on the display.
- When the alarm sounds, press the 'SNOOZE' button (top of unit) to activate the snooze function. The alarm will sound again after approximately 5-10 minutes. To stop the alarm, press any other button.
3.4 Viewing Minimum and Maximum Temperatures
The unit automatically records the minimum and maximum indoor and outdoor temperatures over the past 24 hours.
- Briefly press the '+/MAX MIN' button to cycle through the current, maximum (MAX), and minimum (MIN) temperature readings for both indoor and outdoor sensors.
- The display will indicate whether the shown value is current, MAX, or MIN.
3.5 Connecting Additional Sensors
The base station can connect to up to two additional outdoor sensors (sold separately).
- Ensure the new sensor has batteries installed.
- On the base unit, press the 'CHANNEL' button (or similar, often combined with a cycle icon) to select an unused channel (e.g., CH2 or CH3).
- The base unit will then search for a new sensor on that channel.
- Once connected, you can cycle through the outdoor sensor readings by pressing the 'CHANNEL' button.
4. Maintenance
4.1 Cleaning
- Wipe the unit and sensor with a soft, slightly damp cloth.
- Do not use abrasive cleaners, solvents, or harsh chemicals, as these may damage the plastic components or display.
- Ensure no moisture enters the battery compartments or other openings.
4.2 Battery Replacement
- When the low battery indicator appears on the display, it is time to replace the batteries in the respective unit (base station or sensor).
- Follow the battery installation steps outlined in Section 2.2.
- Always replace all batteries in a unit at the same time with new ones of the same type.
- Dispose of old batteries responsibly according to local regulations.
5. Troubleshooting
If you encounter issues with your Explore Scientific Wireless Weather Station, please refer to the table below for common problems and solutions.
| Issue | Possible Cause | Solution |
|---|---|---|
| No display / Unit not turning on | Batteries are dead or incorrectly inserted. | Check battery polarity. Replace all batteries with fresh ones. |
| Outdoor temperature not displayed or flashing | Sensor out of range, sensor batteries low, or pairing lost. | Ensure sensor is within wireless range (max 30m/100ft in open air). Replace sensor batteries. Re-pair the sensor by resetting both units and following Section 2.3. |
| Inaccurate temperature readings | Sensor exposed to direct sunlight, heat sources, or poor ventilation. | Relocate the outdoor sensor to a shaded, well-ventilated area, away from direct sunlight, heat sources (e.g., walls, windows), or reflective surfaces. Allow time for readings to stabilize. |
| Alarm not sounding | Alarm is not activated. | Ensure the alarm icon is visible on the display. If not, activate it as per Section 3.3. |
6. Technical Specifications
| Feature | Specification |
|---|---|
| Model Number | WSH0002 |
| Product Dimensions (Base Unit) | 7 x 10 x 4 cm |
| Weight | 300 g |
| Power Source (Base Unit) | 4 x AAA batteries (not included) |
| Power Source (Outdoor Sensor) | 2 x AAA batteries (not included, typical for such sensors) |
| Connectivity Technology | Wireless, 433 MHz |
| Temperature Range (Indoor) | 0°C to +50°C (32°F to 122°F) (Typical) |
| Temperature Range (Outdoor) | -20°C to +60°C (-4°F to 140°F) (Typical) |
| Included Components | 1 x temperature station, 1 x outdoor sensor, instruction manual |
7. Warranty and Support
Explore Scientific products are manufactured to high-quality standards. This product comes with a standard manufacturer's warranty against defects in materials and workmanship from the date of purchase. Please retain your proof of purchase for warranty claims.
For detailed warranty terms, technical support, or service inquiries, please visit the official Explore Scientific website or contact their customer service department. Contact information can typically be found on the product packaging or the manufacturer's website.
Note: Unauthorized repairs or modifications to the device may void the warranty.
Related documentsWSH0002


Ask a question about this manual
Ask about setup, troubleshooting, compatibility, parts, safety, or missing instructions. Manuals+ will review the question and use this page’s manual context to help answer it.