
1. Introduction
This manual provides essential information for the safe and effective operation of the LILLIPUT OWON SP6053 DC Power Supply. The SP6053 is a single-channel linear DC power supply designed for various applications requiring stable and precise voltage and current. It features a maximum output of 60V and 5A, with a total power output of 300W. Key features include a 3.7-inch TFT LCD, high resolution (10mV/10mA), low ripple/noise, and comprehensive protection functions like Over-Voltage Protection (OVP) and Over-Current Protection (OCP). Please read this manual thoroughly before using the device.
2. Safety Instructions
To ensure safe operation and prevent damage to the device or injury, observe the following safety precautions:
- Always connect the power supply to a grounded AC outlet.
- Do not operate the device in wet or damp conditions.
- Ensure proper ventilation to prevent overheating. Do not block the ventilation openings.
- Do not open the casing of the power supply. Refer all servicing to qualified personnel.
- Verify the input voltage matches the power supply's requirements before connecting.
- Before connecting or disconnecting loads, ensure the output is turned off.
- Use appropriate test leads and ensure they are in good condition.
3. Product Overview
The OWON SP6053 DC Power Supply features an intuitive interface for easy operation. Below is an overview of its main components.
3.1 Front Panel

Image 1: Front view of the LILLIPUT OWON SP6053 DC Power Supply. This image displays the main 3.7-inch TFT LCD screen, control buttons, rotary knob, power switch, and output terminals. The screen shows real-time voltage, current, and power readings, along with set parameters for OVP and OCP.
The front panel includes a clear 3.7-inch TFT LCD for displaying output voltage, current, power, and various settings. Control buttons such as 'System', 'Memory', 'Keylock', 'OK', and directional arrows allow for navigation and parameter adjustment. A rotary knob provides fine-tuning of values. The main power switch and output terminals (red for positive, black for negative, green for ground) are also located on the front.

Image 2: Angled view of the LILLIPUT OWON SP6053 DC Power Supply. This perspective highlights the side ventilation grilles, crucial for heat dissipation and maintaining optimal operating temperature.
3.2 Rear Panel
The rear panel typically houses the AC power input, a fuse holder, and communication interfaces such as the RS232 port for remote control and data logging. Ensure all connections are secure before operation.
4. Specifications
The following table details the technical specifications for the OWON SP Series DC Power Supplies, including the SP6053 model.
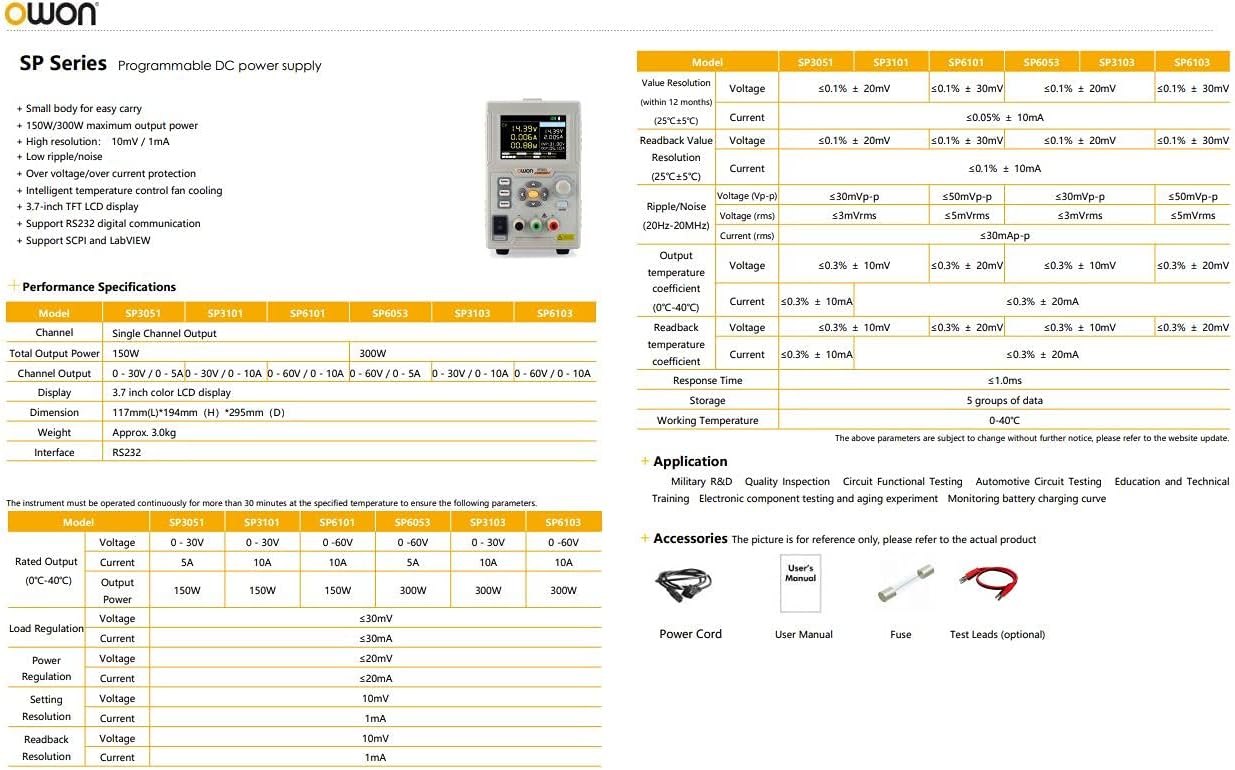
Image 3: Detailed specifications table for OWON SP Series DC Power Supplies. This table provides comprehensive data for various models including SP3051, SP6101, SP6053, SP3103, and SP6103, covering rated output, voltage, current, power, load regulation, line regulation, setting resolution, readback resolution, ripple/noise, display type, dimensions, weight, and interface.
- Model: SP6053
- Channel: Single Channel Output
- Rated Output Voltage: 0-60V
- Rated Output Current: 0-5A
- Output Power: 300W
- Display: 3.7 inch TFT LCD
- Voltage Setting Resolution: 10mV
- Current Setting Resolution: 10mA
- Voltage Readback Resolution: 10mV
- Current Readback Resolution: 10mA
- Ripple/Noise (20Hz-20MHz): Voltage ≤3mVp-p, Current ≤3mAp-p
- Protection: Over-Voltage Protection (OVP), Over-Current Protection (OCP)
- Output Mode: Constant Voltage (CV) / Constant Current (CC)
- Interface: RS232, supports SCPI commands
- Cooling Method: Air
- Dimensions (W×H×D): 117mm × 194mm × 295mm
- Weight: Approx. 3.0kg
5. Setup
5.1 Unpacking and Inspection
Upon receiving the power supply, carefully unpack it and inspect for any signs of damage during transit. Verify that all accessories, such as the power cord and test leads, are included.
5.2 Power Connection
- Ensure the power supply's main switch is in the OFF position.
- Connect the provided AC power cord to the power input socket on the rear panel of the device.
- Plug the other end of the AC power cord into a properly grounded electrical outlet.
5.3 Connecting the Load
- Ensure the power supply's output is OFF (indicated on the display).
- Connect the positive (+) terminal of your load to the red output terminal on the power supply.
- Connect the negative (-) terminal of your load to the black output terminal on the power supply.
- For safety, connect the ground terminal (green) of the power supply to the ground of your circuit if required.
6. Operating Instructions
6.1 Powering On/Off
Press the main power switch on the front panel to turn the device ON or OFF. The TFT LCD will illuminate upon power-on.
6.2 Setting Voltage and Current
- With the output OFF, press the 'System' button to access system settings or directly use the navigation arrows to select the voltage or current parameter on the main display.
- Rotate the rotary knob to adjust the selected parameter (voltage or current) to the desired value. Press the knob to confirm or switch between coarse and fine adjustment.
- Use the left/right arrow buttons to move the cursor for digit-by-digit adjustment.
- Once the desired voltage and current limits are set, press the 'On/Off' button (usually near the output terminals) to enable the output. The display will show the actual output voltage and current.
6.3 Over-Voltage Protection (OVP) and Over-Current Protection (OCP)
The SP6053 includes OVP and OCP features to protect your load and the power supply. These can be set to specific thresholds.
- Access the protection settings via the 'System' menu or dedicated buttons if available.
- Adjust the OVP and OCP thresholds using the rotary knob and navigation buttons. Ensure these values are set appropriately for your application, typically slightly above your desired operating voltage/current.
- If the output voltage or current exceeds these set limits, the power supply will automatically shut down its output to prevent damage.
6.4 Memory Functions
The power supply allows you to save and recall frequently used voltage and current settings.
- To save a setting: Set the desired voltage and current. Press the 'Memory' button, then select a memory location (e.g., M1-M5) using the navigation buttons and press 'OK' to save.
- To recall a setting: Press the 'Memory' button, select the desired memory location, and press 'OK' to load the stored parameters.
6.5 Keylock Function
The 'Keylock' function prevents accidental changes to settings during operation. Press the 'Keylock' button to activate or deactivate it. When active, most front panel controls will be locked.
7. Maintenance
7.1 Cleaning
To clean the exterior of the power supply, use a soft, damp cloth. Do not use abrasive cleaners or solvents. Ensure the device is powered off and disconnected from the AC supply before cleaning.
7.2 Ventilation
Regularly check that the ventilation openings on the sides and rear of the unit are clear of dust and obstructions. Proper airflow is essential for preventing overheating and ensuring long-term reliability.
7.3 Storage
When not in use for extended periods, store the power supply in a dry, dust-free environment, away from direct sunlight and extreme temperatures.
8. Troubleshooting
If you encounter issues with your OWON SP6053, refer to the following common problems and solutions:
- No Power:
- Check if the AC power cord is securely connected to both the power supply and the wall outlet.
- Verify the wall outlet has power.
- Check the fuse on the rear panel. Replace if blown (ensure correct fuse rating).
- No Output Voltage/Current:
- Ensure the output is enabled by pressing the 'On/Off' button on the front panel.
- Check if OVP or OCP has been triggered. Reset the protection by turning the output off and then on again, or by adjusting the protection limits.
- Verify that the load is correctly connected and not short-circuited or open-circuited.
- Incorrect Readings:
- Ensure test leads are properly connected and not damaged.
- Check for any external interference that might affect readings.
- If persistent, contact support for calibration or service.
- Fan is Loud:
- The fan speed adjusts based on the internal temperature and output power. Higher loads will cause the fan to run faster and louder. This is normal operation.
- Ensure ventilation openings are not blocked.
9. Support and Warranty
For technical assistance, service, or warranty inquiries, please contact LILLIPUT customer support. Refer to your purchase documentation for specific warranty terms and contact information. Do not attempt to repair the unit yourself, as this may void the warranty and pose safety risks.


