1. Introduction
This manual provides detailed instructions for the proper use and maintenance of your ORDRO AX65 4K Video Camera Camcorder. Please read this manual thoroughly before operating the device to ensure optimal performance and longevity. The ORDRO AX65 is designed for capturing high-quality video and still images, featuring 4K Ultra HD recording, 12x optical zoom, a 3.5-inch IPS touch screen, and Wi-Fi connectivity.
2. Package Contents
Verify that all items listed below are included in your package. If any items are missing or damaged, please contact customer support.
- 1x ORDRO AX65 4K Video Camera Camcorder
- 1x Lens Cap
- 2x Rechargeable Lithium-Ion Batteries
- 1x External Microphone
- 1x Macro Lens
- 1x Wide-Angle Lens
- 1x Lens Hood
- 1x Camera Bracket
- 1x HDMI Cable
- 1x 1-to-2 Adapter
- 1x Remote Control
- 1x Card Reader
- 1x USB Cable
- 1x User Manual (this document)
- 1x 64GB SD Card

Figure 2.1: ORDRO AX65 Package Contents
3. Setup
3.1 Battery Installation and Charging
- Open the battery compartment cover located on the bottom of the camcorder.
- Insert a fully charged lithium-ion battery, ensuring the contacts align correctly. Close the cover securely.
- To charge the battery, connect the camcorder to a power source using the provided USB cable and charger. The charging indicator light will illuminate. The camcorder can record video while charging.
3.2 SD Card Installation
- Locate the SD card slot on the side of the camcorder.
- Insert the provided 64GB SD card (or another compatible SD card up to 256GB) into the slot until it clicks into place. Ensure the card is inserted in the correct orientation.
- To remove, gently press the SD card until it ejects.
3.3 Attaching Accessories
- External Microphone: Slide the external microphone onto the hot shoe mount on top of the camcorder and connect the audio cable to the MIC input port.
- Wide-Angle/Macro Lens: Screw the wide-angle lens onto the front of the camcorder's main lens. The macro lens component can be detached from the wide-angle lens for close-up videography.
- Lens Hood: Attach the lens hood to the front of the wide-angle lens to reduce glare.
- Camera Bracket: Attach the camera bracket to the bottom of the camcorder for enhanced stability and handling. The top handle of the bracket includes a built-in Allen key for adjustments.

Figure 3.1: ORDRO AX65 with accessories attached
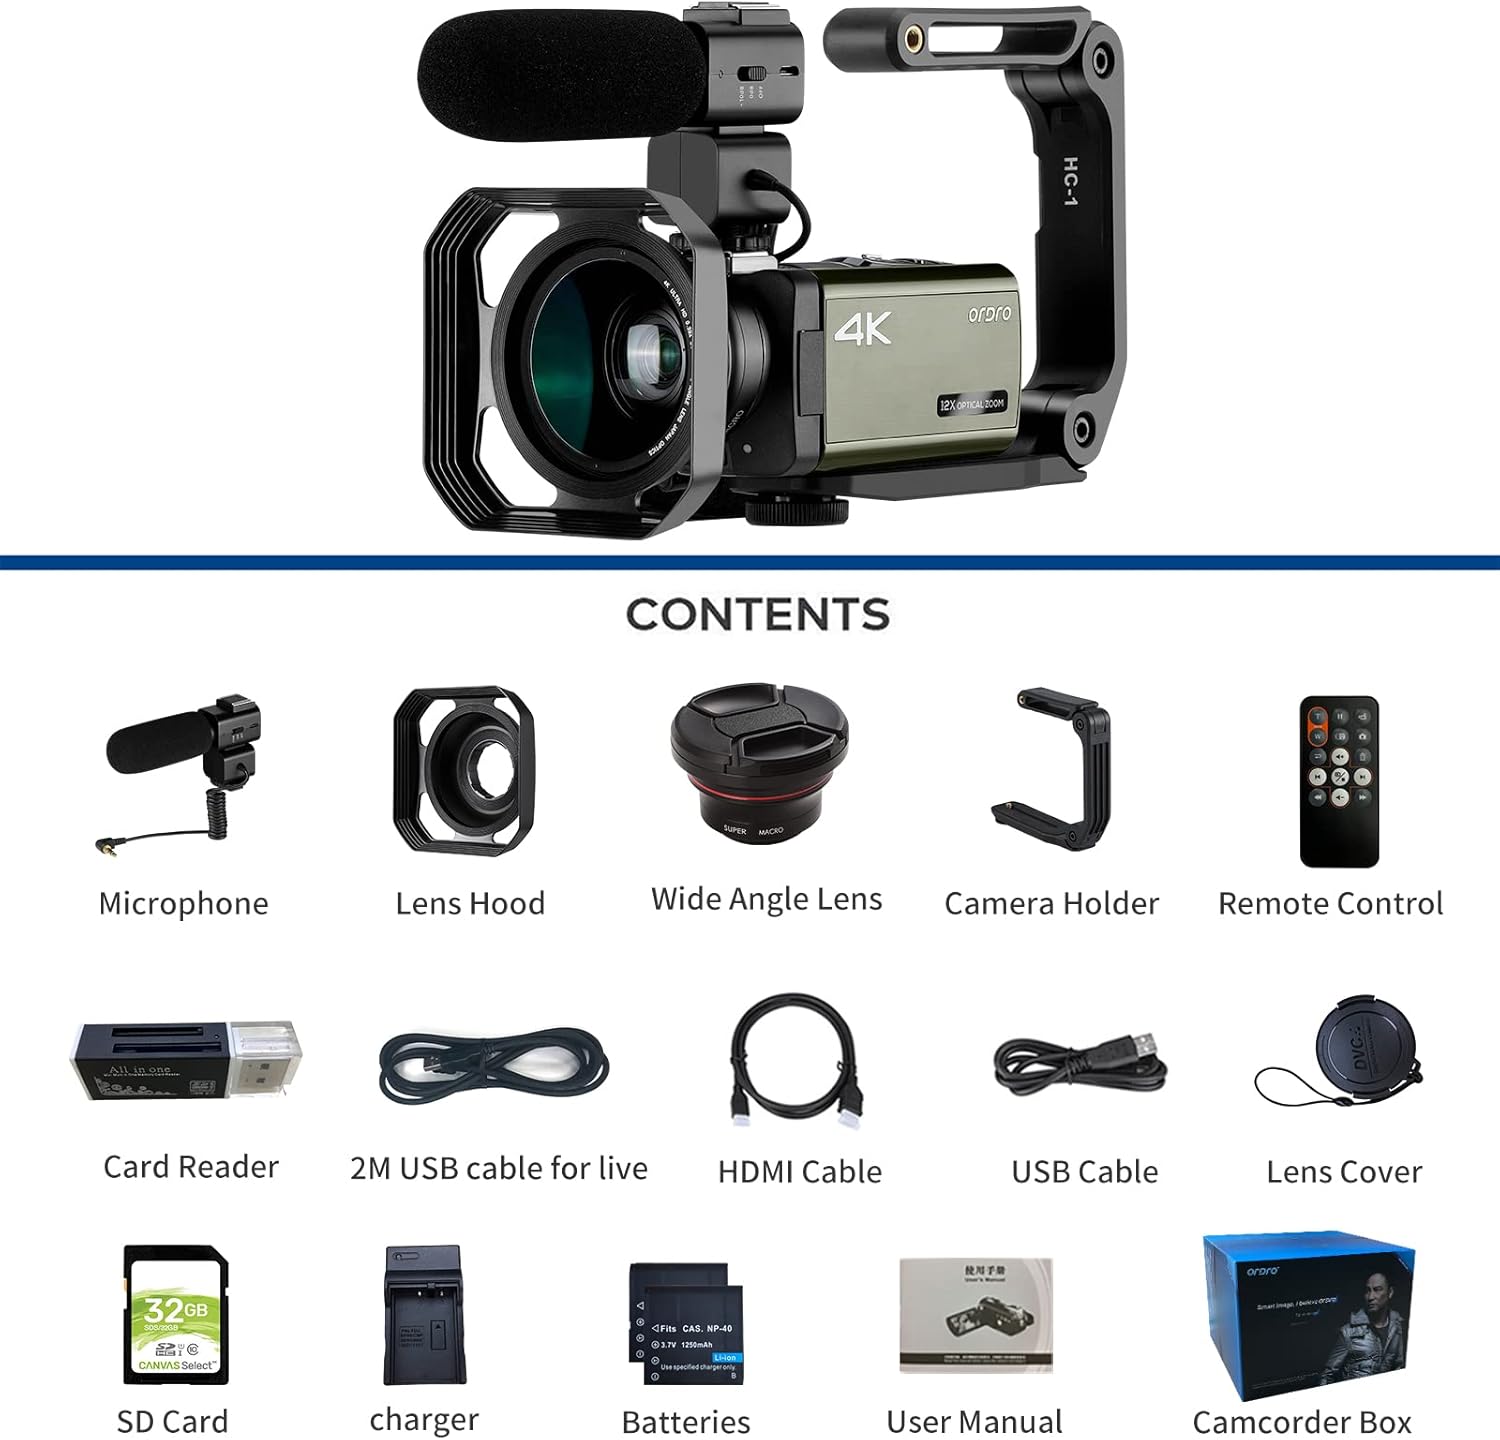
Figure 3.2: Attaching the Wide-Angle Lens
4. Operating Instructions
4.1 Power On/Off
Press and hold the POWER button to turn the camcorder on or off. The 3.5-inch IPS touch screen will activate upon power-on.
4.2 Basic Video Recording
- Ensure an SD card is inserted and the battery is charged.
- Turn on the camcorder.
- Select the desired recording mode (e.g., 4K, 1080p) via the touch screen menu.
- Press the Video Recording Start/Stop button to begin recording. Press it again to stop.

Figure 4.1: 4K and 2K Video Recording Quality
4.3 Photo Taking
Switch to photo mode using the MODE button or touch screen. Press the PHOTO button to capture still images. The camcorder supports 30MP still photos.
4.4 Using Optical Zoom
Utilize the W/T (Zoom Out/Zoom In) lever to adjust the 12x optical zoom. This allows for close-up shots without compromising image quality.

Figure 4.2: 12x Optical Zoom in action
4.5 Advanced Recording Functions
- Pause Function: During video recording, press the PHOTO button to pause the recording. Press it again to resume recording within the same file.
- Time-Lapse Recording: Access this feature through the menu to capture long sequences of events over a short period. Adjustable intervals from 1 second to 30 minutes are available.
- Loop Recording: Enables continuous recording by overwriting the oldest files when the memory card is full.
- Continuous Photo Taking: Capture a series of photos rapidly.
- Timed Photo Taking: Set a timer for photo capture.
- Self-Timer: Delay the start of recording or photo capture.
- Anti-Shake: This feature helps stabilize footage, particularly useful when shooting handheld. For best results, consider using a tripod.
- Face Detection: Automatically detects and focuses on faces within the frame.
- AF Tracking and AF Locking: AF Tracking maintains focus on a moving subject. AF-L (Auto Focus Lock) allows you to lock focus on a subject, then recompose your shot.
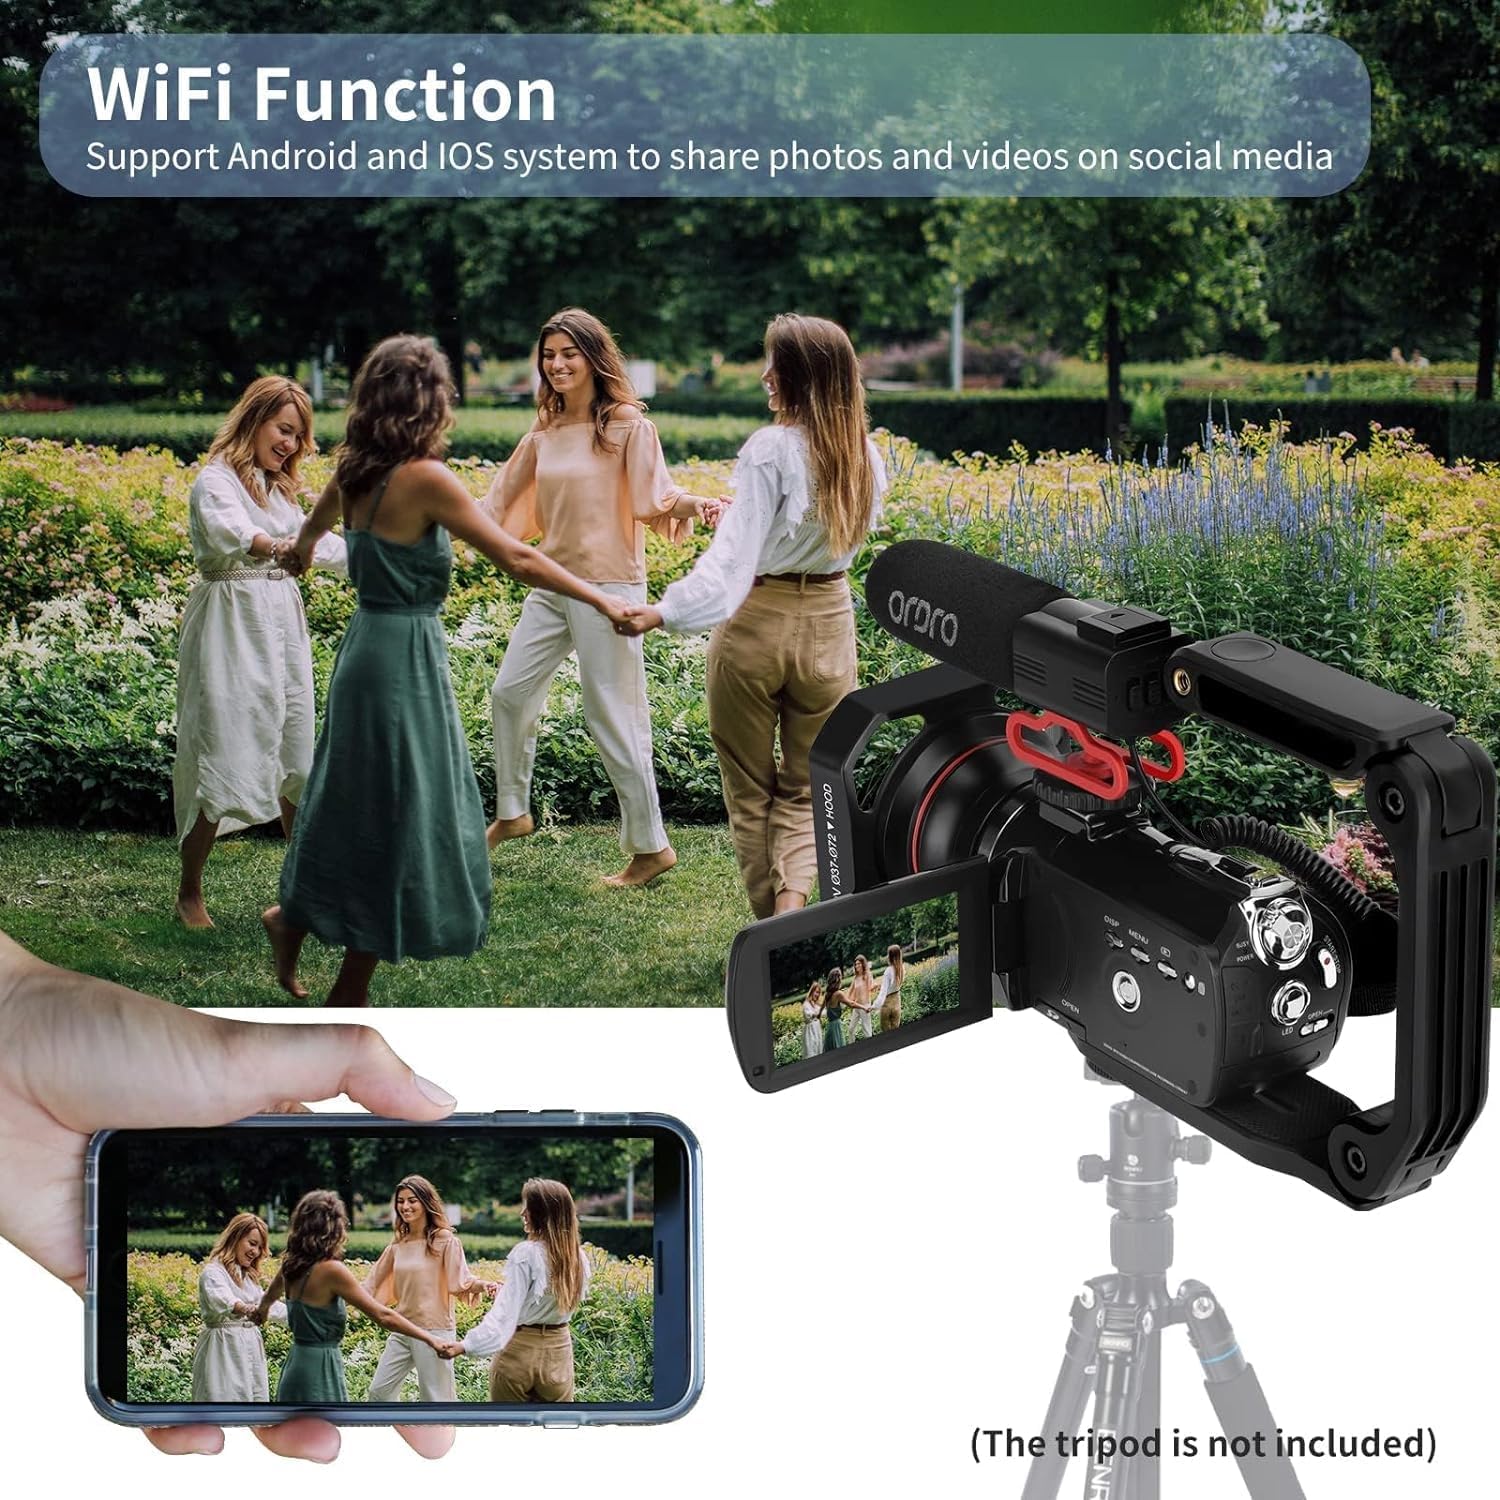
Figure 4.3: Pause Function

Figure 4.4: Various Recording Modes

Figure 4.5: AF Tracking and AF Locking
4.6 Connectivity
- HDMI TV Output: Connect the camcorder to a TV using the HDMI cable to view your recordings on a larger screen.
- Webcam and Livestream: Connect the camcorder to a computer via the USB cable. Select "PC Camera" from the options displayed on the camcorder screen to use it as a webcam for platforms like Facebook, YouTube, Instagram, Skype, or for livestreaming.
- Wi-Fi Function: Enable Wi-Fi through the camcorder's menu. Use the dedicated app on your Android or iOS device to connect to the camcorder for remote control, photo/video transfer, and sharing.

Figure 4.6: TV & PC Connection / Webcam Functionality
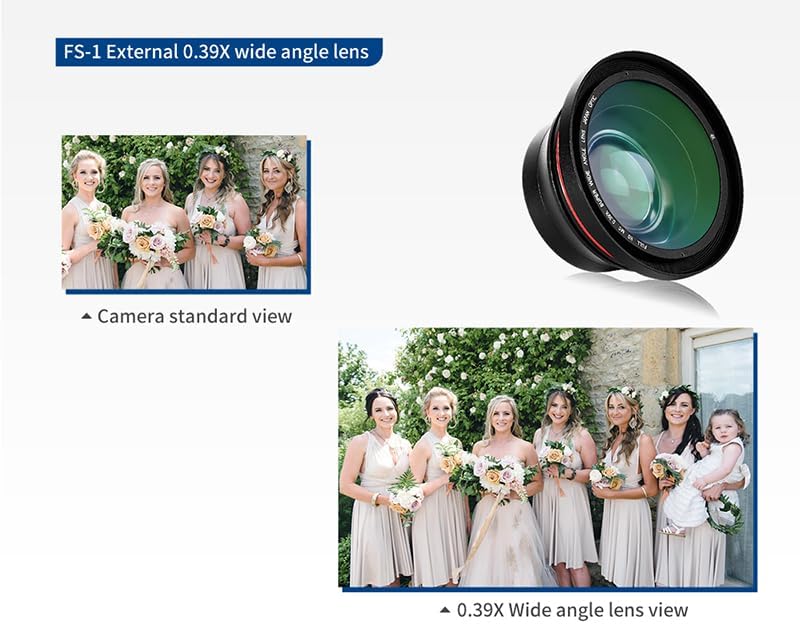
Figure 4.7: Wi-Fi Connectivity with Smartphone
4.7 Low Light Shooting
The camcorder features a built-in LED fill light to assist in dimly lit environments. Activate the LED light through the camcorder's menu or dedicated button. The 1/3-inch Sony CMOS sensor is designed to suppress noise in low-light conditions.

Figure 4.8: Low Light Performance with LED Fill Light
5. Maintenance
- Cleaning: Use a soft, dry cloth to clean the camcorder body. For the lens, use a specialized lens cleaning cloth and solution. Avoid harsh chemicals.
- Battery Care: Store batteries in a cool, dry place when not in use. Fully charge batteries before extended storage and periodically recharge them to maintain their lifespan.
- Storage: When not in use, store the camcorder in a protective case in a dry, dust-free environment away from extreme temperatures.
- Firmware Updates: Check the manufacturer's website periodically for any available firmware updates to ensure optimal performance and access to new features.
6. Troubleshooting
| Problem | Possible Cause | Solution |
|---|---|---|
| Camcorder does not power on. | Battery is depleted or incorrectly inserted. | Ensure battery is fully charged and correctly installed. |
| Recording stops unexpectedly. | SD card is full or corrupted. | Check SD card capacity, format if necessary, or replace. |
| Poor image/video quality. | Insufficient lighting, dirty lens, incorrect settings. | Ensure adequate lighting, clean the lens, adjust resolution and exposure settings. Use LED fill light in dark environments. |
| Wi-Fi connection issues. | Incorrect Wi-Fi settings, app issues, distance from device. | Verify Wi-Fi settings on camcorder and smartphone. Ensure the app is updated. Reduce distance between devices. |
| No audio recording. | External microphone not connected or faulty, internal microphone muted. | Check external microphone connection. Ensure audio recording is enabled in settings. |
| Viewfinder switches off when HDMI cable connected. | This is expected behavior for some camcorders when outputting to an external display. | Use the external display for monitoring. Adjust settings before connecting HDMI if necessary. |
7. Specifications
| Feature | Detail |
|---|---|
| Brand | ORDRO |
| Model Number | HDR-AX65 |
| Item Weight | 11.3 ounces |
| Product Dimensions | 2.13 x 2.52 x 5 inches |
| Batteries | 1 Lithium Ion battery required (included) |
| Photo Sensor Technology | CMOS (1/3-Inch Sony CMOS Sensor, 5.0MP effective pixels) |
| Video Capture Resolution | 4K: 3840*2160 (24FPS), 2K: 2560x1440 (30FPS), 1080p (60fps) |
| Still Photo Resolution | 30MP |
| Optical Zoom | 12x |
| Screen Size | 3.5 Inches IPS Touch Screen (270-degree rotatable) |
| Connectivity Technology | USB, Wi-Fi, HDMI |
| Flash Memory Type | SDHC (supports up to 256GB SD card) |
| Video Capture Format | MP4 |
| Supported Audio Format | AAC, MP3 |
| Special Features | Anti-Shake, Face Detection, AF-L function, Pause function, Time-lapse, Loop recording, Continuous shooting, Timed photo, Self-timer, HDMI TV output, Webcam Function, Hot shoe mount, External microphone jack, Wide angle lens, Remote Control, LED Fill Light |
8. Warranty and Support
For warranty information, technical support, or service inquiries, please refer to the warranty card included in your package or visit the official ORDRO website. Keep your purchase receipt as proof of purchase for warranty claims.
Contact Information: Please refer to the contact details provided on the ORDRO official website or your product packaging for the most up-to-date support channels.


