
1. Introduction
Thank you for choosing the FERM 16mm 1100W Power Hammer, model HDM1014. This instruction manual provides important information regarding the safe operation, setup, maintenance, and troubleshooting of your new power tool. Please read this manual thoroughly before using the power hammer and keep it for future reference. Proper use and maintenance will ensure optimal performance and extend the life of your tool.
2. General Safety Instructions
Always observe the following basic safety precautions when using electrical tools to reduce the risk of electric shock, injury, and fire.
- Work Area Safety: Keep your work area clean and well-lit. Cluttered or dark areas invite accidents. Do not operate power tools in explosive atmospheres, such as in the presence of flammable liquids, gases, or dust.
- Electrical Safety: Power tool plugs must match the outlet. Never modify the plug in any way. Do not abuse the cord. Never use the cord for carrying, pulling, or unplugging the power tool. Keep cord away from heat, oil, sharp edges, or moving parts.
- Personal Safety: Always wear eye protection. Use hearing protection when operating noisy tools. Wear a dust mask if operation is dusty. Dress properly; do not wear loose clothing or jewelry. Keep hair, clothing, and gloves away from moving parts.
- Power Tool Use and Care: Do not force the power tool. Use the correct power tool for your application. Disconnect the plug from the power source before making any adjustments, changing accessories, or storing power tools.
- Service: Have your power tool serviced by a qualified repair person using only identical replacement parts. This will ensure that the safety of the power tool is maintained.
3. Product Overview
The FERM HDM1014 Power Hammer is a robust tool designed for heavy-duty drilling and chiseling tasks. Familiarize yourself with its main components before operation.
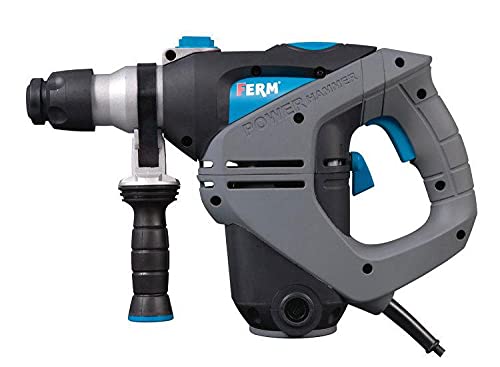
Figure 1: Close-up of the FERM HDM1014 Power Hammer's handle, trigger, and mode selector switch. This image highlights the ergonomic design and accessible controls for user comfort and operational efficiency.
Key Components:
- Main Handle: Ergonomically designed for comfortable grip and control.
- Trigger Switch: Activates the tool.
- Lock-on Button: For continuous operation.
- Mode Selector Switch: Allows selection between drilling, hammer drilling, and chiseling modes.
- Auxiliary Handle: Provides additional grip and control, especially for heavy-duty tasks.
- Chuck: For securely holding drill bits or chisels.
- Depth Stop: For precise drilling depth control.
4. Setup and Assembly
Before operating the power hammer, ensure it is properly set up and all accessories are securely attached.

Figure 2: The FERM HDM1014 Power Hammer, along with its included drill bits, chisels, and auxiliary handle, neatly organized within its robust carrying case. This illustrates the complete package and accessories.
- Unpacking: Carefully remove the power hammer and all accessories from its packaging. Check for any damage during transit.
- Attaching the Auxiliary Handle: Loosen the auxiliary handle clamp, slide the handle onto the tool's neck, and tighten it securely in a comfortable position.
- Inserting Drill Bits/Chisels:
- Clean the shank of the drill bit or chisel.
- Pull back the chuck sleeve and insert the bit into the chuck until it clicks into place.
- Release the sleeve and pull on the bit to ensure it is securely locked.
- Setting the Depth Stop (Optional): Insert the depth stop into its holder on the auxiliary handle. Adjust it to the desired drilling depth.
5. Operating Instructions
Follow these steps for safe and effective operation of your FERM Power Hammer.

Figure 3: The FERM HDM1014 Power Hammer in use, demonstrating its application for chiseling concrete. The user is wearing gloves for safety, and the auxiliary handle is properly utilized for control.
- Select Operating Mode: Use the mode selector switch to choose between:
- Drilling: For drilling into wood, metal, or plastic without hammer action.
- Hammer Drilling: For drilling into concrete, brick, and masonry with hammer action.
- Chiseling: For breaking or chipping concrete and masonry.
- Connect to Power: Plug the power cord into a suitable electrical outlet. Ensure the voltage matches the tool's requirements.
- Starting and Stopping:
- To start, press the trigger switch.
- For continuous operation, press the lock-on button while the trigger is pressed. Release the trigger to stop.
- To stop from continuous operation, press the trigger switch again.
- Working with the Tool:
- Hold the tool firmly with both hands using the main and auxiliary handles.
- Apply steady, even pressure. Do not force the tool.
- For hammer drilling, allow the tool's hammer action to do the work.
- When chiseling, guide the chisel along the desired line, allowing the hammer action to break the material.
- Overload Protection: If the tool becomes overloaded, it may automatically shut off. Reduce the load and restart the tool.
6. Maintenance
Regular maintenance ensures the longevity and safe operation of your power hammer.
- Cleaning: Disconnect the tool from the power supply before cleaning. Keep the ventilation openings clean to prevent overheating. Use a soft brush or compressed air to remove dust and debris. Do not use water or chemical cleaners.
- Lubrication: The gearbox is factory-lubricated and generally does not require additional lubrication. Refer to a qualified service center for any internal lubrication needs.
- Carbon Brushes: Check carbon brushes periodically. Worn brushes should be replaced by a qualified technician to maintain motor performance.
- Power Cord: Regularly inspect the power cord for damage. If damaged, have it replaced by an authorized service agent to avoid electrical hazards.
- Storage: Store the tool in a dry, secure place, out of reach of children. Use the original carrying case for protection.
7. Troubleshooting
This section addresses common issues you might encounter with your power hammer.
| Problem | Possible Cause | Solution |
|---|---|---|
| Tool does not start. | No power supply; damaged cord/plug; faulty switch. | Check power connection. Inspect cord/plug for damage. If switch is faulty, contact service. |
| Reduced power/performance. | Worn carbon brushes; dull bit/chisel; motor overload. | Replace carbon brushes (service). Sharpen/replace bit. Reduce pressure, allow tool to cool. |
| Excessive vibration/noise. | Loose components; damaged internal parts; bent bit. | Check for loose parts. Replace bent bits. If problem persists, contact service. |
| Bit not locking in chuck. | Chuck mechanism dirty or damaged; incorrect bit type. | Clean chuck. Ensure correct SDS-Plus bit is used. If damaged, contact service. |
For issues not listed here or if solutions do not resolve the problem, please contact FERM customer support or an authorized service center.
8. Technical Specifications
| Feature | Detail |
|---|---|
| Model | HDM1014 |
| Type | Power Hammer (Rotary Hammer) |
| Power Source | Corded Electric |
| Brand | FERM |
| Chuck Size | 16 mm |
| Power Input | 1100 Watt |
| Origin | China |
| ASIN | B091JBRCFW |
| First Available Date | April 1, 2021 |
9. Warranty and Support
FERM products are manufactured to high-quality standards and are guaranteed against defects in materials and workmanship. For specific warranty terms and conditions, please refer to the warranty card included with your product or visit the official FERM website. For technical support, spare parts, or service inquiries, please contact your local FERM dealer or authorized service center. Always provide the model number (HDM1014) and serial number (if applicable) when seeking assistance.
Contact Information:
- Official Website: www.ferm.com (Please check for regional websites)
- Customer Service: Refer to your product packaging or the official website for regional contact details.