
1. Introduction
This manual provides detailed instructions for the safe and efficient operation of your ASOMETECH 100W 8-Port Desktop Multiple USB Charging Station, Model X9. This device is designed to provide a centralized charging solution for multiple electronic devices simultaneously, featuring various port types including USB-A, USB-C (PD), and a wireless charging pad.
Package Contents:
- 1 x ASOMETECH 8+1 Ports Charging Station
- 1 x User Manual
- 1 x 1.2m Detachable Power Cord
- 1 x Cord Organizer Cable Management
- 2 x Cable Organizers

Image: The ASOMETECH 8-Port Desktop Charging Station, showing its various ports, LCD display, and included cable management accessories.
2. Product Features
- High Power Output: Provides a total power output of 100W, capable of charging up to 9 devices simultaneously.
- Versatile Charging Ports:
- 1 x 20W USB Type-C Port (PD 3.0 Fast Charging)
- 1 x 18W Quick Charge 3.0 USB-A Port
- 6 x 12W Standard USB-A Ports (up to 5V/2.4A each)
- Smart Wireless Charging: Integrated wireless charging pad with intelligent identification, supporting 2.5W, 5W, 7.5W, and 10W outputs. Features a non-slip shell design.
- Smart LCD Display: Real-time display of current and voltage for each charging port, including the wireless charging pad. The screen automatically dims after 60 seconds to avoid disturbing sleep.
- Advanced Safety Protections: Built-in intelligent protection system against overvoltage, overheating, overcurrent, and short circuits. Constructed with ABS+PC flame-retardant material.
- Compact Design: Dimensions of 4.72 x 3.54 x 1.96 inches, making it easy to carry and suitable for various environments.
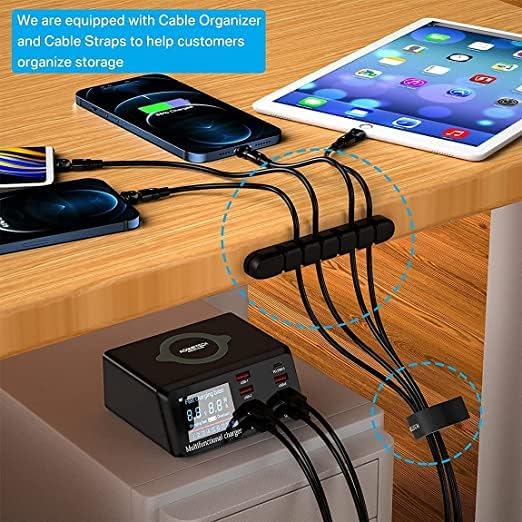
Image: The smart LCD display of the charging station, showing real-time charging data for connected devices.
3. Setup Guide
- Unpack the Device: Carefully remove the charging station and all accessories from the packaging.
- Connect Power: Insert the detachable power cord into the power input port on the back of the charging station.
- Plug into Outlet: Plug the other end of the power cord into a standard 120V AC wall outlet. The LCD display will illuminate, indicating the device is powered on.
- Organize Cables (Optional): Use the included cord organizer and cable straps to manage your charging cables for a tidy setup.

Image: The charging station in use, demonstrating cable organization with the provided accessories.
4. Operating Instructions
Charging Devices:
- USB-A Ports (USB-1 to USB-4, USB-6, USB-7): Connect your devices using their standard USB-A charging cables. These ports provide up to 5V/2.4A.
- Quick Charge 3.0 USB-A Port (QC 3.0-8): For devices compatible with Quick Charge 3.0, use this port for faster charging speeds (5V/3.4A, 9V/2.3A, 12V/1.5A).
- USB Type-C PD Port (PD 20W-5): For devices supporting USB Power Delivery (PD), such as iPhone 12 series and newer, use this port with a USB-C to USB-C or USB-C to Lightning cable for rapid charging (5V/4A, 9V/2.22A, 12V/1.67A).
- Wireless Charging Pad: Place your Qi-compatible device (e.g., smartphone, wireless earbuds) directly onto the wireless charging pad on top of the station. Ensure the device is centered for optimal charging. The LCD display will show the wireless charging status.
Understanding the LCD Display:
The integrated LCD screen provides real-time information about the charging status of each connected device. It displays the voltage (V) and current (A) being drawn by each port, as well as the wireless charging output. The display will automatically turn off after 60 seconds of inactivity to conserve energy and prevent light disturbance, especially at night. Tapping the top of the unit or connecting/disconnecting a device will reactivate the display.
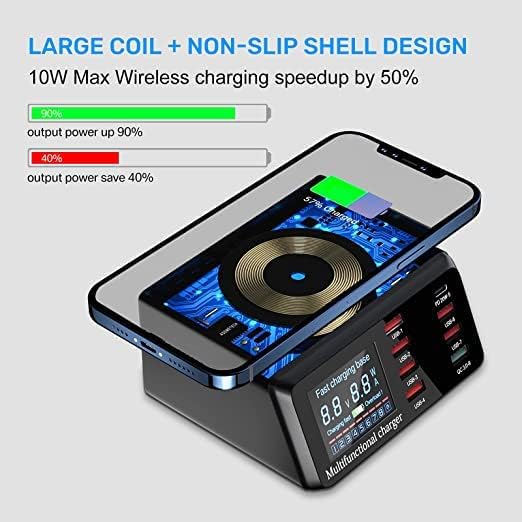
Image: The charging station actively charging multiple devices, highlighting the wireless charging feature and various port types.
5. Compatibility
The ASOMETECH Charging Station is designed for broad compatibility with a wide range of electronic devices.
- Smartphones: Compatible with iPhone (including iPhone 13, 13 Pro, 13 Pro Max, 12, 12 Pro Max, 12 Pro, 11, XR, XS, X, 8, 7 Plus, 6/6S), Samsung Galaxy (S20 series, S8, S8 Plus, S7, S7 edge, S6, S6 edge, S6 edge plus, S5, S4, Note 5), HTC, LG, Google Nexus, Blackberry, Nokia, Motorola, Sony, Huawei, Xiaomi, Microsoft Lumia, and more.
- Tablets: Compatible with iPad (iPad Air 2020, iPad 10.2, iPad Pro 12.9, iPad Pro 11, iPad 9.7, iPad mini 1/2/3/4/5), Kindle, and other tablets.
- Wireless Earbuds: Compatible with AirPods, AirPods Pro, and other wireless earbuds.
- Smartwatches: Compatible with Apple Watch and other smartwatches.
- Other USB Devices: Any device that charges via a standard USB-A or USB-C port.
Note on Wireless Charging: Ensure your device supports Qi wireless charging. Some devices may not support fast wireless charging due to specific compatibility requirements. The conversion efficiency of wireless charging is approximately 80%. It is normal for the device to warm slightly during wireless charging.

Image: Visual representation of the charging station's broad compatibility with smartphones, tablets, and wearables.
6. Maintenance
Proper maintenance ensures the longevity and optimal performance of your charging station.
- Cleaning: Disconnect the power cord before cleaning. Use a soft, dry cloth to wipe the exterior of the device. Do not use liquid cleaners, aerosols, or abrasive materials, as these can damage the surface or internal components.
- Storage: When not in use for extended periods, store the charging station in a cool, dry place away from direct sunlight and extreme temperatures.
- Ventilation: Ensure the ventilation holes on the device are not obstructed to prevent overheating. The device is designed with good heat dissipation.
- Cable Management: Regularly check charging cables for any signs of wear or damage. Replace frayed or damaged cables immediately to prevent electrical hazards.

Image: Illustration of the charging station's heat dissipation design, emphasizing the importance of proper ventilation.
7. Troubleshooting
If you encounter issues with your ASOMETECH Charging Station, please refer to the following common problems and solutions:
| Problem | Possible Cause | Solution |
|---|---|---|
| Device not charging via USB port. |
|
|
| Wireless charging not working. |
|
|
| LCD display is off. |
|
|
| Device gets warm during charging. |
|
|
If the problem persists after trying these solutions, please contact ASOMETECH customer service for further assistance.
8. Specifications
| Feature | Detail |
|---|---|
| Model Number | X9 |
| Total Power Output | 100W |
| USB Type-C (PD) Output | 20W (5V/4A, 9V/2.22A, 12V/1.67A) |
| Quick Charge 3.0 USB-A Output | 18W (5V/3.4A, 9V/2.3A, 12V/1.5A) |
| Standard USB-A Outputs (x6) | Up to 5V/2.4A per port |
| Wireless Charging Output | 2.5W / 5W / 7.5W / 10W (Intelligent Identification) |
| Input Voltage | 120 Volts |
| Product Dimensions | 4.72 x 3.54 x 1.96 inches |
| Item Weight | 1.06 pounds |
| Material | ABS+PC Flame Retardant Material |
| Color | Black |
| Special Features | Quick Charge 3.0, PD Fast Charging, LCD Display, Wireless Charging |
9. Safety Information
Please read and follow these safety guidelines to prevent injury or damage to the device.
- Do not expose the device to water, moisture, or extreme temperatures.
- Do not disassemble, modify, or attempt to repair the device yourself. This will void the warranty and may cause electric shock or fire.
- Avoid dropping or subjecting the device to strong impacts.
- Keep the device away from flammable materials and direct heat sources.
- Ensure the power cord is not pinched, walked on, or otherwise damaged.
- Use only the provided power cord.
- Keep out of reach of children.
- If the device emits smoke, unusual odors, or makes strange noises, immediately unplug it from the power outlet and contact customer support.
10. Warranty and Support
ASOMETECH attaches great importance to your shopping experience. For any questions or issues during the purchase process or product usage, please contact ASOMETECH customer service through the Amazon platform.
Please refer to your purchase documentation for specific warranty terms and conditions. Keep your proof of purchase for warranty claims.