
1. Introduction
This manual provides essential information for the proper installation, operation, maintenance, and troubleshooting of the NC Injector Group, part number 387-9427. This component is specifically designed for use in Caterpillar Motor Grader models 120K2, 140K, 12K, and 140G. Adherence to the guidelines presented herein will help ensure optimal performance and longevity of the injector.
2. Safety Information
WARNING: Always prioritize safety when working with vehicle components, especially fuel systems. Failure to follow safety precautions can result in serious injury or damage to equipment.
- Ensure the engine is completely shut off and cooled down before beginning any work.
- Disconnect the battery to prevent accidental starting or electrical hazards.
- Wear appropriate personal protective equipment (PPE), including safety glasses, gloves, and protective clothing.
- Be aware of residual fuel pressure in the system. Follow manufacturer's guidelines for depressurizing the fuel system.
- Handle fuel and related components in a well-ventilated area, away from open flames or ignition sources.
- Dispose of old parts and fluids according to local environmental regulations.
- If you are not confident in performing the installation, seek assistance from a qualified technician.
3. Product Overview
The NC Injector Group 387-9427 is a critical component of the fuel injection system in compatible Caterpillar Motor Graders. It is responsible for precisely delivering fuel into the engine's combustion chamber, ensuring efficient fuel atomization and combustion.
- Part Number: 387-9427
- Applications: Caterpillar Motor Grader 120K2, 140K, 12K, 140G
- Brand: NC
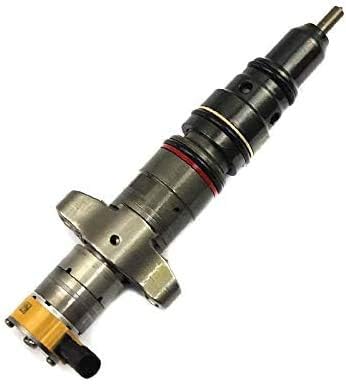
Image: The NC Injector Group 387-9427, a precision component for Caterpillar Motor Graders. This image shows the full assembly of the fuel injector, highlighting its various sections and connection points.
4. Setup and Installation
Installation of fuel injectors requires precision and adherence to manufacturer specifications. It is highly recommended that this procedure be performed by a certified mechanic or a professional with experience in heavy equipment maintenance.
4.1. Tools and Materials Required (Typical)
- Socket set and wrenches
- Torque wrench
- Fuel line disconnect tools (if applicable)
- Clean rags and shop towels
- New injector O-rings and seals (often included with new injector)
- Lubricant for O-rings (e.g., clean engine oil)
- Container for draining fuel
4.2. Installation Procedure (General Steps)
- Preparation: Ensure the engine is off and cool. Disconnect the battery. Relieve fuel system pressure according to the grader's service manual.
- Access: Locate the fuel injectors on the engine. This may require removing engine covers, air intake components, or other obstructing parts.
- Disconnect: Carefully disconnect electrical connectors and fuel lines from the old injector. Be prepared for minor fuel spills.
- Remove Old Injector: Use appropriate tools to remove the retaining bolts or clamps holding the injector in place. Gently pull the old injector out of its bore.
- Clean Bore: Thoroughly clean the injector bore in the cylinder head to remove any carbon deposits or debris. Use a specialized bore cleaning tool if available.
- Prepare New Injector: Install new O-rings and seals onto the new NC Injector Group 387-9427. Lubricate them lightly with clean engine oil to aid installation and prevent damage.
- Install New Injector: Carefully insert the new injector into the clean bore. Ensure it seats properly. Secure it with the retaining bolts or clamps, tightening to the manufacturer's specified torque.
- Reconnect: Reconnect the fuel lines and electrical connectors. Ensure all connections are secure and free of leaks.
- Reassemble: Reinstall any components removed to gain access to the injectors.
- Final Checks: Reconnect the battery. Cycle the ignition a few times (without starting the engine) to prime the fuel system. Check for any fuel leaks.
- Start Engine: Start the engine and allow it to run for a few minutes. Listen for any unusual noises and check for proper operation and absence of leaks.
Note: Always refer to the specific service manual for your Caterpillar Motor Grader model for detailed, model-specific installation instructions and torque specifications.
5. Operating Considerations
Once the NC Injector Group 387-9427 is correctly installed, its operation is integrated into the grader's engine management system. No specific user operation is required for the injector itself beyond ensuring the overall fuel system is maintained.
- Fuel Quality: Always use clean, high-quality diesel fuel as recommended by Caterpillar. Poor fuel quality can lead to injector clogging or damage.
- Fuel System Integrity: Ensure the fuel tank, lines, and filters are free from contaminants and leaks.
- Engine Performance: Monitor engine performance for any changes in power, fuel efficiency, or unusual exhaust smoke, which could indicate an issue with the fuel system.
6. Maintenance
Regular maintenance of the fuel system is crucial for the longevity and performance of the injector. While the injector itself is not typically a user-serviceable part, its environment requires attention.
- Fuel Filter Replacement: Adhere strictly to the manufacturer's recommended intervals for fuel filter replacement. Clogged fuel filters can starve injectors of fuel or introduce contaminants.
- Fuel System Inspection: Periodically inspect fuel lines, connections, and the fuel tank for signs of leaks, corrosion, or damage.
- Injector Inspection: During routine engine maintenance, visually inspect the injectors for any signs of external leaks, damage, or excessive carbon buildup around the nozzle.
- Professional Cleaning: If performance issues arise and are suspected to be injector-related, professional cleaning or testing by a specialized facility may be required.
7. Troubleshooting
If your Caterpillar Motor Grader exhibits symptoms related to fuel delivery, the injector may be a contributing factor. Below are common symptoms and potential causes.
| Symptom | Potential Cause | Action |
|---|---|---|
| Engine Misfire / Rough Idling | Clogged or faulty injector, air in fuel system, low fuel pressure. | Check fuel filter, inspect fuel lines, professional diagnostic scan for injector performance. |
| Reduced Engine Power / Poor Acceleration | Restricted fuel flow, worn injector nozzle, incorrect fuel delivery. | Verify fuel pressure, check for fuel system restrictions, consider injector testing. |
| Excessive Exhaust Smoke (Black/White) | Improper fuel atomization, over-fueling (black smoke), water in fuel (white smoke). | Check fuel quality, inspect injectors for leaks or damage, professional diagnostic. |
| Increased Fuel Consumption | Leaking injector, incorrect spray pattern, engine running rich. | Inspect for external fuel leaks, professional injector flow testing. |
| Difficulty Starting | Insufficient fuel delivery, air in fuel system, faulty injector. | Bleed air from fuel system, check fuel pump and filter, test injector function. |
Important: Many fuel system issues can mimic injector problems. Always perform a thorough diagnostic, including checking fuel pressure, fuel filter condition, and engine fault codes, before concluding an injector replacement is necessary. Consult a qualified technician for complex diagnostics.
8. Specifications
| Attribute | Detail |
|---|---|
| Manufacturer | N\C |
| Brand | NC |
| Item Model Number | 387-9427 |
| Manufacturer Part Number | 387-9427 |
| ASIN | B091FBD7QT |
| Date First Available | March 31, 2021 |
| Applications | Caterpillar Motor Grader 120K2, 140K, 12K, 140G |
9. Warranty and Support
Specific warranty information for the NC Injector Group 387-9427 was not provided in the product details. For warranty claims, technical support, or further inquiries, please contact the seller or manufacturer directly through your purchase platform or their official contact channels.
