
1. Introduction
Thank you for choosing the LEADZM TMW003 TV Wall Mount. This manual provides essential instructions for the safe and correct installation, operation, and maintenance of your wall mount. Please read this manual thoroughly before installation and retain it for future reference.
This wall mount is designed to securely hold televisions ranging from 32 to 70 inches, supporting a maximum weight of 110 lbs (50 kg). It features a tilt adjustment for optimal viewing angles and is constructed from durable cold-rolled steel.
2. Safety Information
WARNING: Failure to read and follow all instructions may result in personal injury, property damage, or voiding of warranty. If you have any questions, please contact customer service.
- Weight Capacity: Do not exceed the maximum load capacity of 110 lbs (50 kg). This mount is intended for use only with the maximum weights indicated. Use with products heavier than the maximum weights indicated may result in instability causing possible injury.
- Screen Size: This mount is designed for TVs between 32 and 70 inches. While some larger TVs may fit, ensure they do not exceed the weight limit and VESA compatibility.
- Wall Structure: The wall mount must be securely fastened to a solid wall structure (wood studs, concrete, or brick). Do NOT mount on drywall alone. Ensure the wall can support the combined weight of the mount and the TV.
- Professional Installation: If you are unsure about the installation process or the suitability of your wall, consult a qualified professional.
- Children: Keep children away from the installation area. Small parts may be a choking hazard.
- Tools: Use appropriate tools for installation. Wear safety glasses and other protective gear as needed.
3. Package Contents
Please verify that all components are present and undamaged before beginning installation. Refer to the image below for a visual representation of the included hardware.

Image: Accessory Information Form and Hardware Kit. This image displays a table listing various screws, anchors, washers, and a spirit level, along with a photograph of these components.
The package includes:
- 1x TV Wall Mount (Main wall plate and TV brackets)
- 1x Standard Hardware Kit (Includes various screws, anchors, washers, and a spirit level. Note: Additional screws may be required for specific TV models. Please verify compatibility before installation.)
4. Specifications
| Feature | Specification |
|---|---|
| Brand | LEADZM |
| Model | TMW003 |
| Mounting Type | Wall Mount |
| Supported Display Size | 32 - 70 inches |
| Tilt Range | 0 - 15 degrees |
| Max VESA Mounting Pattern | 600 x 400 mm |
| Distance Between TV and Wall | 70 mm |
| Load Capacity | 110 lbs (50 kg) |
| Material | Cold Rolled Plate (Alloy Steel) |
| Color | Black |
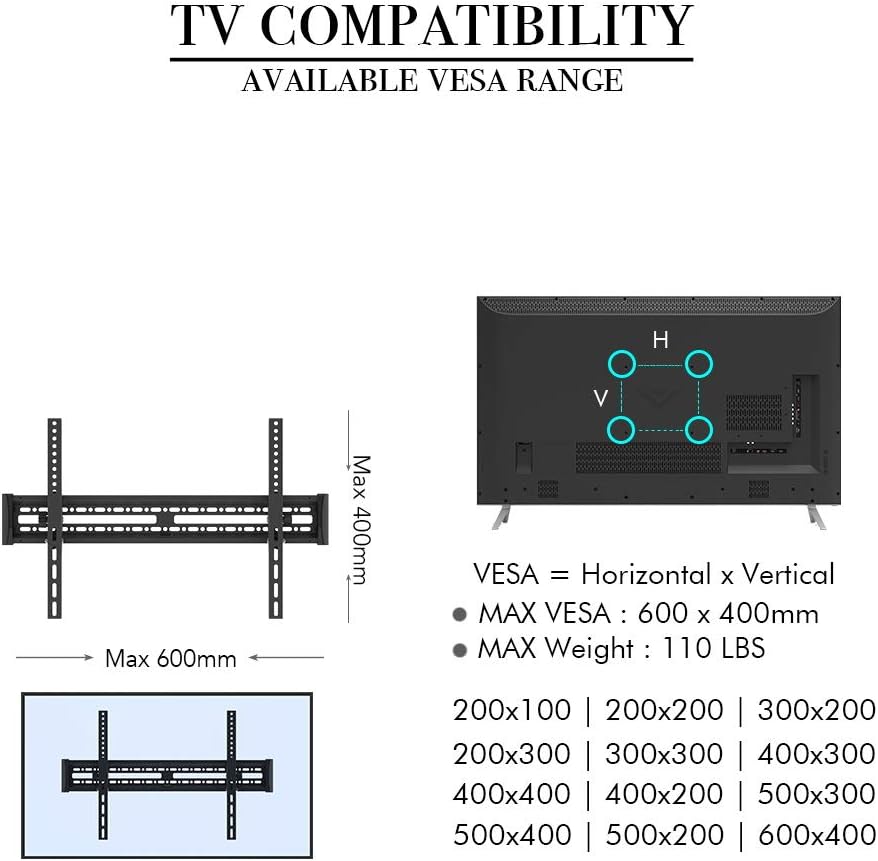
Image: TV Compatibility and VESA Range. This diagram shows the VESA mounting holes on the back of a TV and lists compatible VESA patterns such as 200x100, 200x200, 300x200, 300x300, 400x200, 400x300, 400x400, 500x200, 500x300, and 600x400 mm.
5. Setup and Installation
5.1 Before You Begin
- Check TV VESA Pattern: Measure the horizontal and vertical distance between the mounting holes on the back of your TV. Ensure it falls within the 600x400mm maximum VESA pattern.
- Check TV Weight: Confirm your TV's weight does not exceed 110 lbs (50 kg).
- Identify Wall Type: Determine if your wall is wood stud, concrete, or brick. This will dictate the appropriate mounting hardware and procedure.
5.2 Tools Required (Not Included)
- Pencil
- Tape Measure
- Stud Finder (for wood stud walls)
- Drill with appropriate drill bits (e.g., 10mm for concrete/brick, 5mm for wood studs)
- Phillips Head Screwdriver
- Socket Wrench (for lag bolts)
- Safety Glasses
5.3 Wall Type Compatibility

Image: Compatible Wall Types. This image shows successful mounting on wood studs and brick/concrete walls (requiring anchors), with a clear warning against mounting on drywall alone.
- Wood Stud Walls: Locate the center of the wood studs using a stud finder. Ensure the mounting holes align with the center of the studs.
- Concrete/Brick Walls: Use the provided concrete anchors. Drill pilot holes into the solid concrete or brick.
- DO NOT mount on drywall alone. Drywall cannot support the weight of the TV and mount.
5.4 Mounting the Wall Plate
- Determine the desired height for your TV. Hold the wall plate against the wall and use the included spirit level to ensure it is perfectly horizontal.
- Mark the drilling locations through the holes on the wall plate with a pencil.
- For Wood Studs: Drill pilot holes (approx. 5mm diameter) into the center of the marked stud locations. Secure the wall plate using the lag bolts (A1) and washers (F1/F2).
- For Concrete/Brick Walls: Drill pilot holes (approx. 10mm diameter) into the marked locations. Insert the concrete anchors (A2) flush with the wall surface. Secure the wall plate using the lag bolts (A1) and washers (F1/F2).
- Ensure the wall plate is firmly and securely attached to the wall.
5.5 Attaching Brackets to TV
- Carefully place your TV face down on a soft, clean surface to prevent scratches.
- Attach the two vertical TV brackets to the back of your TV, aligning them with the VESA mounting holes.
- Select the appropriate screws (B, C, D, E) and washers (F1, F2, F3) from the hardware kit that fit your TV's mounting holes. Ensure the screws are long enough to securely fasten the brackets but not so long that they damage internal components.
- Tighten the screws firmly, but do not overtighten.
5.6 Mounting TV to Wall Plate
- With assistance, carefully lift the TV with the attached brackets.
- Hook the TV brackets onto the top edge of the wall plate.
- Gently lower the TV until the brackets engage with the wall plate.
- Locate the security screws or locking mechanisms on the bottom of the TV brackets. Tighten these screws to secure the TV to the wall plate and prevent accidental dislodging.
- Double-check that the TV is securely mounted and level.
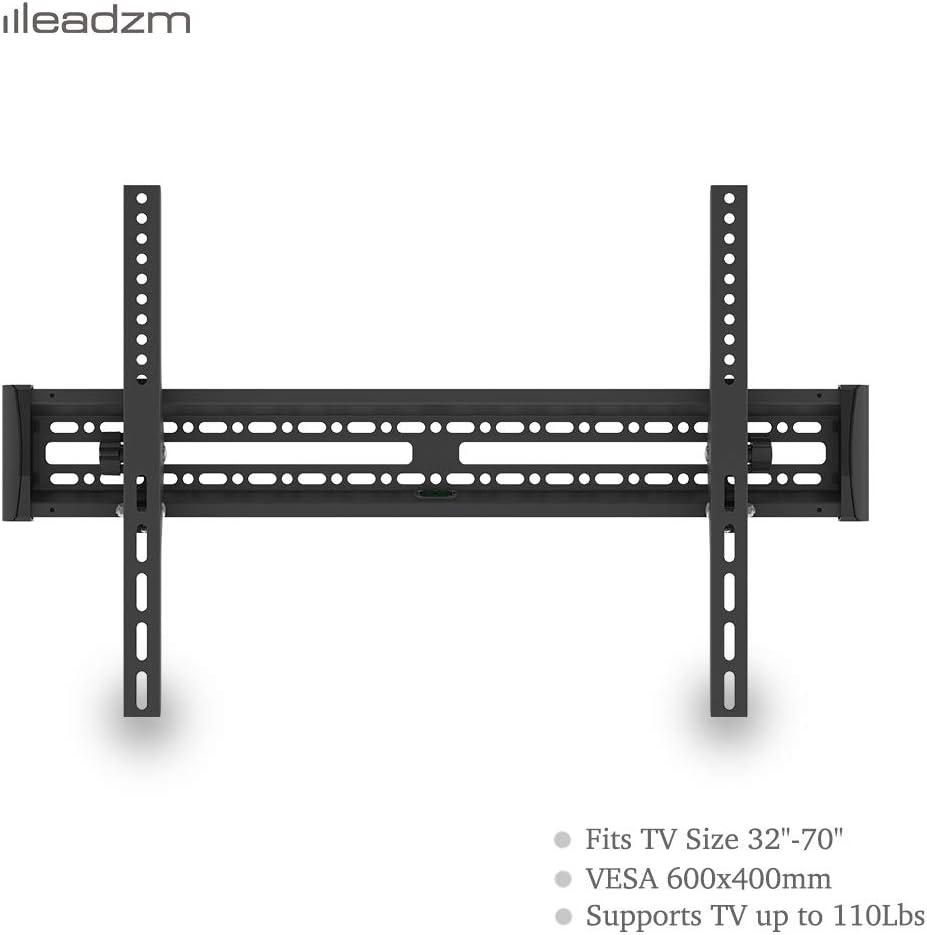
Image: LEADZM TMW003 TV Wall Mount. This image shows the assembled wall mount, consisting of a horizontal wall plate and two vertical brackets that attach to the TV.
6. Operating the Mount (Tilt Adjustment)
The LEADZM TMW003 TV Wall Mount allows for a tilt adjustment of 0 to 15 degrees to achieve your preferred viewing angle.

Image: Tilt Angle Adjustment. This image highlights the tool-free knob used to adjust the TV's vertical tilt up to 15 degrees, also showing the slim design of the mount.
- To adjust the tilt, locate the tool-free knobs on the side of the TV brackets.
- Loosen the knobs slightly.
- Gently tilt the TV to the desired angle (up to 15 degrees downwards).
- Once the desired angle is achieved, tighten the knobs firmly to secure the TV in place.
7. Maintenance
- Cleaning: Wipe the mount with a soft, dry cloth. Avoid using abrasive cleaners or solvents.
- Periodic Checks: Periodically check all screws and bolts to ensure they remain tight and secure. Over time, vibrations or movement can cause fasteners to loosen.
- Damage: If any part of the mount appears damaged or worn, discontinue use and contact customer support for assistance.
8. Troubleshooting
- TV is not level: Ensure the wall plate was installed perfectly level. If not, you may need to adjust the wall plate's position. Small adjustments can sometimes be made by slightly loosening and re-tightening the TV brackets.
- TV feels unstable: Double-check that all wall plate bolts and TV bracket screws are securely tightened. Ensure the security screws on the TV brackets are engaged. Verify that the wall type is appropriate and the anchors (if used) are properly installed.
- Cannot tilt the TV: Ensure the tilt adjustment knobs are sufficiently loosened before attempting to adjust the angle.
- Missing parts: Refer to the 'Package Contents' section. If parts are genuinely missing, contact LEADZM customer support.
9. Warranty and Support
LEADZM is committed to providing high-quality products. For warranty information or technical support, please contact LEADZM customer service through the retailer where you purchased the product or visit the official LEADZM website. Please have your model number (TMW003) and purchase details ready when contacting support.