
1. Introduction
This manual provides detailed instructions for the safe and effective use of your IWISS IWS-2412M Mini Micro Open Barrel Crimping Tool and PL2200 Wire Flush Cutter. Please read this manual thoroughly before operation and retain it for future reference.
The IWISS IWS-2412M is designed for crimping non-insulated open barrel, OEM-style terminals, suitable for AWG 24-12 wires. The PL2200 is a 6-inch side cutter for clean, precise cutting of soft wires and plastic.
2. Safety Information
Always follow basic safety precautions when using hand tools to reduce the risk of injury.
- Wear appropriate personal protective equipment, such as safety glasses, to protect against flying debris.
- Keep hands and fingers clear of the tool's jaws during operation.
- Ensure the workpiece is stable and secure before performing any operation.
- Do not use tools for purposes other than their intended design.
- Inspect tools for damage before each use. Do not use damaged tools.
- Keep tools clean and dry to prevent corrosion and ensure proper function.
- Store tools out of reach of children.
3. Product Overview
The IWISS IWS-2412M crimping tool and PL2200 flush cutter are essential tools for electrical and hobbyist applications. The crimper features multiple die widths for various terminal sizes, while the cutter provides precise cuts for wires and plastic components.
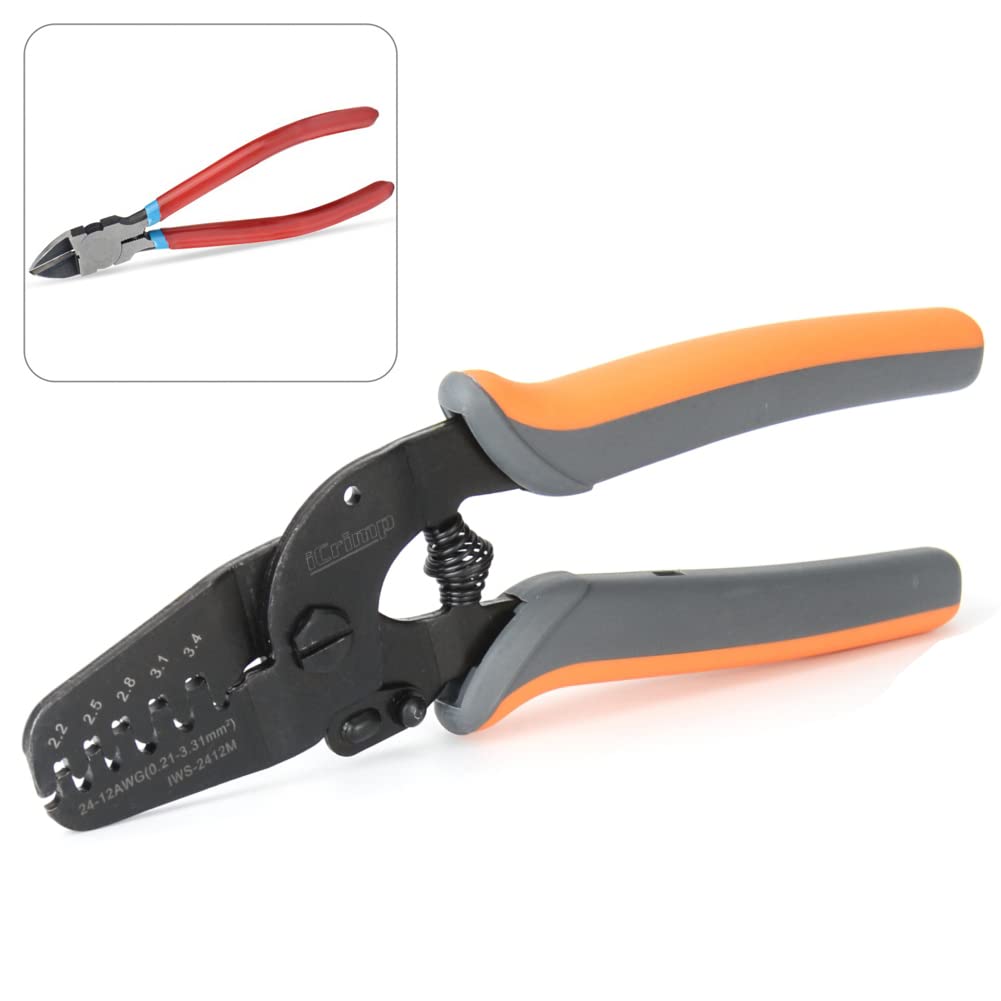
Image 3.1: Overview of the IWISS IWS-2412M Crimping Tool and PL2200 Flush Cutter, showing their primary functions and design.
4. Specifications
4.1. IWISS IWS-2412M Mini Micro Open Barrel Crimping Tool

Image 4.1: Detailed specifications for the IWISS IWS-2412M Crimping Tool.
| Specification | Detail |
|---|---|
| Model | IWS-2412M |
| Length | 7.09 inches |
| Weight | 0.86 lbs |
| Capacity | 0.21-3.31mm² (AWG 24-12) |
| Die Widths | 2.2mm, 2.5mm, 2.8mm, 3.1mm, 3.4mm |
| Crimping Tool Material | Carbon Steel with Black Oxide |
| Crimping Handle Material | PP + TPR |
4.2. PL2200 Wire Flush Cutter

Image 4.2: Detailed specifications for the PL2200 Wire Flush Cutter.
| Specification | Detail |
|---|---|
| Model | PL2200 |
| Cutting Capacity | 6 to 4 AWG Copper Wire |
| Handle Span | 106mm / 4.17 inches |
| Jaw Length | 22mm / 0.86 inches |
| Length | 150mm / 6.0 inches |
| Weight | 0.14Kg / 0.31 lbs |
| Body Material | CR-V Steel with Black Oxide Finish |
| Handle Material | Plastic (Ergonomic, Anti-skid) |
5. Setup
Both tools are ready for use out of the packaging. No assembly is required. Ensure the tools are clean and free of any debris before first use.
- IWS-2412M Crimping Tool: Familiarize yourself with the different die widths (2.2mm, 2.5mm, 2.8mm, 3.1mm, 3.4mm) to select the appropriate size for your terminals.
- PL2200 Wire Flush Cutter: The cutter features a high tenacity holding spring for easy operation. Ensure the jaws open and close smoothly.
6. Operating Instructions
6.1. Using the IWS-2412M Crimping Tool
The IWS-2412M is designed for precise crimping of open barrel terminals. Follow these steps for optimal results:
- Select the Correct Die: Choose the appropriate die width on the crimper that matches the size of your open barrel terminal.
- Place the Barrel: Place the paralleled barrel of the terminal into the upper die. It is recommended to guide the barrel from the reverse side of the crimping die for better alignment.
- Prepare the Wire: Strip the insulation from your wire to the correct length, exposing the conductor. The stripped length should be sufficient to fill the conductor barrel without extending past it, and the insulation should sit within the insulation barrel.
- Insert the Wire: Carefully insert the stripped wire into the barrel of the terminal. Ensure the conductor is fully seated in the conductor barrel and the insulation is positioned correctly in the insulation barrel.
- Crimp the Conductor Tab: Squeeze the handles of the crimper firmly to crimp the conductor tab around the wire's conductor. The double-hinge mechanism ensures parallel jaw movement for a straight and accurate crimp.
- Crimp the Insulation Tab: Continue to squeeze the handles to crimp the insulation tab around the wire's insulation. This provides strain relief and protects the connection.
- Inspect the Crimp: Release the handles and remove the crimped terminal. Visually inspect the crimp to ensure it is secure, uniform, and that no stray strands of wire are exposed or shorting.
Image 6.1: Visual guide for the crimping process, showing barrel placement, wire insertion, and final crimps on conductor and insulation tabs.
Polished Jaw Feature
The IWS-2412M features polished jaws. This design prevents terminals from obstructions after crimping and contributes to high-precision crimping results.

Image 6.2: Close-up of the polished jaws on the IWISS IWS-2412M crimping tool.
6.2. Using the PL2200 Wire Flush Cutter
The PL2200 flush cutter is designed for clean and precise cuts on soft wires and plastic materials.
- Identify Material: Ensure the material to be cut is within the cutter's capacity (e.g., copper wire up to 4 AWG, plastic). Do not cut thick steel or hardened materials, as this will damage the blades.
- Position the Cutter: Place the material between the jaws of the cutter, ensuring it is fully seated and perpendicular to the blades for a clean, flush cut.
- Apply Pressure: Squeeze the handles firmly to cut through the material. The ergonomic design and spring-loaded handles provide comfortable use and reduce fatigue.
- Release and Inspect: Release the handles. The high tenacity holding spring will return the jaws to their open position. Inspect the cut for cleanliness and precision.

Image 6.3: Examples of materials suitable for cutting with the PL2200, including plastic and reel terminals.

Image 6.4: The PL2200 flush cutter being used to cut a wire, demonstrating its application.
PL2200 Features
- CR-V Steel Body: Constructed with CR-V steel for durability and a rust-resistant black oxide finish.
- High Tenacity Holding Spring: Ensures the jaws bounce back to their original position after shearing, facilitating repetitive tasks.
- Ergonomically Designed Handle: Anti-skid grips provide a comfortable and secure user experience.

Image 6.5: Key features of the PL2200 flush cutter, highlighting its construction and ergonomic design.
7. Maintenance
Proper maintenance ensures the longevity and performance of your tools.
- Cleaning: After each use, wipe down the tools with a clean, dry cloth to remove any dirt, dust, or debris. For stubborn grime, a mild solvent can be used, followed by thorough drying.
- Lubrication: Periodically apply a light coat of machine oil to the pivot points and moving parts of both tools to ensure smooth operation and prevent rust.
- Storage: Store the tools in a dry environment to prevent corrosion. Keep them in a tool bag or drawer to protect them from damage and keep them clean.
- Inspection: Regularly inspect the jaws of the crimper and the blades of the cutter for wear, damage, or misalignment. Replace tools if significant damage is observed.
8. Troubleshooting
If you encounter issues with your tools, consider the following common troubleshooting steps:
- Crimper not making a secure connection:
- Ensure you are using the correct die size for the terminal and wire gauge.
- Verify the wire is stripped to the correct length and fully seated in the terminal.
- Apply sufficient pressure during crimping.
- Cutter blades not cutting cleanly:
- Check if the material being cut exceeds the tool's capacity (e.g., attempting to cut hardened steel).
- Inspect blades for damage or dullness. If severely damaged, the tool may need replacement.
- Ensure the blades are clean and free of debris.
- Tools feel stiff or sticky:
- Clean the tools thoroughly and apply lubrication to pivot points.
- Check for any foreign objects obstructing movement.
9. Warranty and Support
For warranty information, technical support, or service inquiries, please refer to the documentation provided with your purchase or contact the manufacturer directly through their official website or customer service channels.
Please retain your proof of purchase for any warranty claims.


