
Karinear 46001
Karinear 24-Inch 4-Burner Electric Radiant Cooktop User Manual
Model: 46001
1. Introduction and Overview
This manual provides essential information for the safe and efficient operation, installation, and maintenance of your Karinear 24-inch 4-Burner Electric Radiant Cooktop. Please read this manual thoroughly before installation and use, and keep it for future reference.
The Karinear electric cooktop is a modern, drop-in appliance designed for seamless integration into your kitchen counter. It features a sleek black ceramic glass surface and offers powerful, precise heating for various cooking needs.
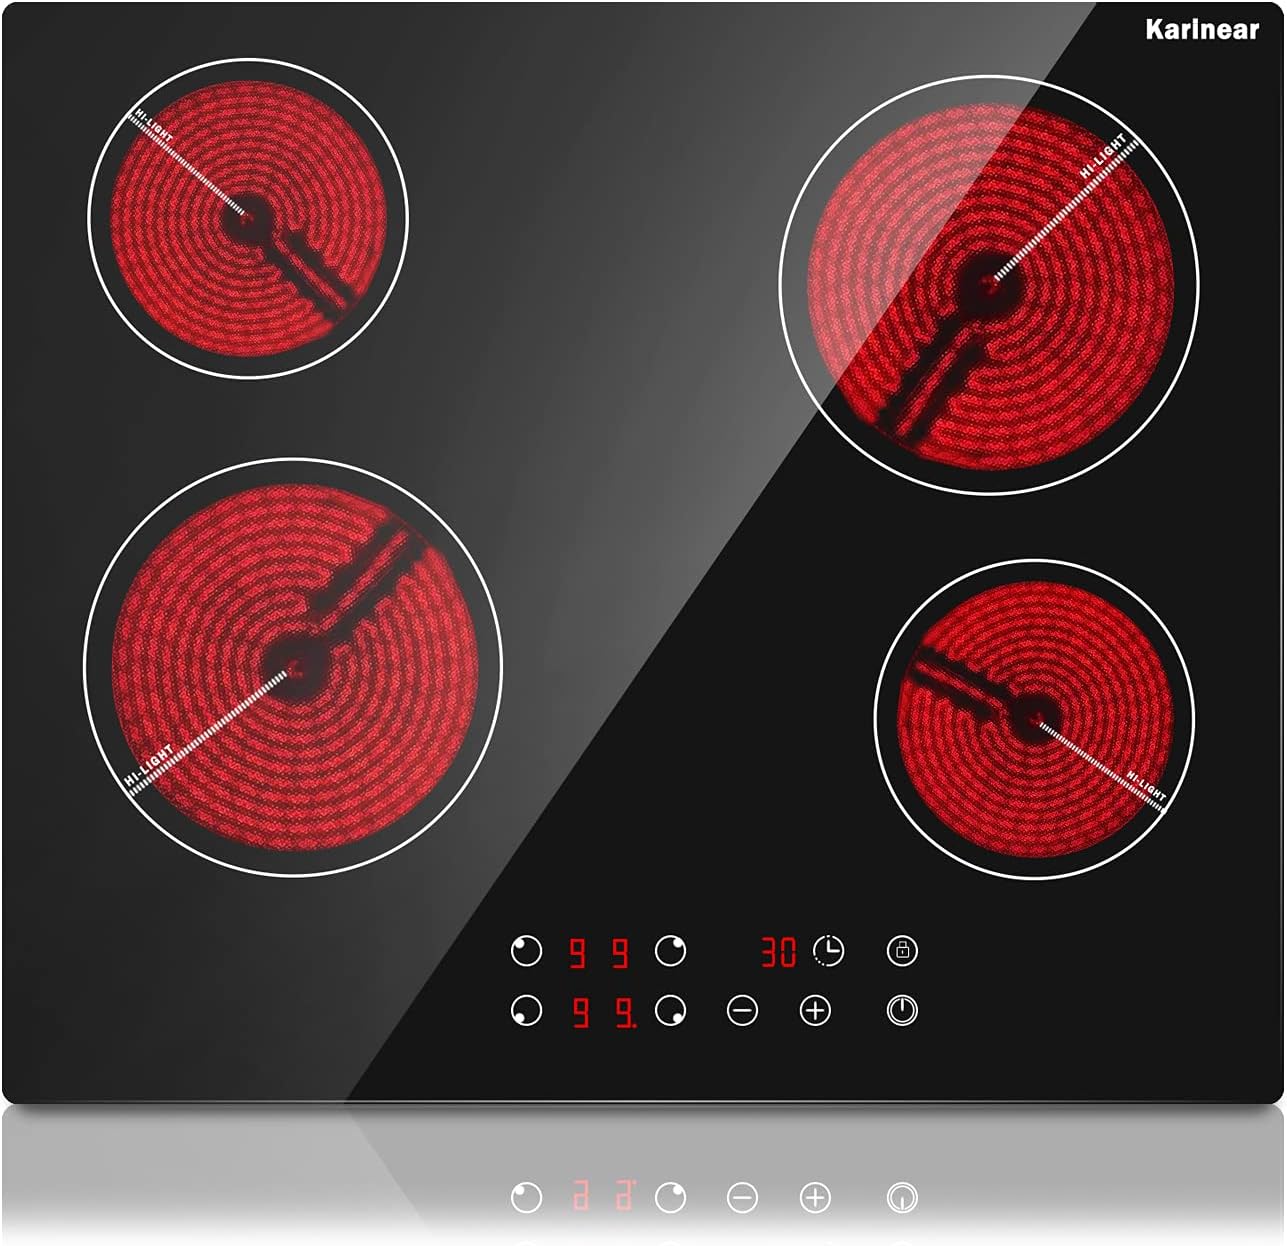
Figure 1: Karinear 24-inch 4-Burner Electric Radiant Cooktop
This image displays the top view of the Karinear 24-inch electric cooktop, highlighting its four radiant heating zones and the integrated touch control panel at the front. The cooktop features a smooth black ceramic glass surface.
2. Safety Information
Your safety and the safety of others are paramount. Please observe all safety precautions outlined in this manual.
- Electrical Connection: This appliance requires a 220-240V hard-wired electrical connection. It does not come with a plug. Installation must be performed by a qualified electrician in accordance with local electrical codes.
- Child Safety Lock: The cooktop is equipped with a child safety lock to prevent accidental operation. Refer to the "Operating Instructions" section for details on how to activate and deactivate this feature.
- Residual Heat Indicator: After use, the cooktop surface may remain hot. An "H" indicator will illuminate on the display to warn of residual heat, even after the burner is turned off. Do not touch the surface until the indicator disappears.
- Automatic Shut-Off: For enhanced safety, the cooktop features an automatic shut-off function if a cooking zone is left on for an extended period without adjustment.
- Overheating Protection: The cooktop will automatically reduce power or shut down if it detects an overheating condition.
- Cookware Compatibility: This radiant cooktop is compatible with all types of flat-bottomed cookware, including aluminum, stainless steel, ceramic, glass, copper, and cast iron pans.
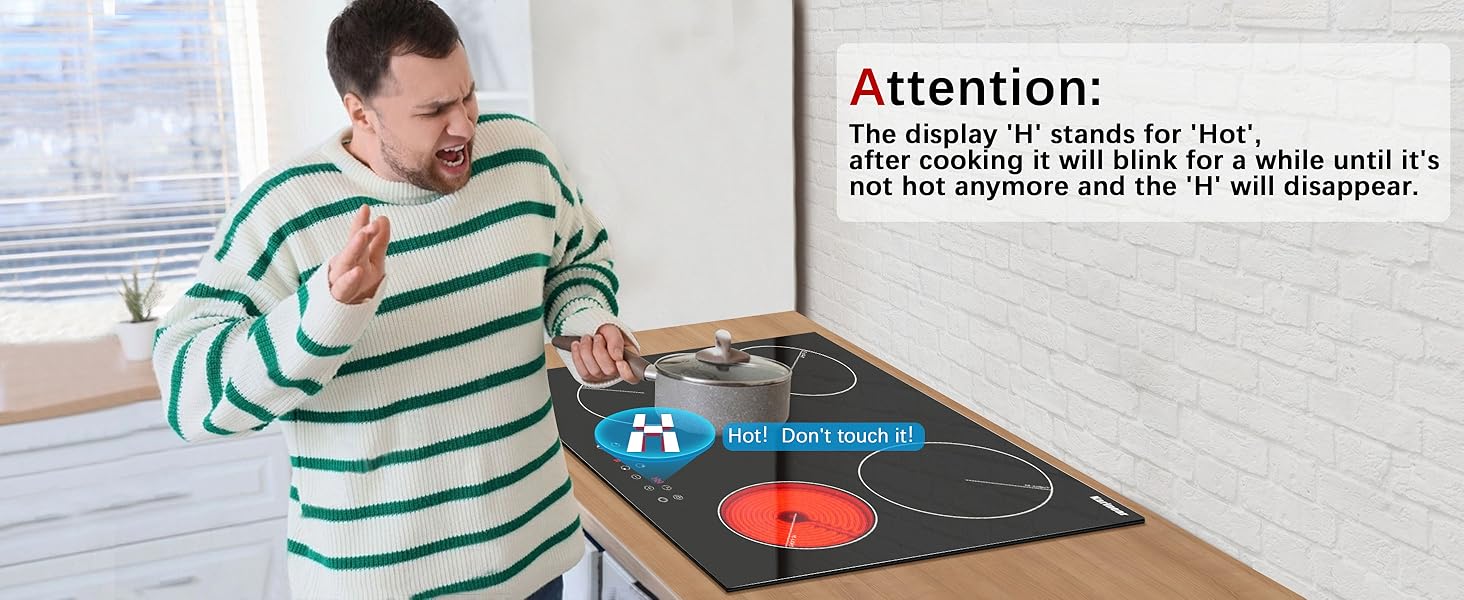
Figure 2: Residual Heat Indicator Warning
This image illustrates the residual heat warning feature, showing an "H" on the cooktop display indicating that the surface is still hot after use, advising users not to touch it.
3. Product Features
- High Power Burners: Equipped with four high-power burners: two 1800W (9.7-inch) zones and two 1200W (6.5-inch) zones, ensuring fast heating and efficient cooking.
- 9 Power Levels: Offers 9 distinct power settings, allowing precise temperature control for various cooking methods, from simmering to boiling.
- Sensor Touch Controls: Intuitive touch controls provide easy and precise adjustment of power levels and settings.
- Sleek Design: The black ceramic glass surface provides a modern aesthetic that complements any kitchen decor. Its smooth surface is also highly resistant to high temperatures.
- Built-in Timer: A convenient timer function allows setting cooking durations from 1 to 99 minutes, with automatic shut-off upon completion.
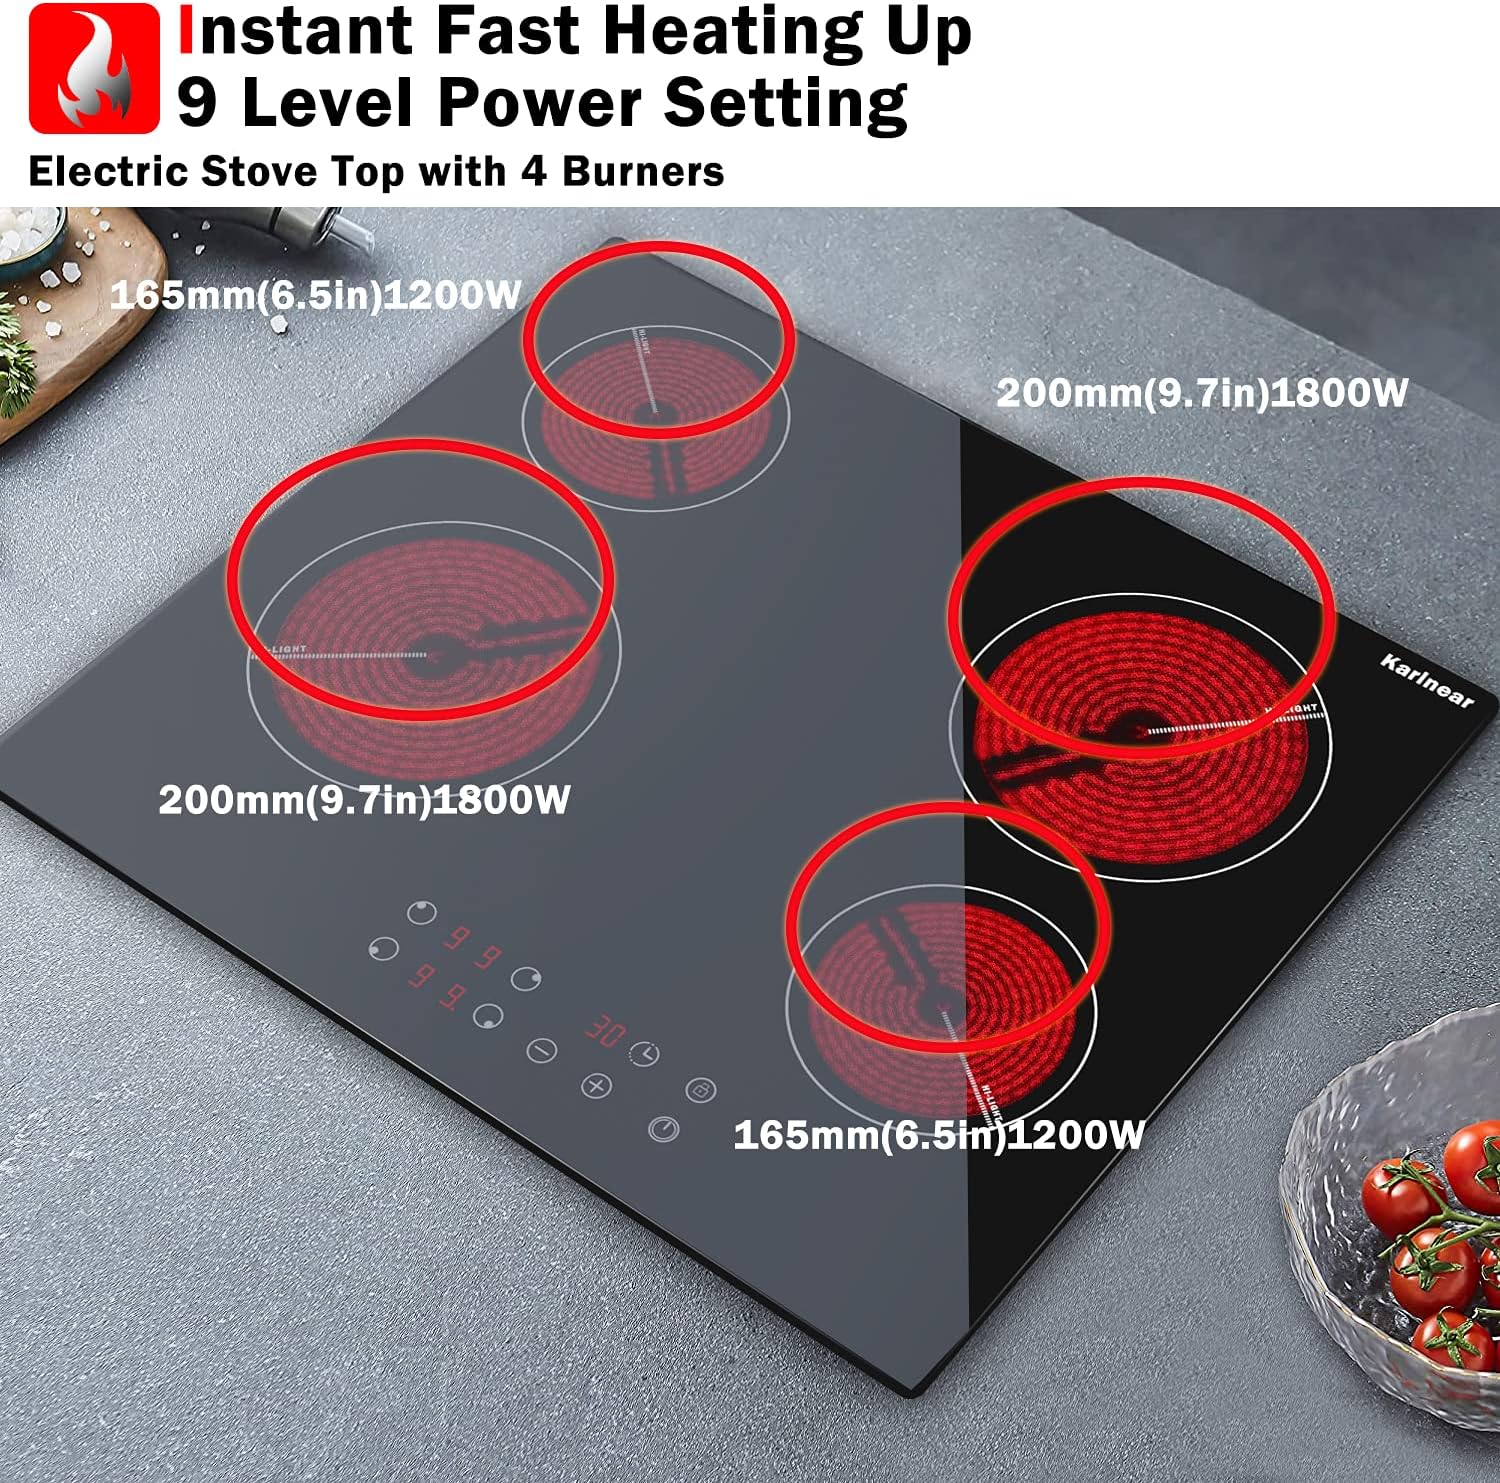
Figure 3: Burner Power and Dimensions
This image details the power output and diameter of each of the four radiant heating zones on the cooktop, indicating two 1800W (9.7-inch) and two 1200W (6.5-inch) burners.

Figure 4: 9 Power Level Settings
This graphic visually represents the 9 power levels available on the cooktop, suggesting appropriate settings for various cooking tasks, from low heat for melting to high heat for boiling.
4. Setup and Installation
The Karinear electric cooktop is designed for drop-in installation. Ensure your countertop opening meets the specified dimensions for a proper fit.
4.1 Electrical Connection
This cooktop requires a 220-240V hard-wired connection. It does not include a power plug. Professional installation by a certified electrician is highly recommended to ensure compliance with all electrical safety standards and local building codes.
- Ensure the main power supply is disconnected before beginning installation.
- Connect the cooktop's wiring to your home's power supply according to the provided wiring diagram and local regulations.
- The cooktop is designed for a 4-wire cable from the home power supply.
4.2 Dimensions and Cut-out
Refer to the diagram below for precise product and cut-out dimensions.
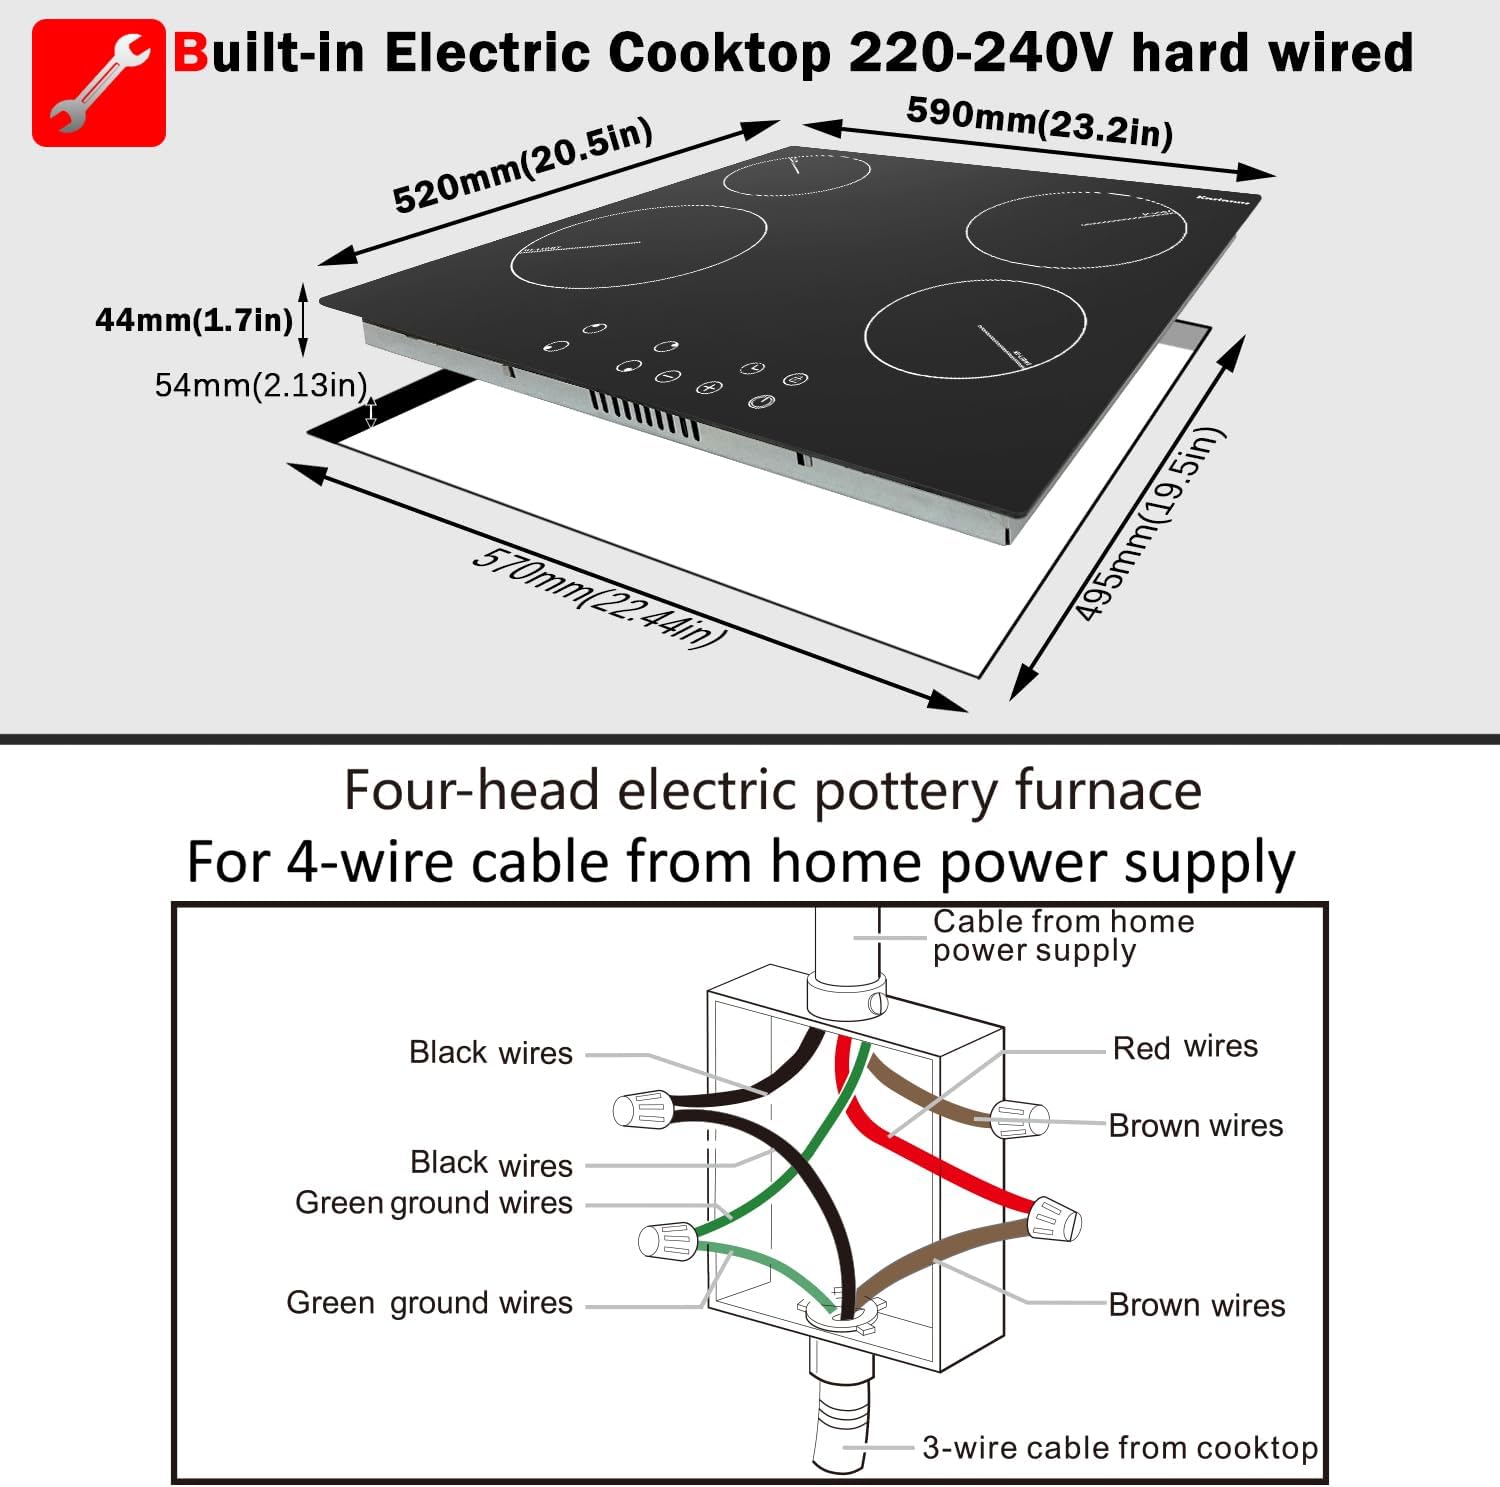
Figure 5: Cooktop Dimensions and Wiring Diagram
This diagram provides detailed measurements for the cooktop itself (23.23 x 20.47 x 2.36 inches) and the necessary countertop cut-out (approximately 22.5 x 19.7 inches). It also includes a schematic for the hard-wired electrical connection.
4.3 Included Components
The product package includes:
- Hard-wired power cord (integrated with the unit)
- Cleaning scrape
5. Operating Instructions
The cooktop features intuitive sensor touch controls for easy operation.
5.1 Powering On/Off
- To turn on the cooktop, touch the main power button.
- To turn off the cooktop, touch and hold the main power button until the display turns off.
5.2 Adjusting Power Levels
- Select the desired cooking zone by touching its corresponding control.
- Use the "+" and "-" buttons to adjust the power level from 1 (low) to 9 (high).
5.3 Using the Timer
- With a cooking zone active, touch the timer button.
- Use the "+" and "-" buttons to set the desired cooking time (1-99 minutes). The cooktop will automatically shut off the selected zone when the timer expires.
5.4 Child Safety Lock
- To activate the child safety lock, touch and hold the lock button for approximately 3 seconds until "Lo" appears on the display. All controls will be locked.
- To deactivate the child safety lock, touch and hold the lock button again for approximately 3 seconds until "Lo" disappears.
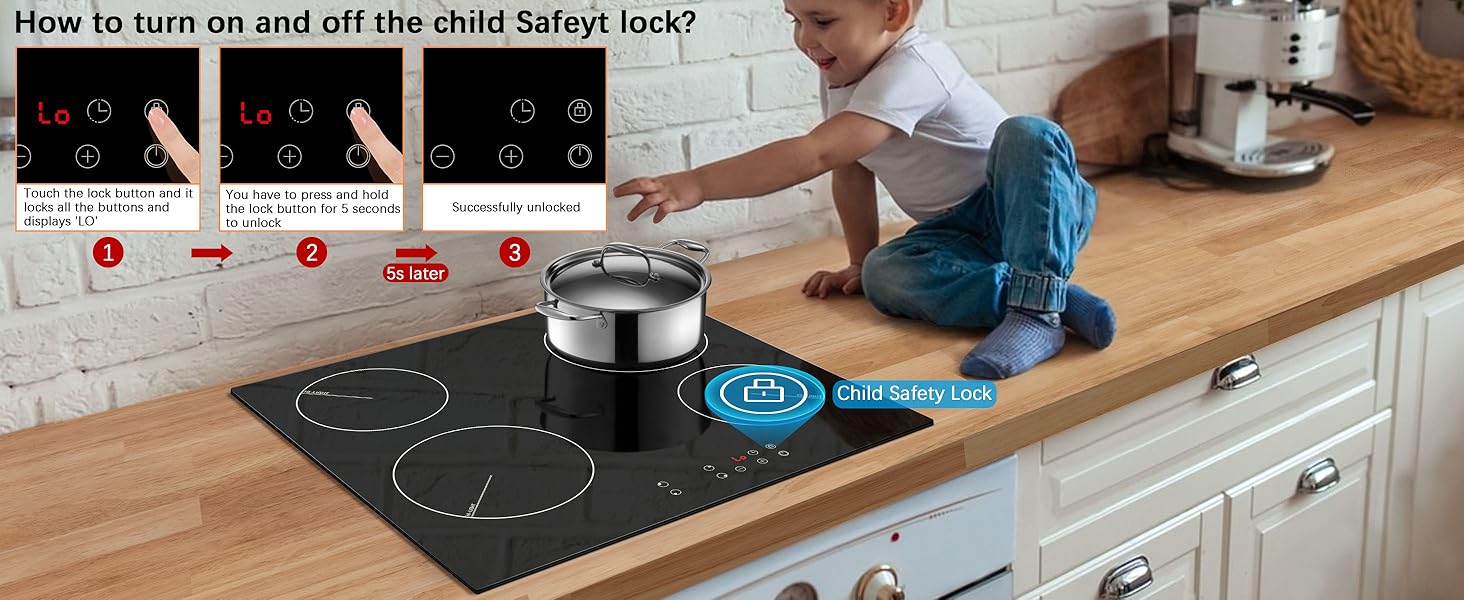
Figure 6: Child Safety Lock Operation
This visual guide demonstrates the steps to engage and disengage the child safety lock feature, showing the "Lo" indicator on the display when activated.
5.5 Cookware Compatibility
The radiant heating technology of this cooktop allows it to be used with virtually any flat-bottomed cookware material. This includes, but is not limited to, stainless steel, cast iron, aluminum, ceramic, glass, and copper pots and pans.

Figure 7: Compatible Cookware Types
This image displays a selection of cookware materials, such as aluminum, stainless steel, enameled cast iron, iron wok, cast iron pan, ceramic, copper, and glass, all of which are suitable for use on this electric cooktop.
6. Maintenance and Cleaning
Regular cleaning and maintenance will ensure the longevity and optimal performance of your cooktop.
- Always ensure the cooktop is cool and disconnected from power before cleaning.
- For daily cleaning, wipe the ceramic glass surface with a damp cloth and mild detergent. Dry thoroughly with a clean cloth.
- For stubborn stains or burnt-on food, use the included cleaning scrape or a specialized ceramic cooktop cleaner. Follow the cleaner's instructions carefully.
- Avoid abrasive cleaners, scouring pads, or sharp objects that could scratch the glass surface.
- Do not clean the cooktop when the surface is hot, as this can cause damage to the glass.

Figure 8: Cleaning the Cooktop Surface
This image shows a hand wiping down the smooth black ceramic glass surface of the cooktop with a blue cleaning cloth, demonstrating its ease of cleaning.
7. Troubleshooting
If you encounter issues with your cooktop, refer to the following common troubleshooting steps. For problems not listed here, please contact customer support.
| Problem | Possible Cause | Solution |
|---|---|---|
| Cooktop does not turn on. | No power supply; Child safety lock active; Incorrect wiring. | Check circuit breaker; Deactivate child safety lock (refer to section 5.4); Verify wiring connections (consult electrician). |
| Cooking zone not heating or heating slowly. | Incorrect power level selected; Cookware not flat-bottomed; Overheating protection activated. | Increase power level; Use compatible flat-bottomed cookware; Allow cooktop to cool down. |
| "H" indicator remains on. | Residual heat present. | This is normal. Wait for the surface to cool down. |
| Controls are unresponsive. | Child safety lock active; Moisture on control panel. | Deactivate child safety lock; Wipe control panel dry. |
8. Specifications
| Feature | Detail |
|---|---|
| Brand | Karinear |
| Model Number | 46001 |
| Installation Type | Drop-In |
| Heating Elements | 4 Radiant Burners |
| Burner Power (Front Left) | 1800W (9.7 inch) |
| Burner Power (Front Right) | 1200W (6.5 inch) |
| Burner Power (Rear Left) | 1200W (6.5 inch) |
| Burner Power (Rear Right) | 1800W (9.7 inch) |
| Total Wattage | 6000W |
| Voltage | 220-240V |
| Fuel Type | Electric |
| Material Type | Vitroceramic Glass |
| Product Dimensions (L x W x H) | 23.23 x 20.47 x 2.36 inches (590 x 520 x 60 mm) |
| Cut-out Dimensions (L x W) | Approx. 22.5 x 19.7 inches (570 x 500 mm) |
| Item Weight | 16.3 pounds |
| Special Features | Safety Lock, Timer, Residual Heat Indicator, Automatic Shut-Off |
9. Official Product Video
Watch the official product video for a visual guide on installation, features, and operation of your Karinear Electric Cooktop.
Video: Karinear 24 inch electric cooktop 4 burners glass cooktop
This video provides a comprehensive overview of the Karinear 24-inch electric cooktop, demonstrating its built-in design, heating capabilities, touch controls, and ease of cleaning. It also highlights key safety features and installation considerations.
10. Warranty and Support
10.1 Product Warranty
Karinear products typically come with a 5-year warranty. Please retain your proof of purchase for warranty claims. For specific warranty terms and conditions, refer to the documentation included with your product or contact Karinear customer support.
10.2 Customer Support
For any questions, technical assistance, or warranty inquiries, please contact Karinear customer support. You can typically find contact information on the product packaging, the official Karinear website, or through your retailer.
For additional information, you may also refer to the official Instructions for Use (IFU) PDF document available online: Karinear IFU PDF
Related documents46001

Ask a question about this manual
Ask about setup, troubleshooting, compatibility, parts, safety, or missing instructions. Manuals+ will review the question and use this page’s manual context to help answer it.