
1. Introduction
This manual provides comprehensive instructions for the installation, operation, and maintenance of the ACTI CORPORATION A418 6MP Network Outdoor Bullet Camera. Please read this manual thoroughly before using the product to ensure proper setup and optimal performance. Keep this manual for future reference.
2. Product Overview
The ACTI CORPORATION A418 is a robust 6-megapixel network outdoor bullet camera designed for high-quality surveillance. It features a 2.7-13.5mm 5X zoom lens with auto-focus capabilities, adaptive IR illumination for night vision up to 85 meters, and superior Wide Dynamic Range (WDR) of 150 dB for clear images in challenging lighting conditions. The camera supports H.265/H.264 video compression, delivers 1440p at 30 frames per second, and includes 3D Digital Noise Reduction (DNR). It is built with an IP68 weatherproof and IK10 vandal-proof metal casing, making it suitable for harsh outdoor environments. Connectivity options include PoE/DC12V power and an RJ45 connection.
Key Features:
- Sensor: 1/2.7" Progressive Scan CMOS with 3072 x 2048 resolution.
- Lens: 2.7-13.5mm, 5X Zoom Lens with Auto Focus.
- IR Range: Up to 85 meters with 4 IR LEDs (850 nm).
- Image Enhancement: Extreme WDR (150 dB) and 2D + 3D DNR.
- Durability: IP68 weatherproof and IK10 vandal-proof metal casing.
- Connectivity: RJ45 for network, PoE/DC12V for power.
- Storage: MicroSD/MicroSDHC/MicroSDXC card slot.
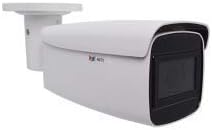
3. Components and Connections
The A418 camera comes with essential components for its operation. Familiarize yourself with the various ports and connections on the device.
Included Components:
- ACTI CORPORATION A418 6MP Network Outdoor Bullet Camera (1 unit)

Connection Points Explained:
- 1. Ethernet Port: RJ45 connector for network connection and Power over Ethernet (PoE).
- 2. Digital Input / Output (DI/DO): For connecting external sensors or alarms.
- 3. Audio Input / Output: For connecting external microphone and speaker.
- 4. DC 12V Power Input: Alternative power input if PoE is not used.
- 5. Reset Button: Used to restore factory default settings.
- 6. Analog Video Output Connector: For local video output during installation or troubleshooting.
- 7. Memory Card Slot: Supports MicroSD/MicroSDHC/MicroSDXC for local storage.
4. Setup and Installation
Proper installation is crucial for the camera's performance and longevity. The A418 is designed for outdoor security applications and can be mounted using optional accessories.
4.1 Physical Installation:
- Choose a Location: Select a suitable outdoor location that provides the desired field of view and is within range of your network and power source. Consider the camera's IP68 weatherproof and IK10 vandal-proof ratings for optimal placement.
- Mounting: Securely mount the camera using appropriate screws and mounting hardware (not included). Ensure the mounting surface can support the camera's weight (15.8 ounces).
- Adjust Angle: Adjust the camera's angle and orientation to cover the desired surveillance area.

4.2 Power and Network Connection:
- Power Supply: Connect the camera to power using either Power over Ethernet (PoE) via the RJ45 Ethernet port or by connecting a DC 12V power adapter to the DC 12V Power Input.
- Network Connection: Connect an Ethernet cable from your network switch or router to the camera's RJ45 Ethernet Port. The camera supports Wi-Fi for wireless communication technology.
- MicroSD Card (Optional): Insert a MicroSD/MicroSDHC/MicroSDXC card into the memory card slot for local video storage.
5. Operating the Camera
Once installed and connected, the camera can be accessed and configured through a network interface.
5.1 Initial Access:
- Discover Camera: Use the manufacturer's provided software or a network scanner to discover the camera's IP address on your network.
- Login: Access the camera's web interface by entering its IP address into a web browser. Log in using the default credentials (refer to the camera's quick start guide or manufacturer's website for default username/password).
- Change Password: For security, immediately change the default password upon first login.
5.2 Configuration and Features:
- Video Settings: Configure video resolution (up to 6 MP, 3072 x 2048), frame rate (30 fps), compression (H.265/H.264), and image quality settings.
- Lens Control: Utilize the 5X optical zoom and auto-focus features to achieve a clear and precise view.
- IR Illumination: The adaptive IR LEDs automatically adjust intensity based on ambient light for optimal night vision up to 85 meters.
- WDR and DNR: Leverage Extreme WDR (150 dB) and 2D/3D DNR for improved image clarity in high-contrast or low-light scenes.
- Motion Detection: Set up motion-only alerts and configure detection zones and sensitivity.
- Storage: Configure recording to the inserted MicroSD card or a Network Video Recorder (NVR).
- Audio: If external audio devices are connected, configure audio input/output settings.
6. Maintenance
Regular maintenance ensures the longevity and optimal performance of your camera.
- Cleaning: Periodically clean the camera lens and housing with a soft, damp cloth. Do not use harsh chemicals or abrasive materials.
- Firmware Updates: Check the ACTi website regularly for firmware updates. Keeping the firmware updated ensures access to the latest features, security patches, and performance improvements.
- Cable Inspection: Periodically inspect all cables and connections for any signs of wear or damage, especially in outdoor environments.
7. Troubleshooting
This section addresses common issues you might encounter with your A418 camera.
- No Power: Ensure both PoE and DC12V power sources are correctly connected and active. Check power cables and network cables for damage.
- No Video Feed: Verify network connectivity. Ensure the camera's IP address is correct and accessible. Check firewall settings on your network.
- Poor Image Quality: Clean the lens. Adjust focus and zoom settings. Check lighting conditions and ensure WDR/DNR settings are optimized.
- Network Connection Issues: Verify the Ethernet cable is securely connected. Check network settings (IP address, subnet mask, gateway). Ensure no IP address conflicts exist on the network.
- Camera Unresponsive: If the camera becomes unresponsive, try power cycling it. If the issue persists, use the reset button (refer to Figure 3.1) to restore factory default settings. Note that this will erase all custom configurations.
8. Specifications
Detailed technical specifications for the ACTI CORPORATION A418 camera.
| Feature | Specification |
|---|---|
| Model Number | A418 |
| Manufacturer | ACTI CORPORATION |
| Video Capture Resolution | 6 MP (3072 x 2048) |
| Frame Rate | 30 fps |
| Lens | 2.7-13.5mm, 5X Zoom Lens |
| Focus Type | Auto Focus |
| IR Range | Up to 85 m |
| WDR | Extreme WDR (150 dB) |
| DNR | 2D + 3D DNR |
| International Protection Rating | IP68 |
| Vandal Resistance | IK10 (metal casing) |
| Power Source | PoE / DC12V |
| Connectivity Technology | Wireless (Wi-Fi), Wired (RJ45) |
| Storage | MicroSD/MicroSDHC/MicroSDXC |
| Form Factor | Bullet |
| Material | Metal |
| Item Dimensions (L x W x H) | 11.7 x 4.1 x 4.1 inches |
| Item Weight | 15.8 ounces |
| Recommended Uses | Outdoor Security |
| UPC | 764227914365 |
9. Warranty and Support
For information regarding product warranty, please refer to the warranty card included with your purchase or visit the official ACTi Corporation website. Support resources, including FAQs, software downloads, and contact information, are also available on the manufacturer's website.
If you require technical assistance, please contact ACTi Corporation customer support or your authorized reseller.

