
1. Introduction and Overview
The FLYDOG Wireless Paging System is designed to enhance communication and service efficiency in various professional environments, including restaurants, cafes, hospitals, and nursing homes. This system allows customers or patients to easily alert staff or caregivers with the press of a button, ensuring timely and efficient service.
Key features of this paging system include:
- Ideal for waiter service in restaurants and cafes.
- Functions as a caregiver pocket bell for patients and the elderly in healthcare settings.
- Supports up to 999 transmitter units for comprehensive coverage.
- One-way call system for efficient request handling.
- Convenient for families needing communication between rooms.

The FLYDOG Wireless Paging System, featuring the main receiver unit and five wireless call buttons.
2. Product Components
Your FLYDOG Wireless Paging System package includes the following main components:
- CS-200D Receiver Unit: The main display unit that receives and shows call notifications.
- CS-M1 Wireless Call Buttons (Transmitters): Compact, waterproof buttons used by individuals to send call signals.
- DC Power Adapter for Receiver.
- Double-sided adhesive for call button installation.

The system is designed for various commercial environments, offering different call button styles.
3. Setup Guide
3.1 Unpacking and Initial Inspection
Carefully remove all components from the packaging. Inspect for any signs of damage. Retain the packaging for future storage or transport.
3.2 Powering the Receiver Unit (CS-200D)
- Connect the provided DC power adapter to the DC input port on the back of the CS-200D receiver.
- Plug the power adapter into a standard electrical outlet.
- The receiver display will illuminate, indicating it is powered on.

The receiver unit features DC power input and external speaker support.
3.3 Placement of the Receiver Unit
The CS-200D receiver can be placed on a tabletop using its integrated stand or mounted on a wall. Choose a central location with good visibility and within optimal signal range of the call buttons.
- Tabletop Placement: Extend the stand on the back of the unit and place it on a flat, stable surface.
- Wall Mounting: Use appropriate screws (not included) with the keyhole slots on the back of the receiver to securely mount it to a wall.
3.4 Placing the Wireless Call Buttons (CS-M1)
Place the CS-M1 call buttons in locations easily accessible to customers or patients. Use the provided double-sided adhesive to secure them to tables, walls, or other desired surfaces.
- Ensure the buttons are within the effective signal range of the receiver (up to 100m from the button to the receiver, or up to 500m from the receiver to the furthest point with a repeater).
- Avoid placing buttons near large metal objects or thick walls that may interfere with the signal.

Understanding the signal range is crucial for optimal placement of both receiver and call buttons.
3.5 Number Setting (If Required)
The receiver supports number settings from 001 to ZZZ (using digits 0-9 and letters A-Z). If your buttons are not pre-paired or you need to reconfigure their IDs, refer to the receiver's settings menu:
- Press the FUN button on the receiver to enter the settings menu.
- Use the BIT button to select the digit position you wish to edit.
- Use the ADJ button to adjust the number or letter.
- Press ENT to confirm and save your settings.

The receiver's touch screen allows for easy adjustment of settings like call numbers and volume.
4. Operating Instructions
4.1 Making a Call
To make a call, simply press the large red button on the CS-M1 wireless call button. A small indicator light on the button will flash, confirming the signal has been sent.

The CS-M1 call button is designed for ease of use and durability.
4.2 Receiving Call Notifications
When a call button is pressed, the CS-200D receiver will:
- Display the corresponding call number on its screen.
- Emit an audible alert (beep sound or English pronunciation, depending on settings).
- The display can show multiple calls simultaneously.

The receiver clearly displays the number of the calling unit.
4.3 Adjusting Receiver Settings
The CS-200D receiver allows for various adjustments:
- Volume Adjustment: The receiver has 9 levels of volume adjustment. Use the appropriate buttons (refer to Section 3.5 for button functions) to increase or decrease the volume. An external speaker can also be connected for amplified sound.
- Broadcast Mode: Choose between 7 types of beep sounds or English pronunciation for call alerts.
- Broadcast Count: Adjust how many times the alert repeats, from 1 to 99 times.
- Clearing Calls: To clear a single call or all calls from the display, use the FUN or ENT buttons as indicated on the screen.
5. Maintenance
5.1 Cleaning
Wipe the receiver and call buttons with a soft, dry cloth. For stubborn dirt, a slightly damp cloth can be used, but ensure no moisture enters the device. Do not use abrasive cleaners or solvents.
5.2 Call Button Battery Replacement (CS-M1)
The CS-M1 call buttons are powered by a CR2025 lithium coin cell battery. If the indicator light on the button becomes dim or the button stops transmitting signals, the battery needs to be replaced.
- Locate the small screws on the back of the call button.
- Carefully unscrew them to open the back casing.
- Remove the old CR2025 battery.
- Insert a new CR2025 battery with the positive (+) side facing up.
- Replace the back casing and secure it with the screws.
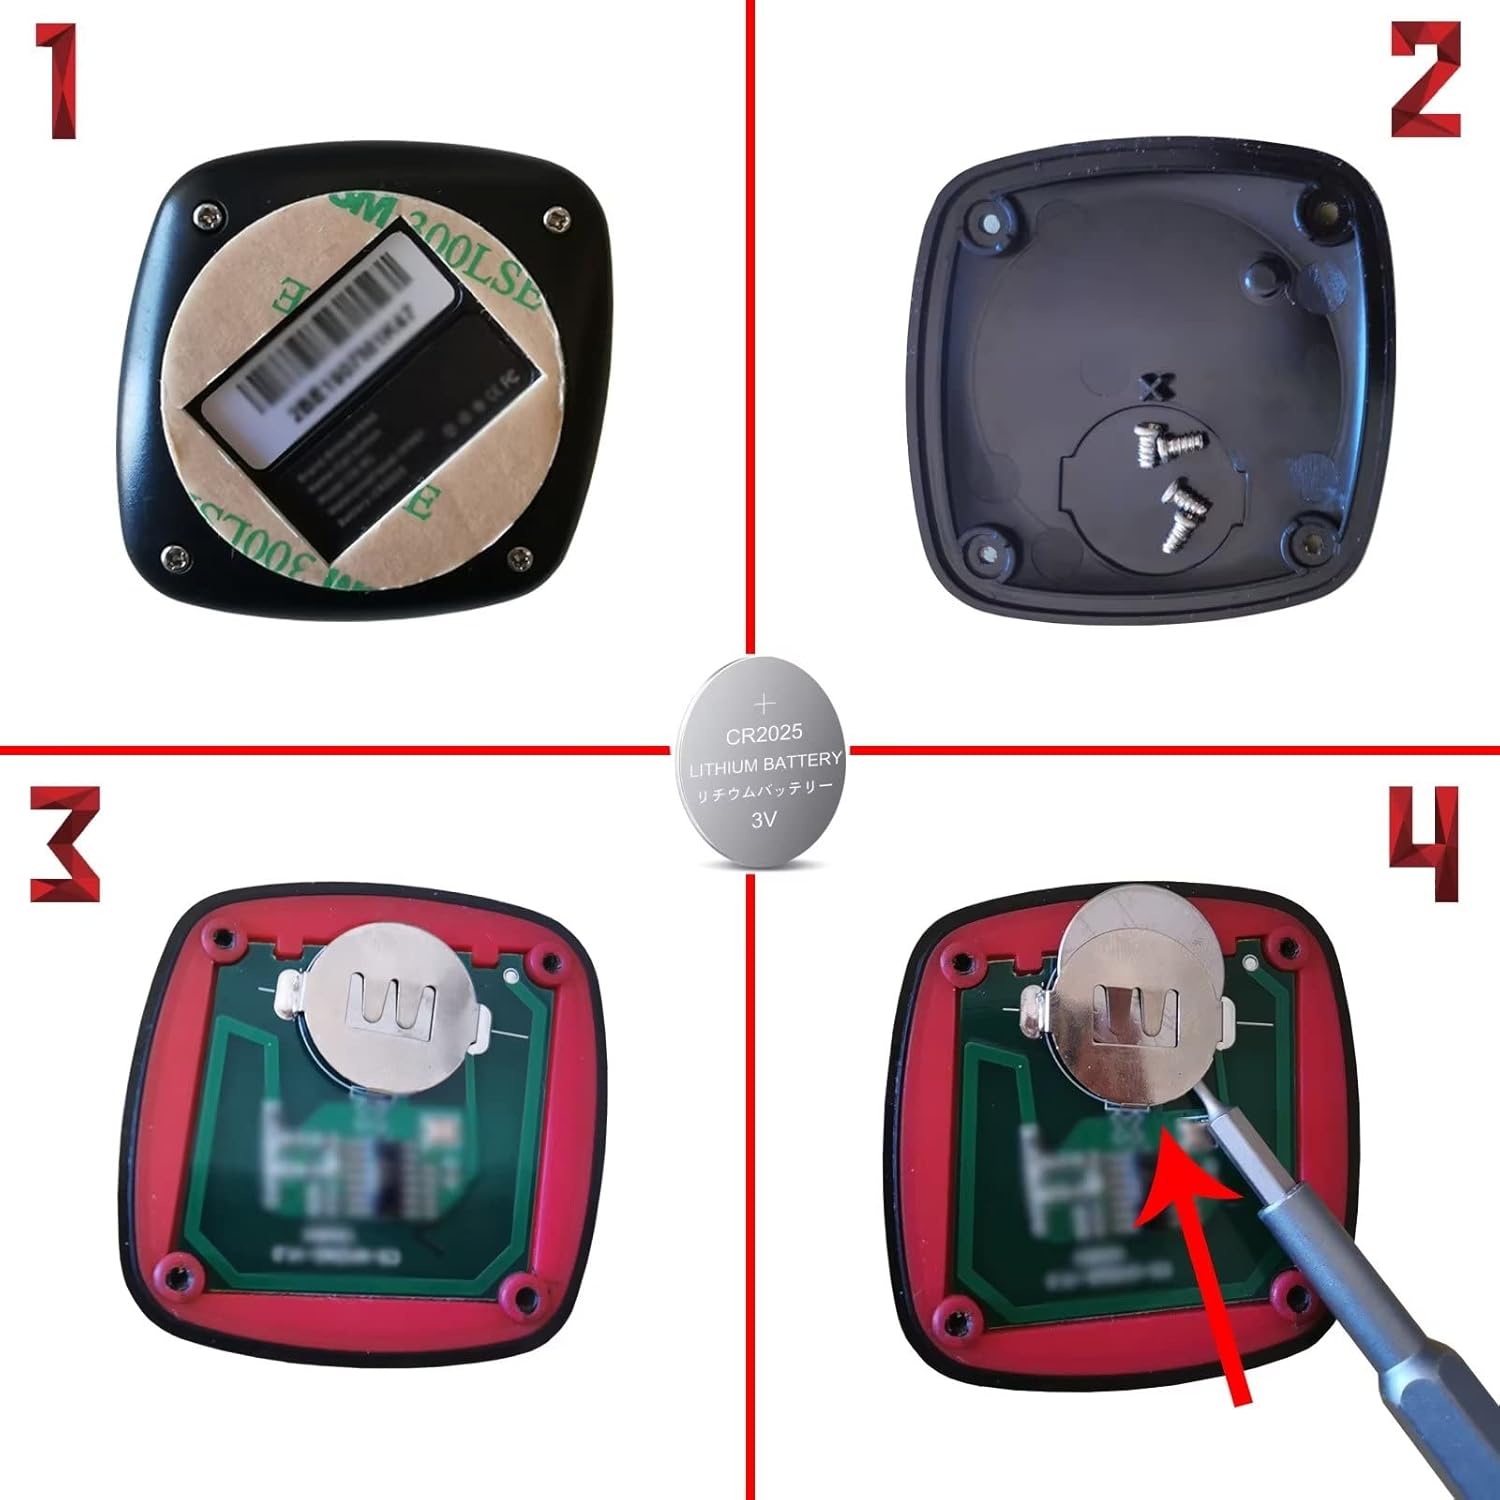
Follow these steps to replace the CR2025 battery in your CS-M1 call button.
6. Troubleshooting
| Problem | Possible Cause | Solution |
|---|---|---|
| Receiver not powering on. | Power adapter not connected or faulty; power outlet issue. | Ensure power adapter is securely connected. Try a different power outlet. Check adapter for damage. |
| Call button not transmitting signal. | Low or dead battery; button malfunction. | Replace the CR2025 battery (refer to Section 5.2). If issue persists, the button may be faulty. |
| Receiver not displaying calls or signal is weak. | Out of range; signal interference; button not paired. | Move receiver closer to call buttons. Remove obstructions (large metal objects, thick walls). Re-pair the call button if necessary (refer to Section 3.5). |
| Audio alert not working or too low. | Volume too low; speaker issue. | Adjust the volume settings on the receiver (refer to Section 4.3). Ensure external speaker (if used) is connected correctly. |
7. Specifications
7.1 CS-200D Receiver Unit
| Feature | Specification |
|---|---|
| Model | CS-200D |
| Dimensions (W x H x D) | 27.4 cm x 18.7 cm x 2.4 cm |
| Power Supply | DC Power Adapter |
| Supported Transmitters | Up to 999 units |
| Number Setting Range | 001-ZZZ (0-9, A-Z) |
| Volume Levels | 9 levels |
| Broadcast Modes | 7 Beep types / English pronunciation |
| Broadcast Count | Adjustable 1-99 times |
| Installation Options | Tabletop (with stand) / Wall Mount |
| Max Signal Range | Up to 500m (5 floors) with repeater |
7.2 CS-M1 Wireless Call Button (Transmitter)
| Feature | Specification |
|---|---|
| Model | CS-M1 (Available in various colors like BR, BB2, BB3, WR, WB) |
| Dimensions (W x H x D) | 56 mm x 56 mm x 9 mm (2.2 x 2.2 x 0.35 inches) |
| Weight | 22g |
| Battery | CR2025 x 1 (Lithium Coin Cell) |
| Waterproof Level | IPX67 (Completely Waterproof) |
| Max Signal Range | 30-100m (direct to receiver) |

Detailed dimensions of the compact CS-M1 call button.
8. Warranty and Support
For warranty information, technical support, or service inquiries, please refer to the product packaging or contact the manufacturer directly through their official website or customer service channels. Keep your purchase receipt as proof of purchase for warranty claims.