
1. Introduction
This manual provides essential instructions for the safe and efficient operation of your BluMill Mini Top-Load Washing Machine with Spin Dryer. Please read this manual thoroughly before first use and retain it for future reference.
The BluMill Mini Washing Machine is designed for quick washing and refreshing of small laundry loads. Its compact size and portability make it suitable for various environments, including small apartments, student rooms, camping trips, or recreational vehicles. It features a washing capacity of 3 kg and a spin capacity of 2 kg, with short wash and spin cycles.

Figure 1: BluMill Mini Top-Load Washing Machine, front view.
2. Important Safety Instructions
To reduce the risk of fire, electric shock, or injury when using your appliance, follow these basic precautions:
- Read all instructions before using the appliance.
- Do not operate any appliance with a damaged cord or plug, or after the appliance malfunctions or has been dropped or damaged in any manner.
- Do not allow children to play on or in the appliance. Close supervision is necessary when the appliance is used near children.
- Do not install or store this appliance where it will be exposed to the weather or to freezing temperatures.
- Do not use or store flammable materials near the appliance.
- Always unplug the appliance from the power outlet before cleaning or performing any maintenance.
- Ensure the appliance is placed on a stable, level surface to prevent tipping.
- Do not immerse the appliance in water or other liquids.
3. Product Overview
Familiarize yourself with the components of your BluMill Mini Washing Machine.

Figure 2: Rear view of the washing machine, highlighting the drain hose, carrying handle, and power cable connection.

Figure 3: Control panel with two rotary knobs for wash/spin selection and timer settings.
Controls:
- Wash/Spin Selector Knob: Used to select between wash and spin functions.
- Timer Knob: Sets the duration for the wash or spin cycle (up to 15 minutes for wash, 5 minutes for spin).
4. Setup
The BluMill Mini Washing Machine does not require a fixed water connection, offering flexibility in placement.
4.1 Unpacking
- Carefully remove the appliance from its packaging.
- Check for any damage during transit. If damaged, do not use and contact your retailer.
- Ensure all accessories, including the drain hose and water fill hose, are present.
4.2 Placement
- Place the washing machine on a firm, level surface to minimize vibration and noise during operation.
- Ensure there is enough space around the machine for proper ventilation and access.
- Keep the machine away from direct sunlight, heat sources, and moisture.
4.3 Connecting Hoses and Power
- Drain Hose: Attach the provided drain hose to the outlet on the side of the machine. Position the other end of the drain hose into a sink, bucket, or drain that is lower than the machine to allow for gravity drainage.
- Water Fill: The machine is filled manually. Use the provided water fill hose or a bucket to add water directly into the tub.
- Power Connection: Plug the power cord into a grounded electrical outlet. Ensure the voltage matches the specifications of the appliance.
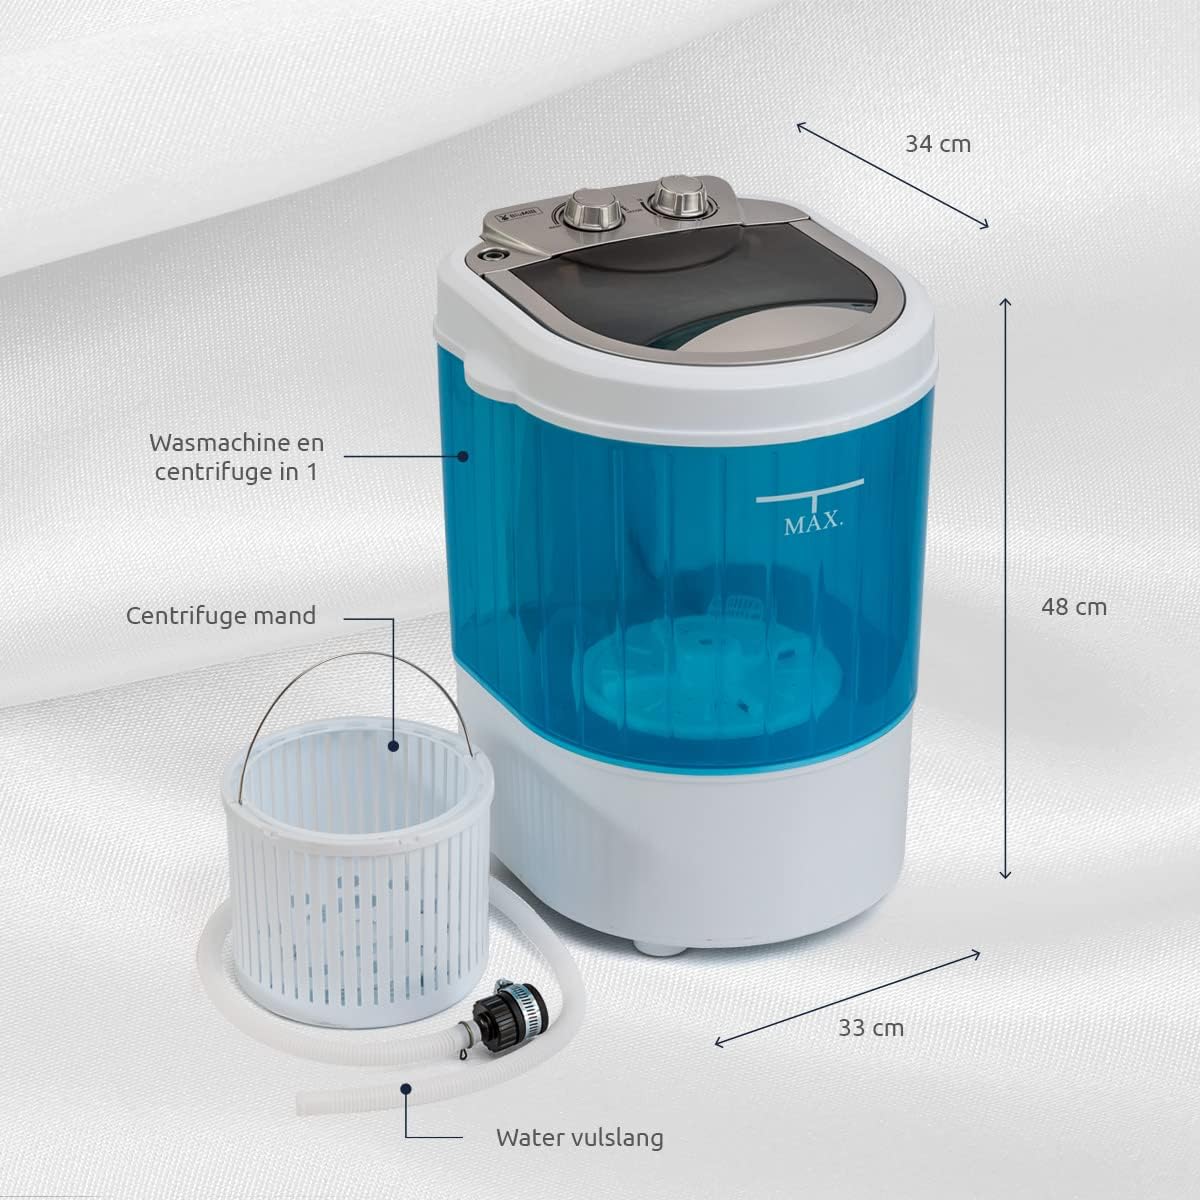
Figure 4: Machine dimensions and illustration of the water fill hose connection.
5. Operating Instructions
5.1 Washing Cycle
- Load Laundry: Open the lid and place up to 3 kg of dry laundry into the washing tub. Do not overload the machine.
- Add Water: Pour water into the tub until the water level reaches the 'MAX' mark, or until the laundry is fully submerged. Use warm or cold water as appropriate for your garments.
- Add Detergent: Add a suitable amount of laundry detergent directly into the tub with the water and clothes.
- Select Wash: Turn the Wash/Spin selector knob to the 'WASH' position.
- Set Timer: Turn the Timer knob to set the desired wash duration, typically 15 minutes for a full cycle. The machine will start automatically.
- Drain Water: Once the wash cycle is complete (the machine will automatically stop), position the drain hose to empty the dirty water.
- Rinse (Optional): For rinsing, you can refill the tub with clean water and run a short wash cycle (e.g., 5 minutes) without detergent, then drain. Repeat if necessary.

Figure 5: The washing tub (left) for up to 3 kg of laundry and the spin basket (right) for up to 2 kg.
5.2 Spin Cycle
- Transfer Laundry: After washing and draining, transfer the laundry from the wash tub to the spin basket. Ensure the laundry is evenly distributed in the spin basket to prevent imbalance. The spin basket has a capacity of 2 kg.
- Secure Lid: Close the lid of the spin basket and the main lid of the machine.
- Select Spin: Turn the Wash/Spin selector knob to the 'SPIN' position.
- Set Timer: Turn the Timer knob to set the spin duration, typically 5 minutes. The machine will start automatically.
- Remove Laundry: Once the spin cycle is complete, carefully remove the spun laundry.
6. Maintenance
Regular cleaning and maintenance will ensure the longevity and optimal performance of your washing machine.
6.1 Cleaning the Exterior
- Wipe the exterior of the machine with a soft, damp cloth.
- Do not use abrasive cleaners, solvents, or harsh chemicals, as these can damage the surface.
6.2 Cleaning the Interior Tub
- After each use, ensure all water is drained from the tub.
- Wipe the inside of the tub with a clean cloth to remove any detergent residue or lint.
- Occasionally, you may run a short wash cycle with just water to clean the tub thoroughly.
6.3 Storage
- If storing the machine for an extended period, ensure it is completely dry inside and out.
- Store in a cool, dry place, away from direct sunlight and extreme temperatures.
7. Troubleshooting
If you encounter any issues with your BluMill Mini Washing Machine, refer to the following table for potential solutions. If the problem persists, contact customer support.
| Problem | Possible Cause | Solution |
|---|---|---|
| Machine does not start | No power supply Timer not set | Check if the power cord is securely plugged in. Ensure the Timer knob is set to a duration. |
| Water does not drain | Drain hose kinked or blocked Drain hose positioned too high | Check the drain hose for kinks or obstructions. Ensure the drain hose is positioned lower than the machine for gravity drainage. |
| Excessive vibration/noise during spin | Uneven laundry load Machine not on a level surface | Redistribute laundry evenly in the spin basket. Ensure the machine is placed on a stable, level surface. |
| Water leaks | Hose connections loose Overfilling the tub | Check all hose connections for tightness. Do not fill water above the 'MAX' level. |
8. Specifications
Technical details for the BluMill Mini Top-Load Washing Machine with Spin Dryer.
| Parameter | Value |
|---|---|
| Brand | BluMill |
| Model Identifier | V07072 |
| Dimensions (L x W x H) | 34.01 x 32.99 x 48.01 cm |
| Weight | 5 Kilograms |
| Energy Efficiency Class | B |
| Washing Capacity | 3 Kilograms |
| Spin Capacity | 2 Kilograms |
| Voltage | 110 Volts |
| Load Type | Top-Load |
| Controls Type | Push-button (Rotary Knobs) |
| Cycle Options | Normal Wash, Spin |
| Max Wash Time | 15 minutes |
| Max Spin Time | 5 minutes |

Figure 6: Official Product Information Sheet with detailed specifications.

Figure 7: Energy Label indicating Class B energy efficiency.
9. Warranty and Support
For warranty information and customer support, please refer to the documentation provided at the time of purchase or contact your retailer. Keep your proof of purchase for any warranty claims.

