Introduction
This user manual provides comprehensive instructions for the installation, operation, and maintenance of your wansview W9 Outdoor Security Camera. Please read this manual carefully before using the product to ensure proper functionality and safety. Keep this manual for future reference.
What's in the Box
Verify that all components are present in the package:
- wansview W9 Outdoor Security Camera
- 5dBi WiFi Antenna
- USB Power Supply
- Mounting Bracket Set
Product Overview
Familiarize yourself with the key components of your wansview W9 camera.

Figure 1: wansview W9 Outdoor Security Camera and Live View on Smartphone.
This image shows the wansview W9 outdoor security camera mounted on a wall, alongside a smartphone displaying a live feed from the camera. The camera is white with a black lens area, and the phone screen shows a dog in a grassy yard, illustrating the live monitoring capability.
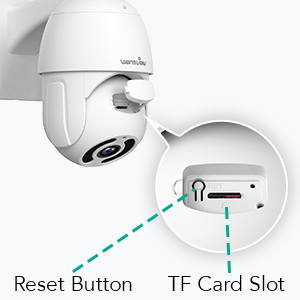
Figure 2: Reset Button and TF Card Slot Location.
This diagram highlights the location of the reset button and the TF (microSD) card slot on the wansview W9 camera, essential for initial setup and local storage.
Setup Guide
1. Powering On the Camera
Connect the USB power supply to the camera and plug it into a power outlet. The camera will power on and initiate its self-test sequence.
2. App Installation
Download the "Wansview Cloud" app from your smartphone's app store (available on iOS and Android). Register for a new account or log in if you already have one.
3. Network Connection
The wansview W9 camera supports both Wi-Fi (2.4GHz only) and Ethernet connections.
Wi-Fi Connection:
- Open the Wansview Cloud app and tap the "+" icon to add a new device.
- Select your camera model (W9) and follow the on-screen instructions.
- Ensure your phone is connected to a 2.4GHz Wi-Fi network. The camera does not support 5GHz Wi-Fi.
- Scan the QR code displayed on your phone with the camera lens.
- Wait for the camera to connect to your Wi-Fi network.

Figure 3: Wi-Fi Compatibility (2.4GHz only).
This image illustrates the wansview W9 camera with its upgraded 5dBi antenna, emphasizing its compatibility with 2.4GHz Wi-Fi networks for extended signal range and faster connection speeds. It explicitly shows that 5GHz Wi-Fi is not supported.
Ethernet Connection:
- Connect an Ethernet cable from your router to the RJ45 port on the camera.
- The camera will automatically connect to the network.
- Follow the app instructions to add the camera to your account.
4. Mounting the Camera
The wansview W9 camera is designed for wall mounting and outdoor use (IP65 waterproof).
- Choose a suitable location for installation, ensuring a clear view and stable mounting surface.
- Use the provided mounting bracket set to securely attach the camera to the wall.
- Adjust the camera's angle as needed after mounting.
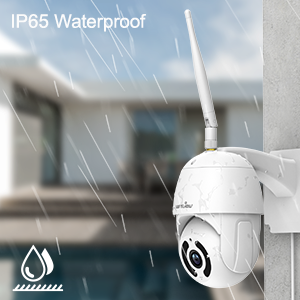
Figure 4: IP65 Waterproof Feature.
This image depicts the wansview W9 camera outdoors with rain falling on it, visually confirming its IP65 waterproof rating, making it suitable for various weather conditions.
Operating Instructions
1. Pan-Tilt Control
The camera features a 350° horizontal pan and 90° vertical tilt range, allowing you to monitor a wide area.
- In the Wansview Cloud app, access the live view of your camera.
- Use the directional controls on the screen to remotely adjust the camera's pan and tilt angles.

Figure 5: 2K FHD PTZ Coverage.
This image demonstrates the wansview W9 camera's 2K FHD resolution and its Pan-Tilt-Zoom (PTZ) capabilities, showing a 350° pan and 95° tilt range for comprehensive area coverage, with a house in the background to illustrate its outdoor application.
2. Night Vision
The camera is equipped with 12pcs 850nm infrared LED lights, providing clear night vision up to 50 feet.
- The camera automatically switches to night vision mode in low-light conditions.
- You can view the night vision feed in real-time through the Wansview Cloud app.

Figure 6: Excellent Night Vision Capability.
This image presents a split view comparing the daytime and night vision performance of the wansview W9 camera. The night vision segment clearly shows objects up to 50 feet away in darkness, highlighting the camera's effective infrared capabilities.
3. Two-Way Audio
Communicate with visitors or deter intruders using the built-in microphone and speaker.
- From the live view in the Wansview Cloud app, tap the microphone icon to speak.
- Tap the speaker icon to listen to audio from the camera's location.

Figure 7: Two-Way Audio in Action.
This image illustrates the two-way audio feature of the wansview W9 camera, showing a person communicating with a delivery driver through the camera via a smartphone app. Speech bubbles indicate the conversation, demonstrating real-time interaction.

Figure 8: Deterring Intruders with Two-Way Audio.
This image shows the wansview W9 camera being used to deter an intruder. Speech bubbles indicate a command from the camera ("Move away from my house") and the intruder's response ("arrgg, no, I'm off"), demonstrating the camera's ability to act as a deterrent.
4. Motion Detection and Alerts
The camera uses motion sensors to detect activity and sends instant alerts to your phone.
- Customize sensor sensitivity and detection areas within the Wansview Cloud app.
- Receive 10-second video alerts when motion is detected.

Figure 9: Instant Detection and Alerts.
This image shows a smartphone displaying a "Motion alarm" notification from the Wansview Cloud app, indicating that the wansview W9 camera has detected activity and sent an immediate alert to the user's phone.
5. Storage Options (SD Card & Cloud)
The wansview W9 camera offers flexible storage solutions for recorded footage.
- SD Card Storage: Supports up to 128GB microSD cards. Insert the card into the TF card slot (refer to Figure 2). Recorded video and images can be stored locally for preview.
- Cloud Storage: Subscribe to the paid Cloud service via the Wansview Cloud app to save and upload videos securely to the cloud. This provides an additional layer of security against camera theft or damage.

Figure 10: Dual Storage Choices.
This image highlights the dual storage options for the wansview W9 camera: secure TF (microSD) card storage and encrypted cloud storage, providing users with flexible ways to back up recorded footage.
6. Alexa Integration
Control your wansview W9 camera and view live feeds using Amazon Alexa.
- Enable the Wansview skill in the Alexa app.
- Link your Wansview Cloud account with Alexa.
- Use voice commands such as "Alexa, show me the [camera name]" to display the live video on compatible Alexa devices (e.g., Echo Show).
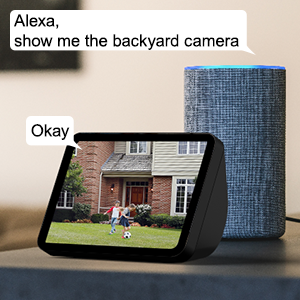
Figure 11: Alexa Integration.
This image shows an Amazon Echo Show displaying a live video feed from a wansview camera, with speech bubbles indicating a user's voice command ("Alexa, show me the backyard camera") and Alexa's response ("Okay"), demonstrating seamless integration with Alexa for voice control.
7. Multiple Family Members Sharing
Share access to your camera's live feed with up to 4 users simultaneously.
- Generate an invitation link within the Wansview Cloud app.
- Share the link with family members to grant them access.
Maintenance
- Cleaning: Gently wipe the camera lens and body with a soft, dry cloth. Do not use harsh chemicals or abrasive cleaners.
- Firmware Updates: Regularly check for and install firmware updates via the Wansview Cloud app to ensure optimal performance and security.
- Power Supply: Ensure the power supply is securely connected and free from damage.
- Network Connection: Verify a stable Wi-Fi or Ethernet connection for uninterrupted monitoring.
Troubleshooting
| Problem | Possible Cause | Solution |
|---|---|---|
| Camera offline | No power; Wi-Fi signal weak/disconnected; Router issue. | Check power connection; Move camera closer to router or use Ethernet; Restart router. |
| Cannot connect to Wi-Fi | Incorrect Wi-Fi password; Connecting to 5GHz network; Too far from router. | Double-check password; Ensure connection to 2.4GHz Wi-Fi; Relocate camera or router. |
| Motion alerts not received | Motion detection disabled; App notifications off; Sensitivity too low. | Enable motion detection in app; Check phone notification settings; Adjust sensitivity. |
| Poor night vision quality | Obstruction in front of lens; Infrared LEDs blocked. | Clear any obstructions; Ensure lens is clean. |
| Two-way audio issues | Microphone/speaker blocked; App permissions. | Ensure clear path for audio; Check app permissions for microphone. |
Specifications
| Model Number | W9-W |
| Video Capture Resolution | 1080p (2K HD) |
| Pan/Tilt Range | 350° Pan, 90° Tilt |
| Connectivity Technology | Wireless (Wi-Fi 2.4GHz), Ethernet |
| Wireless Communication Technology | Wi-Fi |
| Power Source | Corded Electric |
| Night Vision Range | 50 Feet |
| International Protection Rating | IP65 (Waterproof) |
| Storage Options | SD Card (up to 128GB), Cloud Storage |
| Audio | 2-Way Audio (Built-in Microphone & Speaker) |
| Compatible Devices | Smartphone (iOS, Android), Alexa Echo Show |
| Mounting Type | Wall Mount |
| Dimensions (L x W x H) | 6.3 x 6.1 x 3.94 inches |
| Item Weight | 1.6 Pounds |
Warranty and Support
For warranty information and technical support, please refer to the wansview official website or contact their customer service directly. Details are typically available on the product packaging or the wansview brand store on Amazon.
Visit the wansview Store for more information.


