
M SANMERSEN 1405B
M SANMERSEN 49-Key Kids Piano Keyboard Instruction Manual
Model: 1405B
1. Introduction
Thank you for choosing the M SANMERSEN 49-Key Kids Piano Keyboard. This electronic musical instrument is designed to provide an engaging and educational experience for young beginners. It features 49 keys, a microphone, headphones, and various musical functions to encourage exploration and learning. Please read this manual thoroughly before use to ensure proper operation and maintenance.

Image 1: The M SANMERSEN 49-Key Kids Piano Keyboard, featuring its pink design, microphone, and included headphones.
2. Package Contents
Please check the package to ensure all items are present:
- M SANMERSEN 49-Key Kids Piano Keyboard
- Microphone with stand
- Headphones
- Audio Cable (for MP3/phone connection)
- Instruction Manual (this document)
3. Product Overview
Familiarize yourself with the various parts and controls of your piano keyboard.

Image 2: Detailed diagram showing the location of the earphone jack, mic jack, MP3 jack, volume controls, tempo controls, guide buttons, demo buttons, drum group, percussion group, rhythm group, instrument group, record, replay, stop, LED button, and mic stand hole.
- Earphone Jack: For connecting headphones.
- Mic Jack: For connecting the microphone.
- MP3 Jack: For connecting external audio devices (e.g., MP3 player, smartphone).
- Volume +/-: Adjusts the overall sound volume.
- Tempo +/-: Adjusts the speed of rhythms and demos.
- Guide Buttons: Activate guided play modes.
- Demo Buttons: Play pre-recorded demonstration songs.
- Drum Group: Buttons for various drum sounds.
- Percussion Group: Buttons for additional percussion sounds.
- Rhythm Group: Buttons for different musical rhythms (e.g., Slow Rock, Blues, Rumba, Tango, Samba, Country, Waltz, Disco).
- Instrument Group: Buttons for various instrument tones (e.g., Piano, Guitar, Violin, Organ, Trumpet, Music Box, Accordion, Mandolin).
- Record: Initiates recording of played notes.
- Replay: Plays back recorded notes.
- Stop: Stops current playback or recording.
- LED Button: Toggles the flashing LED lights on/off.
- Mic Stand Hole: For attaching the microphone stand.
4. Setup
4.1 Power Supply
The piano keyboard requires 4 AA batteries (not included) for operation. Locate the battery compartment on the underside of the keyboard, open it, insert the batteries according to the polarity markings, and close the compartment securely.
4.2 Connecting Accessories
- Microphone: Insert the microphone plug into the 'Mic Jack'. If using the stand, attach the microphone to the stand and then insert the stand into the 'Mic Stand Hole'.
- Headphones: Insert the headphone plug into the 'Earphone Jack'.
- External Audio Device (MP3/Phone): Use the provided audio cable to connect your MP3 player or smartphone to the 'MP3 Jack' on the keyboard. This allows you to play music through the keyboard's speakers.
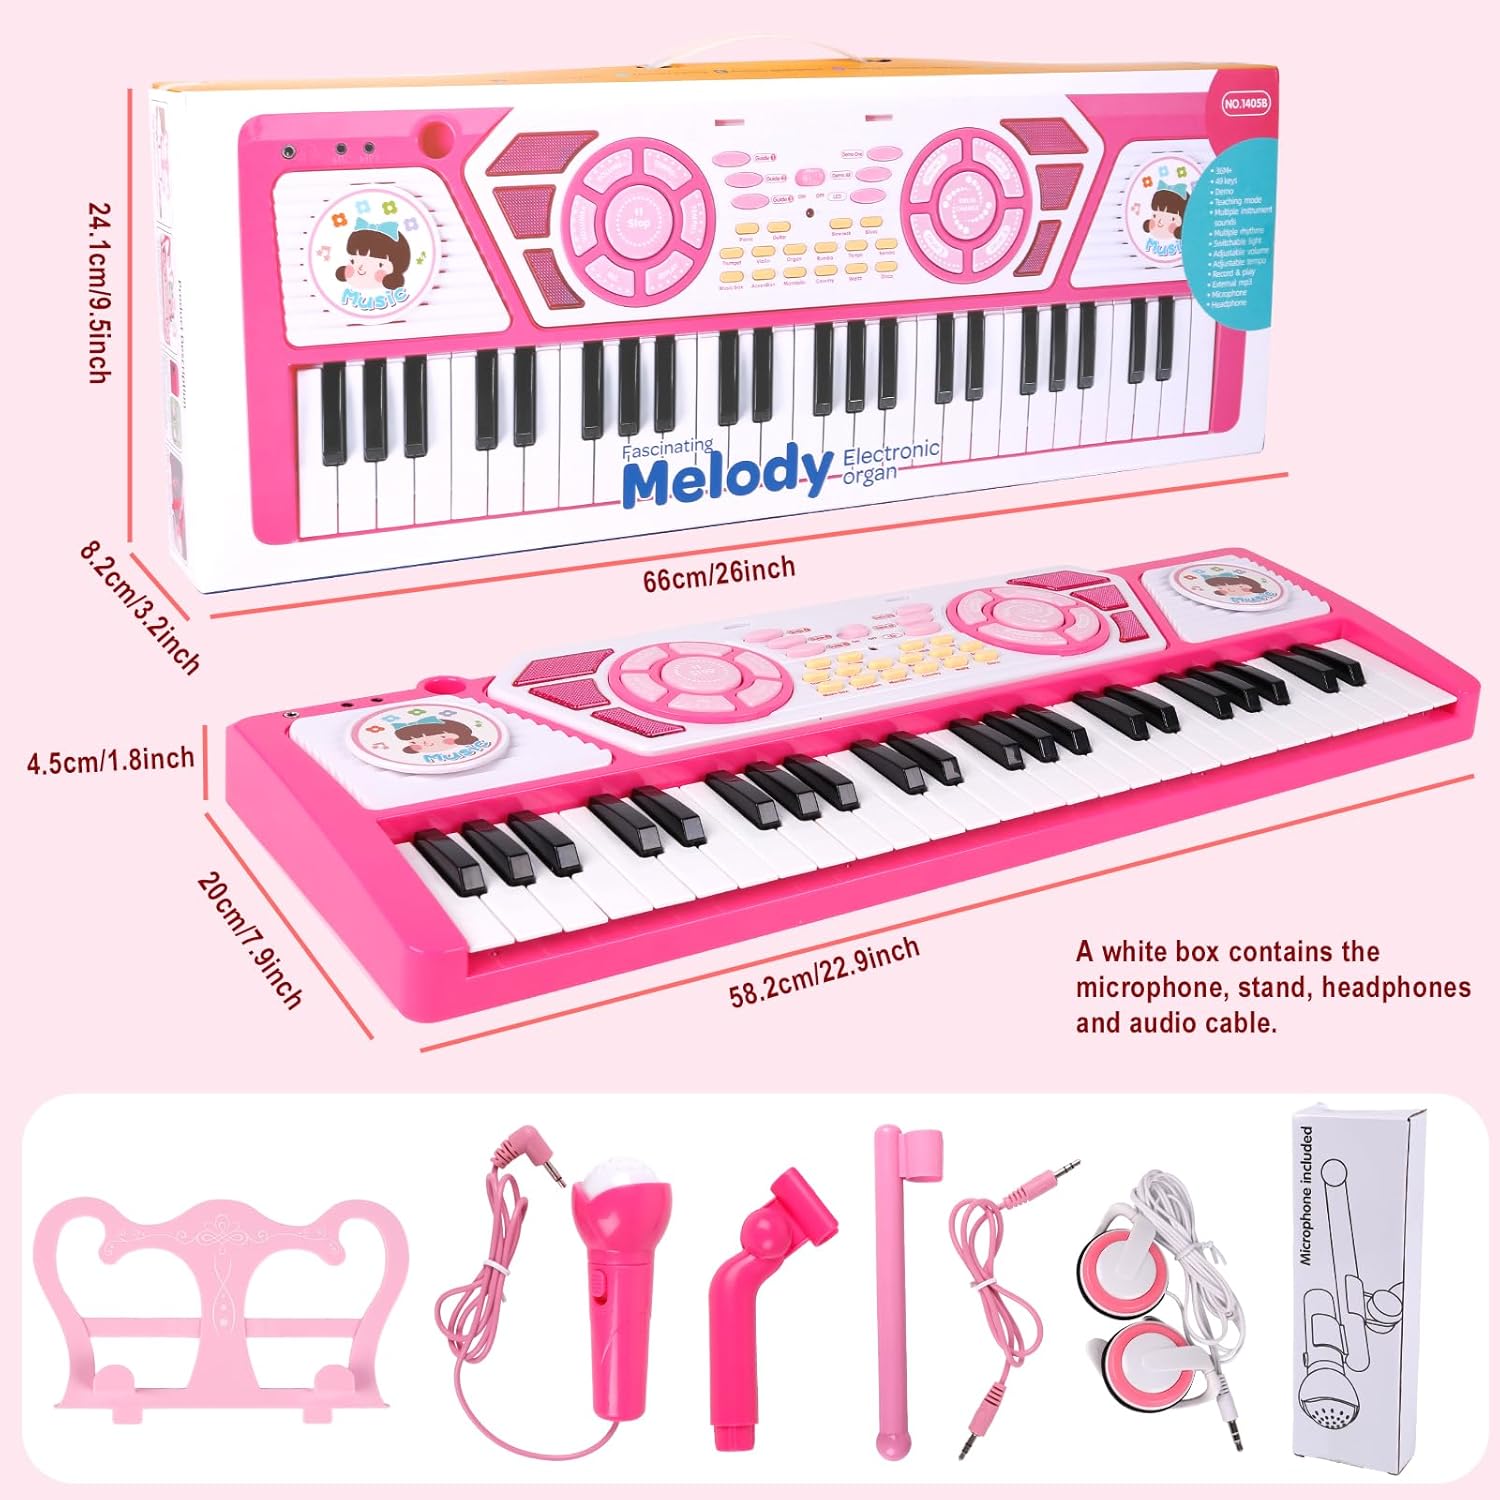
Image 3: A child demonstrating the use of headphones with the piano keyboard, highlighting the earphone function for private listening.
5. Operating Instructions
5.1 Power On/Off
Press the Switch button to turn the keyboard on or off. A musical melody will play upon startup.
5.2 Adjusting Volume and Tempo
Use the Volume + and Volume - buttons to increase or decrease the overall sound output. Use the Tempo + and Tempo - buttons to adjust the speed of rhythms and demo songs.
5.3 Playing the Keyboard
Press the keys to play musical notes. The keys are designed to be similar in size to a standard piano for easier playability.
5.4 Changing Instrument Tones
Select a desired instrument sound by pressing one of the buttons in the Instrument Group (e.g., Piano, Guitar, Violin, Organ, Trumpet, Music Box, Accordion, Mandolin).
5.5 Using Rhythms and Percussion
Press a button in the Rhythm Group to add a background rhythm to your playing. Use the Drum Group and Percussion Group buttons to add individual drum and percussion sounds.
5.6 Demonstration Songs
Press the Demo buttons to listen to pre-programmed demonstration songs. There are 22 demos available.
5.7 Guided Play
Activate the guided play mode by pressing a Guide button. The keyboard will illuminate keys to indicate which notes to play, assisting beginners in learning melodies.
5.8 Recording and Playback
- To Record: Press the Record button. Play your desired notes on the keyboard.
- To Replay: Press the Replay button to listen to your recorded performance.
- To Stop: Press the Stop button to end recording or playback.
5.9 Microphone Use
When the microphone is connected, you can sing along while playing the keyboard or listening to music from an external device. The microphone features an adjustable angle and can also be held by hand.

Image 4: A close-up view of the adjustable microphone, demonstrating its flexibility for different user preferences.
5.10 LED Lights
The keyboard features flashing LED lights. Press the LED button to toggle these lights on or off.
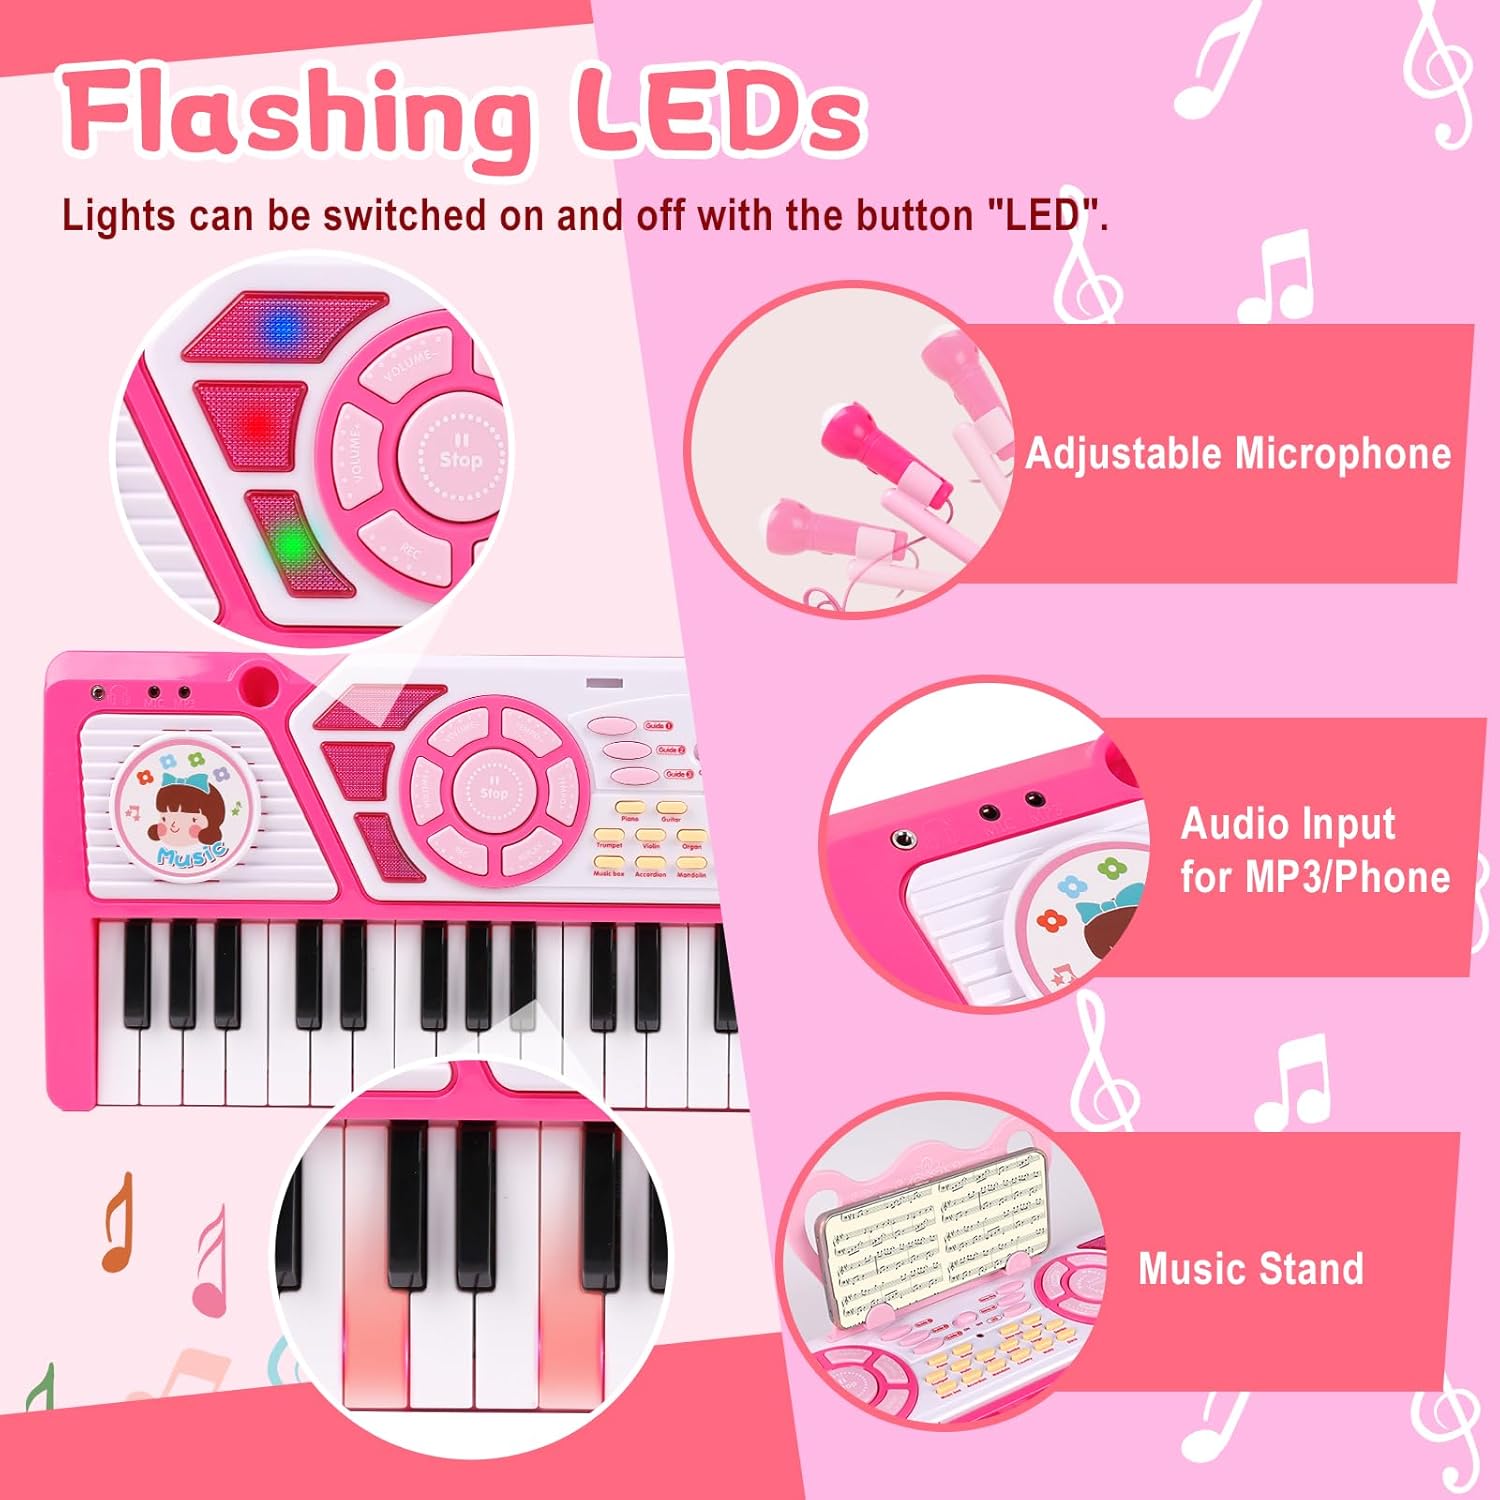
Image 5: A detailed view of the keyboard's control panel and keys, illustrating the flashing LED lights feature.
5.11 Music Stand
The included music stand can be attached to the keyboard to hold sheet music or a tablet, facilitating easy practice and learning.

Image 6: The music stand positioned on the keyboard, designed to hold sheet music for convenient viewing during play.
6. Maintenance
- Cleaning: Wipe the keyboard surface with a soft, dry cloth. Do not use abrasive cleaners or solvents.
- Storage: Store the keyboard in a cool, dry place away from direct sunlight and extreme temperatures.
- Battery Care: Remove batteries if the keyboard will not be used for an extended period to prevent leakage.
- Handling: Handle the keyboard with care to avoid dropping or impacting it, which could damage internal components.
7. Troubleshooting
| Problem | Possible Cause | Solution |
|---|---|---|
| Keyboard does not power on. | Batteries are low or incorrectly inserted. | Replace with fresh AA batteries, ensuring correct polarity. |
| No sound from speakers. | Volume is too low; headphones are connected. | Increase volume using Volume +. Disconnect headphones if sound is desired from speakers. |
| Microphone not working. | Microphone not properly connected. | Ensure microphone is securely plugged into the 'Mic Jack'. |
| Lights are not flashing. | LED function is turned off. | Press the LED button to turn the lights on. |
| Distorted sound or static. | Low batteries; interference. | Replace batteries. Move keyboard away from other electronic devices. |
8. Specifications
| Feature | Detail |
|---|---|
| Model Number | 1405B |
| Number of Keys | 49 |
| Power Source | 4 x AA Batteries (not included) |
| Recommended Age | 3 years and up |
| Item Weight | 3.74 pounds |
| Package Dimensions | 26 x 9.5 x 4 inches |
| Key Size (approx.) | 3.11 x 0.67 inches (closer to standard piano key size) |

Image 7: Visual representation of the keyboard's dimensions, including length, width, and height, for reference.
9. Safety Information
- This product is intended for children aged 3 years and up. Adult supervision is recommended.
- Do not expose the keyboard to water or moisture.
- Do not attempt to disassemble or modify the product.
- Keep small parts, such as batteries, out of reach of young children to prevent choking hazards.
- Dispose of used batteries responsibly according to local regulations.
- Ensure the microphone cable and headphone cable do not pose a strangulation risk.
10. Warranty and Support
For product support, technical assistance, or inquiries regarding potential protection plans, please refer to the retailer's customer service or the M SANMERSEN brand's official support channels. Information regarding optional protection plans may be available at the point of purchase.
Ask a question about this manual
Ask about setup, troubleshooting, compatibility, parts, safety, or missing instructions. Manuals+ will review the question and use this page’s manual context to help answer it.