
1. Introduction
This manual provides detailed instructions for assembling your Metal Earth Fascinations Premium Series Space Shuttle Launch Kit. This 3D metal model kit is designed for hobbyists aged 14 and up. No glue or solder is required for assembly, as parts connect using a tab-and-slot system.
2. Safety Information
Warning: This kit contains small parts and sharp edges. Exercise caution during assembly, especially when handling components. Not suitable for young children due to potential choking hazards and sharp metal edges.
3. What's in the Box
Your Metal Earth Space Shuttle Launch Kit includes the following components:
- Three (3) metal sheets with pre-etched parts
- One (1) set of illustrated instructions
- One (1) pair of tweezers

Image: Metal sheets containing the model parts and the fully assembled Space Shuttle Launch Kit.

Image: The complete Metal Earth Space Shuttle Launch Kit model, ready for display.
4. Assembly Instructions
Follow these steps carefully to assemble your Space Shuttle Launch Kit. Patience and precision are key for the best results. Refer to the included illustrated instructions for detailed diagrams.
4.1. Recommended Tools
While tweezers are included, additional tools can greatly assist in assembly:
- Clippers: For detaching parts cleanly from the metal sheets.
- Needle-nose pliers: For precise bending and twisting of connection tabs.
- Tweezers: For handling small parts and fine manipulation (included).
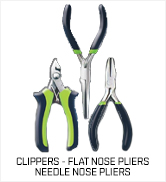
Image: A set of recommended tools for model assembly, including clippers, flat-nose pliers, and needle-nose pliers.
4.2. Step-by-Step Guide
- Prepare Parts: Carefully clip each part from the metal sheets. Use clippers to ensure clean breaks and avoid bending the parts. Do not tear parts from the sheets.
- Bend and Fold: Refer to the illustrated instructions for specific bending and folding requirements for each piece. Some parts may require gentle curves. Use appropriate tools for smooth, even bends.
- Connect Tabs and Holes: Align the tabs on one piece with the corresponding holes on another. Ensure a snug fit before securing.
- Twist Tabs: Once aligned, twist the tabs to secure the connection. Use tweezers for precise twisting to avoid damaging the metal.
- Continue Assembly: Follow the numbered steps in the provided instructions to complete the model section by section. Work methodically and take breaks if needed.

Image: A close-up of tweezers being used to carefully clip a small metal part from its sheet.

Image: A metal piece being carefully bent to form a curved section of the model.

Image: A close-up demonstrating how a tab is inserted into a corresponding slot for connection.

Image: A metal tab being twisted to firmly secure two model pieces together.
5. Operating Instructions
This Metal Earth model is a static display item and does not require any operational procedures. Once assembled, it is ready for display.
6. Maintenance
To maintain the appearance of your model, gently dust it with a soft, dry cloth as needed. Avoid using liquids, abrasive cleaners, or harsh chemicals, as these may damage the finish or material.
7. Troubleshooting
If you encounter difficulties during assembly, consider the following:
- Parts not fitting: Ensure you are using the correct parts for the current step. Double-check the part numbers against the illustrated instructions.
- Tabs breaking: Apply gentle, even pressure when bending and twisting tabs. Avoid excessive force, which can weaken or break the metal.
- Difficulty with small parts: Utilize the included tweezers or other fine-tipped tools for better control and precision.
- Model unstable: Re-examine all connections to ensure that tabs are securely twisted and that all parts are correctly interlocked according to the instructions.
8. Specifications
| Feature | Detail |
|---|---|
| Model Name | Space Shuttle Launch Kit |
| Brand | Metal Earth |
| Material | Steel |
| Assembled Dimensions (L x W x H) | 4.13 x 3.54 x 6.70 inches |
| Scale | 1:342 |
| Number of Pieces | 92 |
| Difficulty Level | Moderate |
| Recommended Age | 14+ (Adult) |
| Included Tools | Tweezers |
9. Warranty and Support
For information regarding product warranty or customer support, please refer to the manufacturer's official website, Fascinations Metal Earth, or contact their customer service directly. Specific warranty details are not provided within this instruction manual.