
Crown CT33100
Crown CT33100 Digital Inverter Welding Machine User Manual
Model: CT33100
1. Introduction
This manual provides essential information for the safe and effective operation, setup, maintenance, and troubleshooting of your Crown CT33100 Digital Inverter Welding Machine. Please read this manual thoroughly before using the machine to ensure proper handling and to prevent injury or damage.
Important Safety Information
Always observe basic safety precautions to reduce the risk of fire, electric shock, and personal injury. Keep this manual for future reference.
- Ensure the work area is well-ventilated and free from flammable materials.
- Wear appropriate personal protective equipment (PPE), including welding helmet, gloves, and protective clothing.
- Do not operate the machine in damp or wet conditions.
- Disconnect power before performing any maintenance or adjustments.
2. Components Overview
Familiarize yourself with the main parts of your Crown CT33100 welding machine.

Figure 2.1: Overall view of the Crown CT33100 Digital Inverter Welding Machine, showing its compact design and integrated handle.

Figure 2.2: Front panel of the welding machine, featuring the current adjustment knob (30-250A scale, actual range 30-200A) and the positive (+) and negative (-) output terminals for connecting welding cables.

Figure 2.3: Rear panel of the welding machine, showing the main power switch (ON/OFF), AC 220V power input, and the cooling fan for heat dissipation.
Key Components:
- Current Adjustment Knob: Used to set the welding current (Amperage).
- Output Terminals: Connect the electrode holder and ground clamp cables.
- Power Switch: Turns the machine ON or OFF.
- Cooling Fan: Ensures proper ventilation and prevents overheating.
- Carry Handle: For portability.
3. Setup Instructions
Follow these steps to prepare your welding machine for operation.
- Unpacking: Carefully remove the welding machine and all accessories from its packaging. Inspect for any shipping damage.
- Placement: Place the machine on a stable, level surface, ensuring adequate clearance around the cooling fan and vents for proper airflow.
- Power Connection: Connect the power cord to a suitable electrical outlet. The machine operates on a rated input voltage of 160-265 Volt. Ensure your power supply matches this requirement.
- Connect Welding Cables:
- Connect the electrode holder cable to the positive (+) output terminal.
- Connect the ground clamp cable to the negative (-) output terminal.
- Ensure all connections are tight and secure.
- Attach Ground Clamp: Securely attach the ground clamp to the workpiece or a metal workbench that is in direct contact with the workpiece. A good ground connection is crucial for stable arc and safe operation.
- Insert Electrode: Insert the appropriate welding electrode into the electrode holder. The machine supports electrode diameters from 2.4 mm to 4 mm.
4. Operating Instructions
This section outlines the basic steps for operating your welding machine.
- Power On: Turn the main power switch on the rear panel to the 'ON' position. The machine's indicator light should illuminate.
- Set Welding Current: Adjust the current adjustment knob on the front panel to the desired amperage. The current adjustment range is 30-200 A. The optimal setting depends on the electrode type, diameter, and material thickness. Refer to electrode manufacturer guidelines for recommended settings.
- Begin Welding:
- Put on all necessary PPE, including your welding helmet.
- Strike an arc by lightly scratching the electrode against the workpiece.
- Once the arc is established, maintain a consistent arc length and travel speed to create a uniform weld bead.
- Monitor Performance: Pay attention to the sound of the arc and the appearance of the weld puddle. Adjust current as needed for optimal results.
- Power Off: After completing your welding task, turn the main power switch to the 'OFF' position. Allow the machine to cool down before storing.
Operational Safety Precautions:
- Never touch live electrical parts or electrodes with bare hands or wet gloves.
- Avoid looking at the welding arc without proper eye protection.
- Ensure proper ventilation to disperse welding fumes.
5. Maintenance
Regular maintenance ensures the longevity and safe operation of your welding machine.
- Cleaning: Periodically clean the machine's exterior, especially the cooling vents, to prevent dust and debris buildup. Use compressed air to gently clear internal components if necessary, ensuring the machine is unplugged.
- Cable Inspection: Regularly inspect welding cables, electrode holder, and ground clamp for damage, frayed wires, or loose connections. Replace damaged components immediately.
- Storage: Store the welding machine in a clean, dry environment, away from moisture and extreme temperatures.
- Professional Service: For internal repairs or complex issues, contact qualified service personnel. Do not attempt to open the machine casing unless you are a trained professional.
6. Troubleshooting
This section addresses common issues you might encounter and their potential solutions.
| Problem | Possible Cause | Solution |
|---|---|---|
| Machine does not power on | No power supply; Power switch off; Faulty power cord | Check power outlet and circuit breaker; Ensure power switch is ON; Inspect power cord for damage. |
| No welding arc | Poor ground connection; Incorrect current setting; Wet electrode; Faulty cables | Ensure ground clamp is securely attached to clean metal; Adjust current; Use dry electrodes; Check cables for damage. |
| Weak or unstable arc | Low current setting; Poor ground; Incorrect electrode size | Increase current; Improve ground connection; Use appropriate electrode for material thickness. |
| Machine overheats (thermal protection activates) | Blocked cooling vents; Excessive duty cycle; High ambient temperature | Clean vents; Allow machine to cool down; Operate within recommended duty cycle. |
7. Specifications
Technical specifications for the Crown CT33100 Digital Inverter Welding Machine.
| Feature | Specification |
|---|---|
| Model | CT33100 |
| Rated Input Voltage | 160-265 Volt |
| Current Adjustment Range | 30-200 A |
| Welding Electrode Diameter | 2.4-4 mm |
| Power Source Type | Corded Electric |
| Item Weight | 209 g |
| Product Dimensions (L x W x H) | 37 x 20 x 10 cm |
| Manufacturer | Egypt |
| Date First Available | 14 February 2021 |
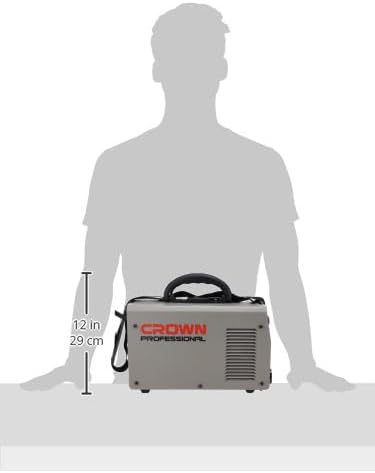
Figure 7.1: Size comparison of the Crown CT33100 welding machine, illustrating its compact form factor relative to a person.
8. Warranty and Support
For warranty information, technical support, or service inquiries regarding your Crown CT33100 Digital Inverter Welding Machine, please contact the retailer or the manufacturer directly. Keep your purchase receipt as proof of purchase.
You can visit the official Crown store for more information: Crown Official Store
Ask a question about this manual
Ask about setup, troubleshooting, compatibility, parts, safety, or missing instructions. Manuals+ will review the question and use this page’s manual context to help answer it.