
1. Important Safety Information
Read these instructions carefully before installing and using the appliance. Keep this manual for future reference. The manufacturer is not responsible for any injuries or damages resulting from incorrect installation or usage.
- This appliance is intended for domestic use only.
- Ensure the appliance is correctly installed by a qualified person.
- Keep children away from the appliance during operation. The surface can become hot.
- Do not store items on the cooking surface.
- Always use appropriate cookware for induction hobs.
- Do not use harsh abrasive cleaners or sharp metal scrapers to clean the hob surface.
- Disconnect the appliance from the power supply before cleaning or maintenance.
2. Product Overview
The AEG IKE42640KB is a 2-burner induction hob designed for efficient and precise cooking. It features touch controls, programmable functions, and a safety lock for enhanced user experience and safety.
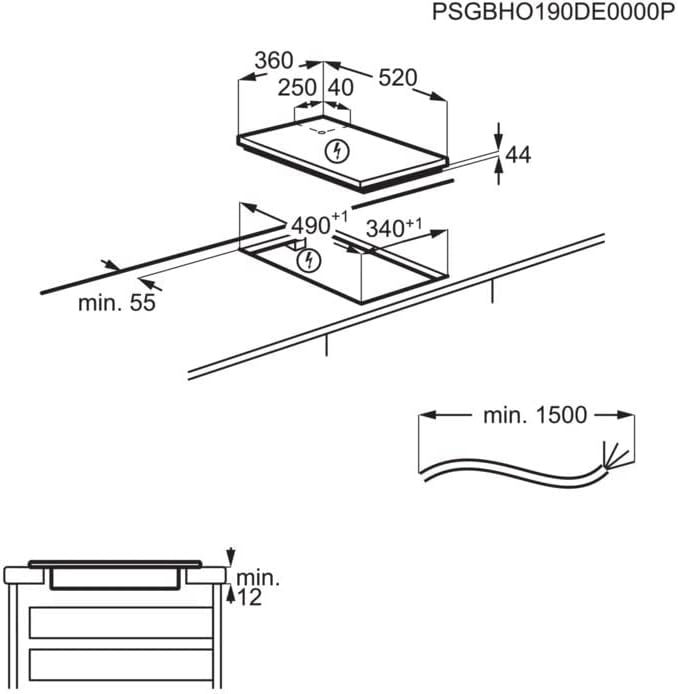
Image: Close-up of the AEG Induction Hob's control panel with a pot on one of the cooking zones. The touch controls for power levels and functions are visible.
Image: Detailed view of the AEG Induction Hob's touch control panel, displaying power levels from 0 to 9, a 'P' for PowerBoost, and a lock icon for the safety lock feature.
3. Installation
The AEG IKE42640KB induction hob is designed for recessed installation. Proper ventilation and clearance are crucial for safe and efficient operation.
3.1. Cut-out Dimensions
Refer to the diagram below for precise cut-out dimensions required for installation into your countertop. Ensure minimum clearances are maintained as specified.
- Minimum depth of countertop: 55 mm.
- Minimum clearance below the hob: 12 mm.
- Power cable length: Minimum 1500 mm.

Image: Technical diagram illustrating the required cut-out dimensions for recessed installation of the AEG Induction Hob. Key measurements include width (520 mm), depth (360 mm), and minimum clearances for ventilation and cable routing.
3.2. Electrical Connection
The electrical connection must be performed by a qualified electrician in accordance with local regulations. Ensure the power supply matches the appliance's specifications (3700 watts).
4. Operating Instructions
The hob is operated using touch controls. Ensure your fingers are clean and dry when interacting with the control panel.
4.1. Turning On/Off
- To turn on: Touch the main power symbol.
- To turn off: Touch the main power symbol again.
4.2. Selecting a Cooking Zone and Setting Power Level
- Place suitable cookware on the desired cooking zone.
- Touch the corresponding cooking zone selection control.
- Use the '+' or '-' symbols to adjust the power level from 1 (low) to 9 (high).
- For rapid heating, select 'P' (PowerBoost) if available for the zone.
4.3. Safety Lock
The safety lock prevents accidental operation of the hob, especially useful to prevent children from turning it on.
- To activate: With the hob off, touch and hold the lock symbol for a few seconds until an indicator light appears.
- To deactivate: Touch and hold the lock symbol again until the indicator light disappears.
4.4. Programmable Features
This hob includes programmable features, such as a timer function. Consult the full manual for detailed instructions on setting and using these features.
5. Cooking Tips
Induction cooking offers fast and precise heat control. Here are some tips for optimal results:
- Cookware: Use pots and pans with a magnetic base. Cast iron, enameled steel, and stainless steel with a magnetic base are suitable. Glass, ceramic, and aluminum without a magnetic base will not work.
- Boiling: Induction heats water very quickly. Use the PowerBoost function for rapid boiling.
- Melting: For delicate tasks like melting chocolate, use a low heat setting (e.g., power level 1 or 2) to prevent burning.

Image: A pot of water rapidly boiling on the AEG Induction Hob, demonstrating the efficient heating capability of induction technology.

Image: Chocolate melting gently in a saucepan on the AEG Induction Hob, illustrating precise temperature control for delicate cooking tasks.
6. Cleaning and Maintenance
Regular cleaning and maintenance will ensure the longevity and optimal performance of your induction hob.
6.1. Daily Cleaning
- Always ensure the hob is cool before cleaning.
- Wipe the surface with a soft cloth and warm soapy water.
- For stubborn stains, use a ceramic hob cleaner.
- Rinse thoroughly and dry with a clean cloth to prevent water marks.

Image: Spilled milk on the black surface of the AEG Induction Hob, with a cleaning cloth nearby, demonstrating the ease of cleaning the smooth surface.
6.2. Avoiding Damage
- Do not use abrasive sponges, scouring pads, or harsh chemical cleaners.
- Avoid dropping heavy or sharp objects on the hob surface.
- Do not drag cookware across the surface, as this can cause scratches.
7. Troubleshooting
Before contacting service, check the following common issues and solutions:
| Problem | Possible Cause | Solution |
|---|---|---|
| Hob does not turn on. | No power supply; Safety lock activated. | Check circuit breaker; Deactivate safety lock. |
| Cooking zone not heating. | Incorrect cookware; Cookware not centered. | Use induction-compatible cookware; Reposition cookware. |
| Display shows an error code. | Specific internal fault. | Refer to the full manual for error code meanings or contact service. |
| Hob turns off unexpectedly. | Overheating; Spill on controls. | Allow to cool; Clean control panel. |
8. Specifications
| Brand | AEG |
| Model Number | IKE42640KB |
| Installation Type | Recessed |
| Number of Heating Elements | 2 |
| Control Type | Touch |
| Wattage | 3700 watts |
| Product Dimensions (L x W x H) | 20.47 x 14.17 x 1.57 inches (52 x 36 x 4 cm) |
| Item Weight | 17.16 pounds (7.78 kg) |
| Special Features | Programmable, Safety Lock |
| Fuel Type | Electric |
| Power Source | Induction |
9. Warranty and Support
For warranty information, technical support, or to schedule service, please refer to the warranty card included with your appliance or visit the official AEG website. Keep your proof of purchase for warranty claims.
Always ensure that any repairs or maintenance not covered in this manual are performed by authorized service personnel.


