
1. Introduction
This user manual provides comprehensive instructions for the installation, operation, and maintenance of your L&S LED Radio Dimmer Set, Model 2000446. Please read this manual carefully before using the product to ensure safe and efficient operation. Keep this manual for future reference.
2. Safety Instructions
- Ensure the power supply is disconnected before installation or maintenance.
- This device is designed for indoor use only.
- Do not expose the device to moisture or extreme temperatures.
- Only use the specified voltage (12V/24V) for operation.
- Installation should be performed by a qualified electrician if you are unsure.
- Keep out of reach of children.
3. Package Contents
Verify that all components are present and undamaged upon unpacking:
- 1x LED Radio Dimmer Receiver
- 1x 4-Channel Remote Control
- 1x User Manual (this document)
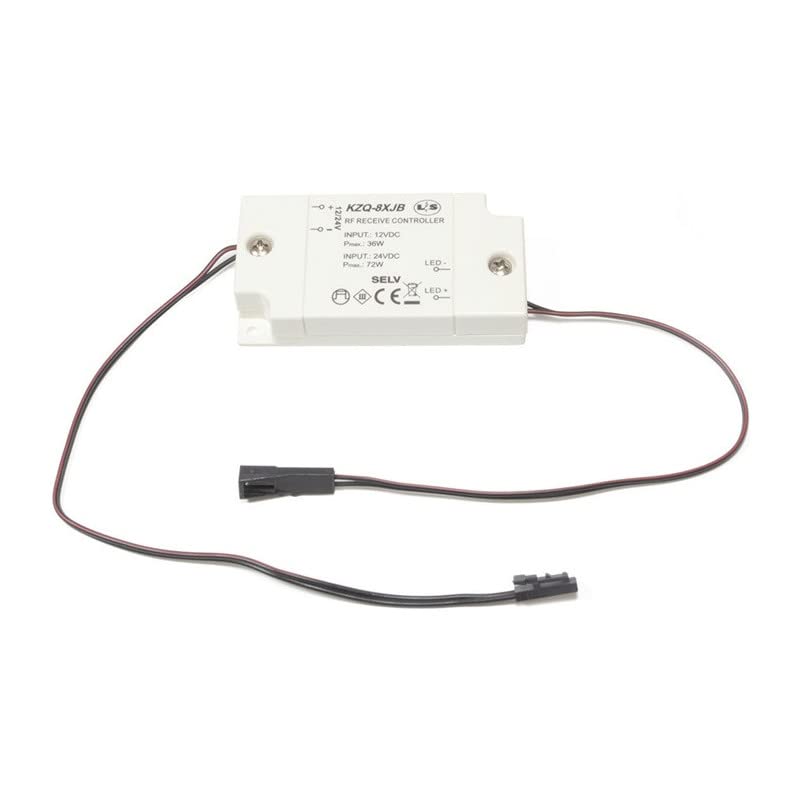
Image 1: L&S LED Radio Dimmer Set components. This image shows the main components of the dimmer set, including the receiver unit and the remote control.
4. Specifications
| Feature | Detail |
|---|---|
| Model Number | 2000446 |
| Brand | L&S |
| Input Voltage | 12V / 24V DC |
| Output Power | 36W (at 12V) / 72W (at 24V) |
| Control Type | Radio Frequency (RF) Remote Control |
| Remote Channels | 4 Channels |
| Item Weight | 200 grams |
5. Setup and Installation
- Prepare Wiring: Ensure the power supply is turned off at the main circuit breaker before beginning installation.
- Connect LED Strip: Connect your 12V or 24V LED strip to the output terminals of the dimmer receiver. Observe polarity (+ and -).
- Connect Power Supply: Connect the appropriate 12V or 24V DC power supply to the input terminals of the dimmer receiver. Again, observe polarity.
- Mount Receiver: Secure the dimmer receiver in a suitable, dry location, away from direct heat or moisture.
- Power On: Once all connections are secure, restore power to the circuit.
- Pair Remote Control: The remote control is typically pre-paired. If not, refer to the "Pairing Remote Control" section.
6. Operating Instructions
6.1 Basic Operation with Remote Control
The 4-channel remote control allows for easy operation of your LED lighting.
- Power On/Off: Press the ON button to turn the lights on, and the OFF button to turn them off.
- Dimming: Use the + and - buttons to increase or decrease the brightness of the connected LED lights.
- Channel Selection: If you have multiple dimmer sets, use the channel buttons (e.g., A, B, C, D) on the remote to select which receiver to control.
6.2 Pairing Remote Control (if necessary)
- Ensure the dimmer receiver is powered on.
- Within 5 seconds of powering on the receiver, press and hold the desired channel button (e.g., A) on the remote control for approximately 3 seconds.
- The connected LED lights will flash once to indicate successful pairing.
- Repeat for other channels if you wish to control multiple receivers with different channels.
7. Maintenance
- Cleaning: Clean the dimmer receiver and remote control with a soft, dry cloth. Do not use abrasive cleaners or solvents.
- Battery Replacement: If the remote control's range decreases or it stops responding, replace its battery (type usually CR2032, check remote for specifics).
- Inspection: Periodically check all wiring connections for tightness and signs of wear or damage.
8. Troubleshooting
| Problem | Possible Cause | Solution |
|---|---|---|
| Lights do not turn on. | No power supply; incorrect wiring; remote battery flat; receiver not paired. | Check power connections; verify wiring polarity; replace remote battery; re-pair remote. |
| Lights do not dim. | Incorrect dimmer type for LED; faulty receiver. | Ensure LEDs are dimmable; contact support if receiver is faulty. |
| Remote control not responding. | Remote battery flat; out of range; interference. | Replace remote battery; move closer to receiver; reduce interference sources. |
9. Warranty and Support
L&S products are designed for reliability and performance. For warranty information or technical support, please refer to the contact details provided with your purchase documentation or visit the official L&S website. Please have your model number (2000446) ready when contacting support.


