
Introduction
The ELECFREAKS microbit Nezha Inventor Kit Planet X is an educational kit designed for use with the BBC micro:bit (micro:bit not included). It combines Planet X sensors with over 400 building bricks, offering a platform for learning programming through various creative projects. The kit features a NeZha Expansion Board with multiple connections for servos, motors, and sensors, and includes a built-in 900mAh lithium battery for portable use.
This manual provides essential information for setting up, operating, and maintaining your Nezha Inventor Kit. For detailed programming tutorials and project ideas, please refer to the official ELECFREAKS Wiki at wiki.elecfreaks.com/en/.
What's Included (Packing List)
The Nezha Inventor Kit includes the following components. Please verify all items are present upon unboxing.
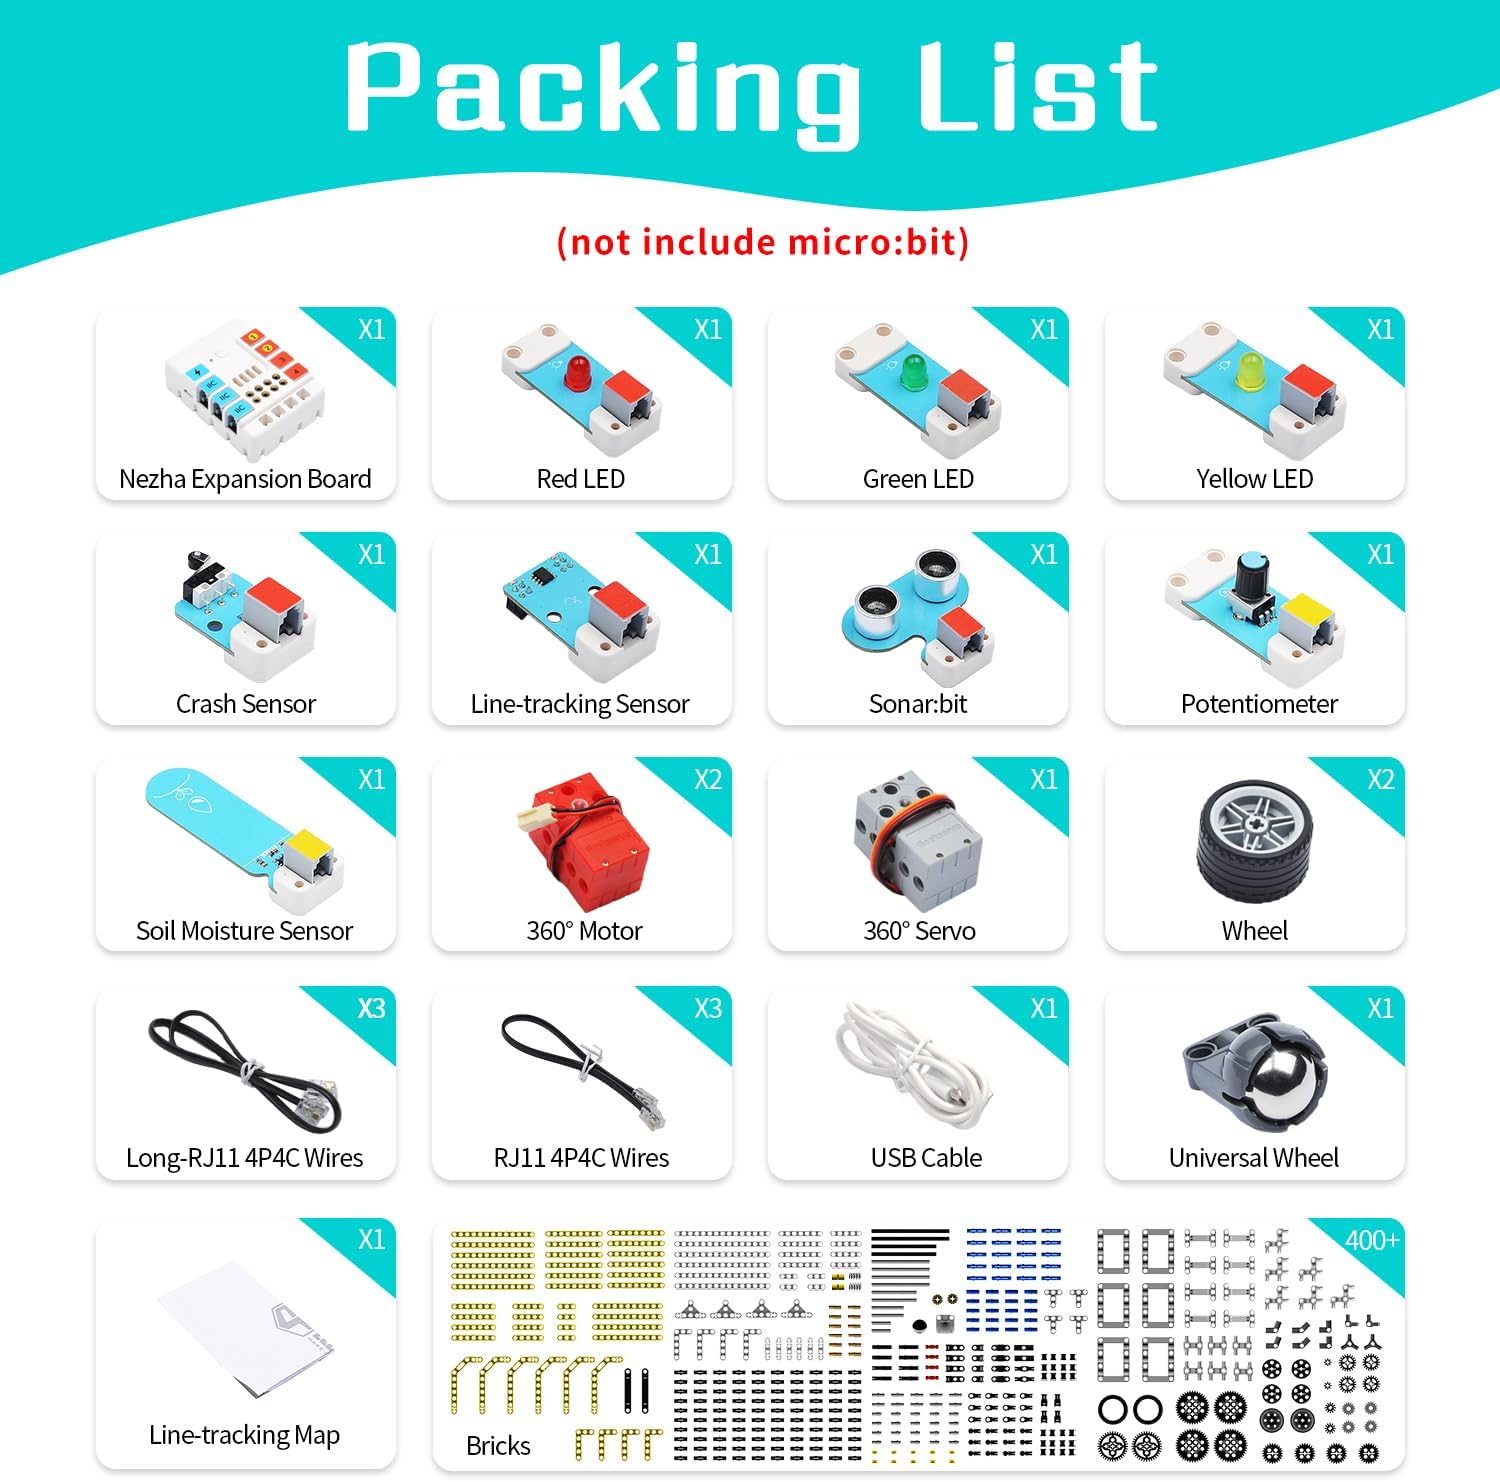
Image: Detailed view of the kit's packing list, showing the Nezha Expansion Board, various Planet X sensors (Red LED, Green LED, Yellow LED, Crash Sensor, Line-tracking Sensor, Sonar.bit, Potentiometer, Soil Moisture Sensor), 360° Motors, 360° Servo, Wheels, RJ11 cables, USB cable, Universal Wheel, Line-tracking Map, and over 400 building bricks.
- Nezha Expansion Board (x1)
- Planet X Sensors: Red LED (x1), Green LED (x1), Yellow LED (x1), Crash Sensor (x1), Line-tracking Sensor (x1), Sonar.bit (x1), Potentiometer (x1), Soil Moisture Sensor (x1)
- 360° Motor (x2)
- 360° Servo (x1)
- Wheel (x2)
- Long RJ11 4P4C Wires (x3)
- RJ11 4P4C Wires (x3)
- USB Cable (x1)
- Universal Wheel (x1)
- Line-tracking Map (x1)
- Building Bricks (400+ pieces)
Note: The micro:bit board is NOT included in this kit and must be purchased separately.
Setup Instructions
1. Understanding the Nezha Expansion Board
The Nezha Expansion Board serves as the central hub for connecting your micro:bit to various sensors and actuators. It features clearly labeled ports for easy assembly.

Image: Close-up of the Nezha Expansion Board, highlighting the IIC ports, digital/analog ports (labeled 1-4), and motor/servo connections (M1-M4, S1-S4).
- IIC Ports: For I2C communication sensors.
- Digital/Analog Ports (1-4): For connecting various Planet X sensors using RJ11 cables. These ports support both digital and analog signals.
- Motor/Servo Connections (M1-M4, S1-S4): For connecting motors and servos.
- Power Input: USB-C port for charging the built-in 900mAh lithium battery and powering the board.
2. Connecting the micro:bit
Insert your micro:bit board into the dedicated slot on the Nezha Expansion Board. Ensure it is securely seated with the gold edge connector fully engaged.

Image: A micro:bit board correctly inserted into the Nezha Expansion Board, ready for use.
3. Connecting Planet X Sensors
Planet X sensors connect to the Nezha Expansion Board using RJ11 cables. The ports are color-coded to simplify connections and correspond to programming blocks.

Image: Demonstrates connecting Planet X sensors (e.g., LED, potentiometer) to the Nezha Expansion Board using RJ11 cables. The board's ports are color-coded for easy identification.
Simply plug the RJ11 cable from the sensor into the corresponding port on the expansion board. For example, digital sensors can connect to ports 1-4, and IIC sensors to the IIC ports.
4. Charging the Battery
The Nezha Expansion Board has a built-in 900mAh lithium battery. Connect the provided USB cable to the USB-C port on the board and a power source (e.g., computer, USB wall adapter) to charge. A full charge provides approximately 2 hours of operation.

Image: An exploded view of the Nezha Expansion Board showing the integrated 900mAh lithium battery and indicating up to 2 hours of usage.
The battery includes protection against overcurrent, short-circuit, and electrostatic discharge.
Operating Instructions
The Nezha Inventor Kit is designed for hands-on learning and programming. Once assembled, you can program your micro:bit using graphical programming tools (e.g., MakeCode) to control the sensors and actuators.
Building with Bricks
The kit is compatible with standard building bricks, allowing you to construct various models and integrate the Planet X sensors and the Nezha Expansion Board into your creations.

Image: Examples of Planet X sensors and the Nezha Expansion Board integrated into brick-built structures, demonstrating compatibility with standard building blocks.
Project Examples
The kit supports over 40 programming projects. Here are a few examples of what you can create:
Video: Demonstrates various projects built with the Nezha Inventor Kit, including Traffic Lights, an Automatic Gate, Mini Table Lamps, an Automatic Dryer, a Temperature-controlled Fan, Smart Lamps, Speed Adjustable Fans, an Invading Detection Device, a Line-tracking Car, and an Obstacles Avoidance Car. This video showcases the kit's versatility and potential for creative builds.
- Traffic Lights: Program LEDs to simulate traffic light sequences.
- Automatic Gate: Use an ultrasonic sensor and servo motor to create a gate that opens when an object is detected.
- Mini Table Lamps: Build a lamp that can be controlled via programming or sensors.
- Automatic Dryer: Create a device that simulates a dryer, possibly using a motor and a sensor.
- Temperature-controlled Fan: Use a temperature sensor to activate a fan when a certain temperature is reached.
- Smart Lamps: Lamps that respond to external stimuli, such as hand gestures.
- Speed Adjustable Fans: Control the speed of a fan using a potentiometer.
- Invading Detection Device: An alarm system using an ultrasonic sensor to detect movement.
- Line-tracking Car: Build a car that follows a black line on a white surface using a line-tracking sensor.
- Obstacles Avoidance Car: Program a car to detect and avoid obstacles using an ultrasonic sensor.
For detailed instructions on these and other projects, visit the ELECFREAKS Wiki.
Specifications
| Brand Name | EF ELECFREAKS |
| Model Number | NEZHA Inventor's kit for micro:bit |
| Material Type | ABS |
| Battery Type | 900mAh Lithium-Ion (Built-in) |
| Battery Duration | Up to 2 hours (after full charge) |
| Educational Objective | STEM, Programming, Creativity |
| Minimum Age (Manufacturer) | 120 months (10 years) |
| Maximum Age (Manufacturer) | 174 months (14.5 years) |
| Number of Bricks | 400+ |
| Item Weight | 1.3 Kilograms |
Troubleshooting
- Kit not powering on: Ensure the built-in battery is charged. Connect the USB cable to a power source and check the charging indicator.
- Sensors not responding: Verify that the RJ11 cables are securely connected to both the sensor and the correct port on the Nezha Expansion Board. Check your micro:bit program for correct sensor initialization and reading.
- Motors/Servos not moving: Confirm that motors/servos are correctly connected to the designated ports (M1-M4 for motors, S1-S4 for servos). Ensure your program sends the correct commands and power is sufficient.
- Micro:bit not detected: Ensure the micro:bit is fully inserted into its slot on the expansion board.
- Programming issues: Double-check your code for syntax errors or logical flaws. Refer to the ELECFREAKS Wiki for example projects and detailed programming guides.
For further assistance, please visit the official ELECFREAKS Wiki at wiki.elecfreaks.com/en/ or contact customer support.
Warranty and Support
The ELECFREAKS microbit Nezha Inventor Kit comes with a manufacturer's warranty. For specific warranty details, please refer to your purchase documentation or contact the seller directly.
Technical Support:
- For comprehensive tutorials and learning resources, visit the ELECFREAKS Wiki: wiki.elecfreaks.com/en/
- For direct support, you can contact ELECFREAKS by clicking on "elecfreaks" on the product page and then selecting "Ask a question" to send an email.