1. Introduction
This manual provides comprehensive instructions for the safe and efficient use of your Fockety 48W 12V Portable Milking Vacuum Pump. Please read this manual thoroughly before operating the device to ensure proper function and longevity. This pump is designed for use with various livestock, including donkeys, sheep, cattle, and horses, as part of a milking machine system.
Safety Information
- Always ensure the power supply matches the pump's requirements (12V DC).
- Keep the pump away from water and moisture to prevent electrical hazards.
- Do not operate the pump if any parts are damaged.
- Ensure proper ventilation during operation to prevent overheating.
- Keep out of reach of children and untrained personnel.
2. Product Overview
The Fockety Milking Vacuum Pump is a compact and portable unit designed to provide vacuum for milking machines. It features a durable aluminum alloy shell and a copper core motor for reliable performance.
Key Components
- Vacuum Pump Unit: Main housing with motor and vacuum mechanism.
- Power Button: Green button for turning the pump on and off.
- Vacuum Ports (1 & 2): Connection points for milking machine hoses.
- Power Input Port: For connecting the DC power adapter.
- Carry Handle: For easy portability.
- AC/DC Adapter: External power supply unit.
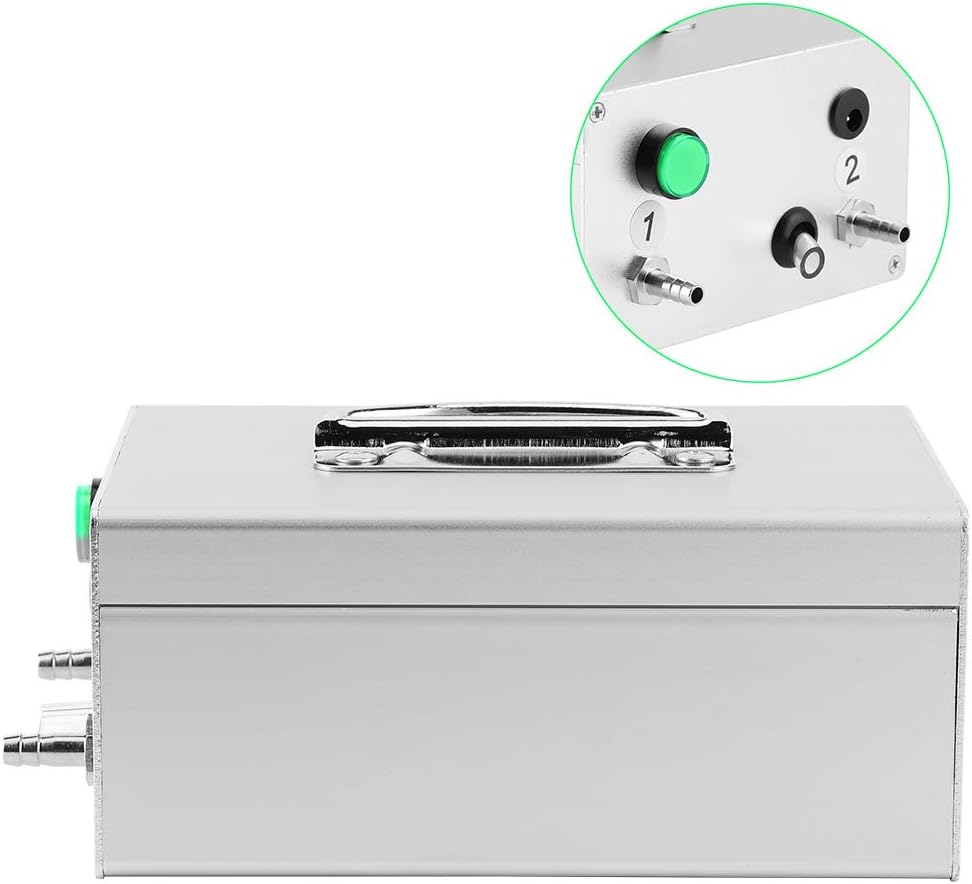
This image displays the front panel of the Fockety Milking Vacuum Pump. On the left, there is a prominent green power button. To the right of the button, two vacuum ports are visible, labeled '1' and '2', which are used to connect the milking hoses. Above port '2', a power input port is located for the AC/DC adapter. The overall casing is silver-colored aluminum alloy.
3. Specifications
| Feature | Detail |
|---|---|
| Model Number | Focketywhbcg743pd-11 |
| Power | 48W |
| Voltage | 12V DC |
| Material | Aluminum Alloy Shell, Copper Core |
| Item Weight | 2.62 pounds (approx. 1.19 kg) |
| Dimensions (L x W x H) | 16cm x 12cm x 7cm (approx. 6.3in x 4.7in x 2.8in) |

This image illustrates the physical dimensions of the Fockety Milking Vacuum Pump. The length is approximately 16 cm (6.3 inches), the width is about 12 cm (4.7 inches), and the height is around 7 cm (2.8 inches). These measurements provide a clear understanding of the pump's compact size.
4. Setup
Follow these steps for the initial setup of your milking vacuum pump:
- Unpack Components: Carefully remove all items from the packaging. Ensure you have the vacuum pump unit and the AC/DC power adapter.
- Connect Power Adapter: Plug the DC output connector of the AC/DC adapter into the power input port on the vacuum pump (labeled '2' or the circular port without a number).
- Connect to Power Outlet: Plug the AC input of the power adapter into a suitable electrical outlet (100-240V AC, 50/60Hz).
- Attach Milking Hoses: Connect the vacuum hoses from your milking machine to the vacuum ports on the pump (labeled '1' and '2'). Ensure a secure and airtight connection.
- Placement: Place the pump on a stable, dry surface, ensuring adequate ventilation around the unit.

This image shows the Fockety Milking Vacuum Pump alongside its AC/DC power adapter. The adapter is a standard black wall plug with a DC barrel connector, which plugs into the pump's power input. This illustrates the power connection step for setting up the device.

This image provides an example of the vacuum pump integrated into a milking system. The pump is connected via hoses to a milking bucket, which is then used for milking an animal. This visual aids in understanding the complete setup for operation.
5. Operating Instructions
Once the pump is properly set up and connected to your milking machine, follow these steps to operate it:
- Power On: Press the green power button on the front of the pump to turn it on. The pump will begin to generate vacuum.
- Monitor Vacuum: Ensure the milking machine is creating adequate vacuum for efficient and comfortable milking. Refer to your milking machine's instructions for optimal vacuum levels.
- Milking Process: Proceed with the milking process according to your standard procedures for the specific livestock.
- Power Off: After milking is complete, press the green power button again to turn off the pump.
- Disconnect Hoses: Carefully disconnect the vacuum hoses from the pump and the milking machine components.

This image shows the Fockety Milking Vacuum Pump positioned in a barn setting, with cows being milked in the background. This illustrates the pump's intended use as part of a larger milking operation, providing vacuum for the milking clusters.
6. Maintenance
Regular maintenance ensures the longevity and optimal performance of your vacuum pump.
- Cleaning: Wipe the exterior of the pump with a clean, damp cloth. Do not use harsh chemicals or abrasive cleaners. Ensure no liquids enter the pump's internal components.
- Check Connections: Periodically inspect all hose connections for wear, cracks, or leaks. Replace any damaged hoses or fittings to maintain proper vacuum.
- Storage: When not in use, store the pump in a dry, clean environment, away from direct sunlight and extreme temperatures.
- Air Filter (if applicable): If your milking machine system includes an air filter, ensure it is cleaned or replaced regularly according to the milking machine's instructions to prevent debris from entering the vacuum pump.
7. Troubleshooting
If you encounter issues with your vacuum pump, refer to the table below for common problems and solutions.
| Problem | Possible Cause | Solution |
|---|---|---|
| Pump does not turn on. | No power supply; faulty adapter; power button issue. | Check power outlet and adapter connection. Ensure adapter is functional. Press power button firmly. |
| Low or no vacuum. | Loose hose connections; damaged hoses; blockage in system. | Inspect all hose connections for leaks. Check hoses for cracks or damage. Clear any blockages in the milking system. |
| Pump is overheating. | Poor ventilation; prolonged use. | Ensure adequate airflow around the pump. Allow the pump to cool down if used for extended periods. |
| Unusual noise during operation. | Internal component issue; foreign object. | Turn off the pump immediately. Inspect for any visible foreign objects. If noise persists, contact customer support. |
8. Warranty and Support
Fockety products are manufactured to high-quality standards. For specific warranty details, please refer to the documentation included with your purchase or contact the seller directly. If you have any questions, require technical assistance, or need to report a defect, please contact our customer support team.
Customer Support: Refer to your purchase invoice or the seller's contact information for assistance.


