1. Introduction
Thank you for choosing the SEBSON Outdoor Motion Detector IR_OUT_AA. This infrared motion sensor is designed for outdoor use and surface mounting, providing reliable detection for various lighting applications. It features adjustable settings for detection range, ambient light sensitivity, and operating duration, making it suitable for a wide range of environments. Please read this manual carefully before installation and use to ensure proper function and safety.
2. Safety Instructions
- Installation must be performed by a qualified electrician in accordance with local wiring regulations.
- Ensure the power supply is disconnected before any installation, maintenance, or repair work.
- Do not exceed the maximum load capacity of the device (800W incandescent, 400W LED).
- This product is rated IP44 for outdoor use, protecting against splashing water and solid objects larger than 1mm. However, avoid direct high-pressure water jets.
- Do not open or modify the device. Unauthorized modifications may void the warranty and pose safety risks.
- Keep packaging materials away from children.
3. Package Contents
The package includes:
- 1 x SEBSON Infrared Motion Detector IP44
- Mounting screws and wall plugs (typically included)
- Instruction Manual
4. Product Overview
The SEBSON Outdoor Motion Detector is a compact and adjustable unit designed for efficient lighting control.

Figure 4.1: Front view of the SEBSON Outdoor Motion Detector.

Figure 4.2: Key features of the motion detector including 12m/180° range, 400W LED compatibility, IP44 rating, 10s-15min time adjustment, 3-2000 LUX sensitivity, and 230V operation.

Figure 4.3: Rear view of the motion detector, illustrating the surface mounting points and cable entry.

Figure 4.4: Close-up of the adjustable dials for 'TIME' (duration) and 'LUX' (light sensitivity).
5. Technical Specifications
| Feature | Specification |
|---|---|
| Manufacturer | SEBSON |
| Model Number | IR_OUT_AA |
| Dimensions (L x W x H) | 7.9 x 5.55 x 6.75 cm |
| Weight | 97 Grams |
| Color | Anthracite |
| Material | Plastic |
| Power Source | AC |
| Voltage | 230 Volts |
| Max. Incandescent Load | 800 Watts |
| Max. LED/Energy Saving Load | 400 Watts |
| Installation Method | Wall Mount (Surface Mount) |
| Detection Range | Max. 12m / 180° |
| Time Adjustment | Approx. 10 seconds to 15 minutes |
| LUX Adjustment | 3 - 2000 LUX |
| Protection Class | IP44 |
| Special Features | Adjustable, Programmable, 3-wire connection |
| Operating Temperature | 30°C (approx.) |
6. Installation
6.1 Mounting Location
Choose a suitable location for mounting the motion detector. For optimal performance, consider the following:
- Mount the sensor at a height of 1.8m to 2.5m for best detection coverage.
- Avoid mounting near heat sources (e.g., vents, windows exposed to direct sunlight) or objects that may cause rapid temperature changes, as this can lead to false triggers.
- Ensure the detection area is clear of obstructions like trees, bushes, or walls that could block the sensor's view.
- The sensor has a 180° detection angle and a maximum range of 12 meters.
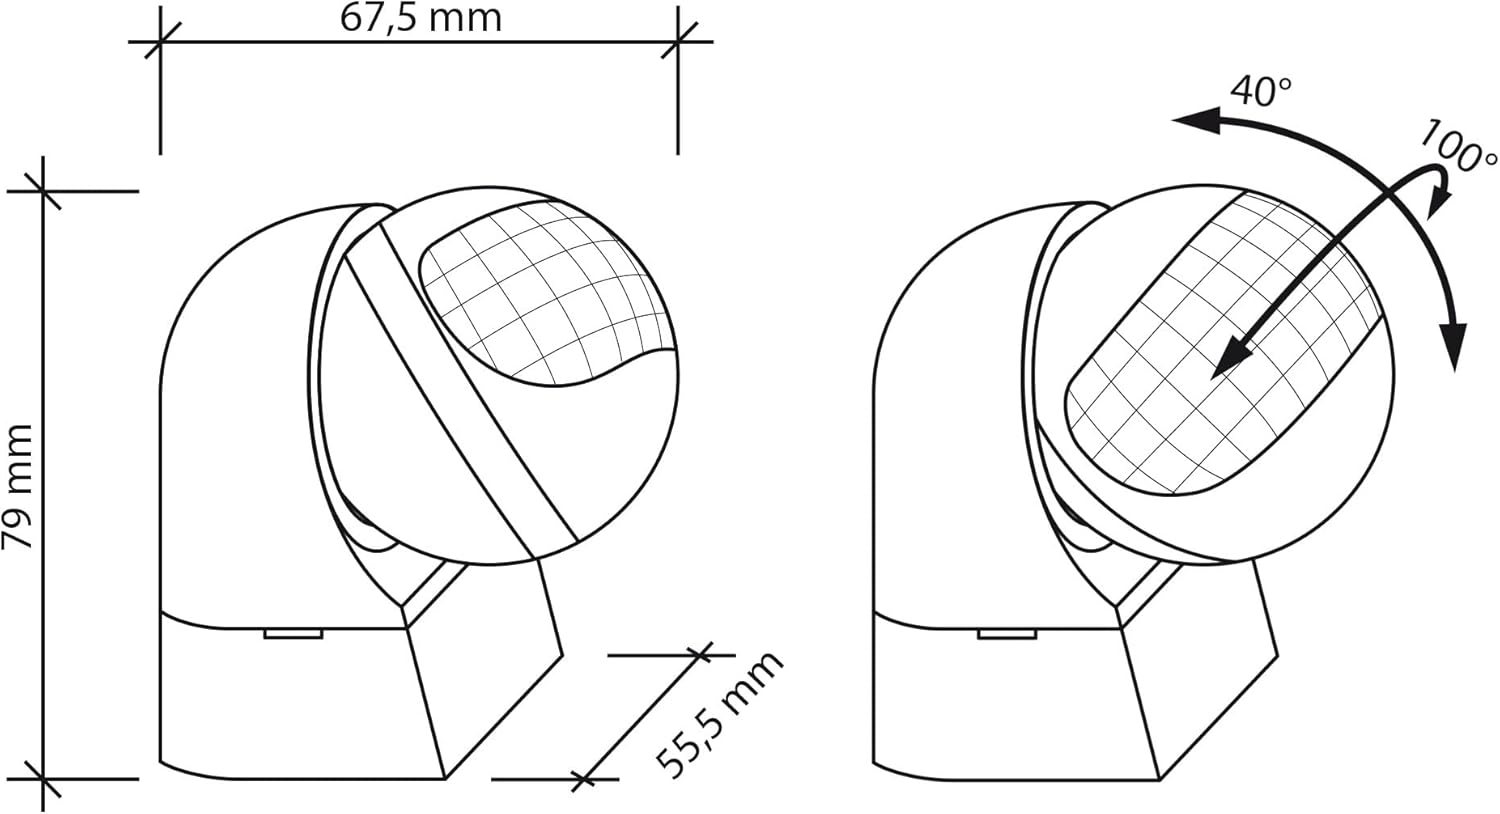
Figure 6.1: Dimensions of the motion detector (79mm height, 55.5mm width, 67.5mm depth) and its adjustable head (40° up/down, 100° left/right).
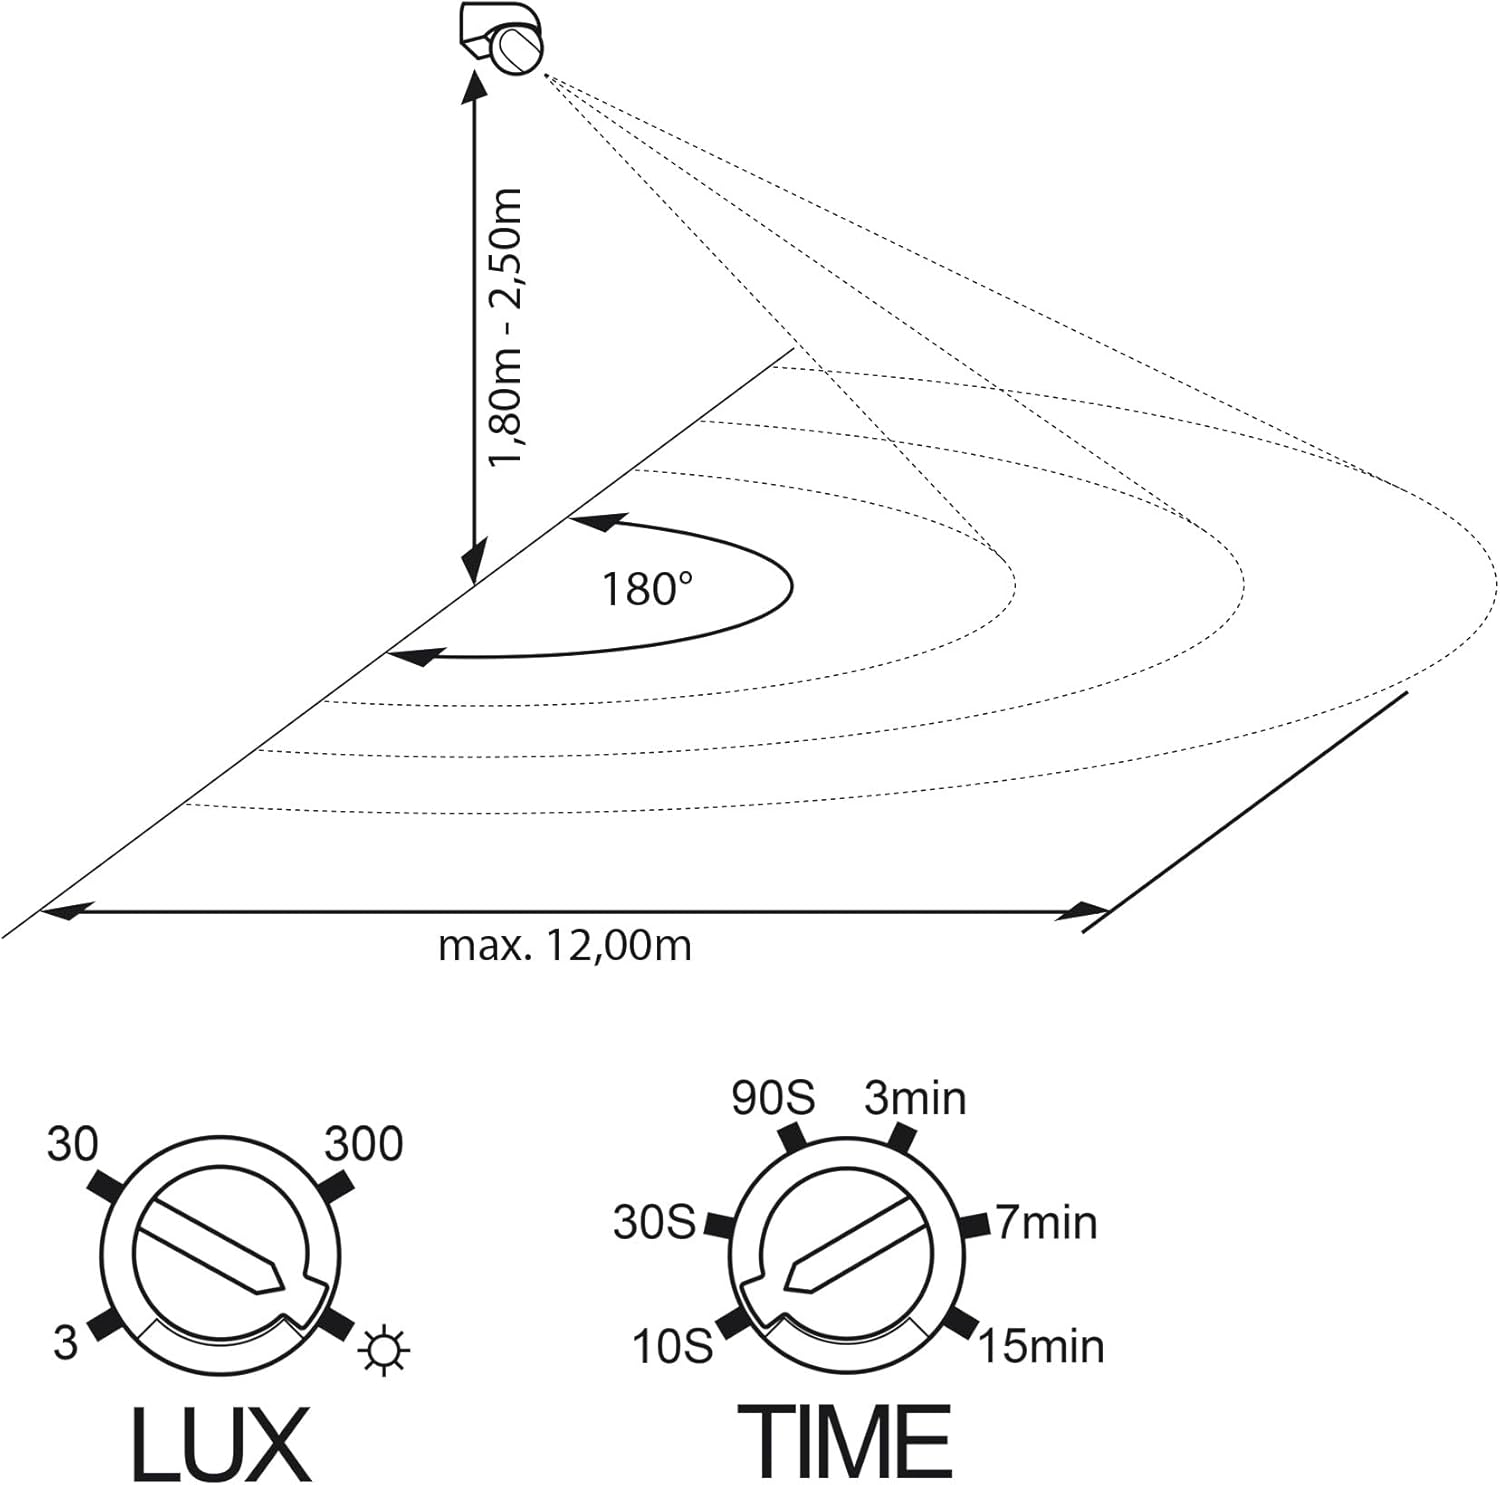
Figure 6.2: Recommended mounting height (1.8m - 2.5m) and detection range (max. 12m with 180° angle).
6.2 Wiring
WARNING: Disconnect power at the circuit breaker before wiring. Improper wiring can cause electric shock or fire.
- Open the housing of the motion detector carefully.
- Connect the wires according to the diagram provided inside the device or in the detailed wiring instructions (typically L, N, and L' for switched load).
- Ensure all connections are secure and properly insulated.
- Close the housing securely, ensuring the IP44 rating is maintained.
7. Setup and Configuration
After installation, you can adjust the sensor's settings using the two dials located on the bottom of the sensor head (refer to Figure 4.4 and 6.2).
7.1 LUX (Ambient Light Sensitivity) Adjustment
The LUX dial controls at what ambient light level the sensor will activate the connected light. Rotate the dial:
- Towards the 'sun' symbol (2000 LUX) for activation during both day and night.
- Towards the 'moon' symbol (3 LUX) for activation only in low light conditions (dusk/night).
7.2 TIME (Operating Duration) Adjustment
The TIME dial sets how long the connected light remains on after motion is detected and no further motion is sensed. Rotate the dial:
- From 10 seconds (10S) to 15 minutes (15min).
- Set to a shorter duration for energy saving or a longer duration for convenience.
7.3 Sensor Head Adjustment
The sensor head can be physically adjusted to optimize the detection area:
- Tilt the sensor head up or down by up to 40°.
- Swivel the sensor head left or right by up to 100°.
- Adjust the head to cover the desired area and avoid unwanted triggers from public pathways or neighboring properties.
8. Operating Instructions
Once installed and configured, the SEBSON motion detector operates automatically. When motion is detected within its range and the ambient light level is below the set LUX threshold, the connected light will switch on. The light will remain on for the duration set by the TIME dial. If motion is detected again during this period, the timer will reset. After the set time expires and no further motion is detected, the light will switch off.
9. Maintenance
The SEBSON motion detector requires minimal maintenance.
- Cleaning: Periodically wipe the sensor lens with a soft, damp cloth to remove dust or dirt that might obstruct detection. Do not use abrasive cleaners or solvents.
- Inspection: Regularly check the mounting and wiring for any signs of wear or damage.
- Environmental Factors: Ensure no new obstructions (e.g., growing plants) are blocking the sensor's field of view.
10. Troubleshooting
| Problem | Possible Cause | Solution |
|---|---|---|
| Light does not turn on when motion is detected. | 1. Incorrect LUX setting (too high). 2. No power to the unit. 3. Faulty wiring. 4. Sensor obstructed. | 1. Adjust LUX dial towards 'moon' symbol. 2. Check circuit breaker and connections. 3. Verify wiring connections (consult electrician if unsure). 4. Clear any obstructions from the sensor's view. |
| Light stays on continuously. | 1. Continuous motion in detection area. 2. TIME setting too long. 3. Faulty unit. | 1. Check for constant movement or heat sources. 2. Adjust TIME dial to a shorter duration. 3. Contact support if problem persists after checking other causes. |
| Light turns on without apparent motion. | 1. Sensor too sensitive. 2. Heat sources or reflective surfaces. 3. Small animals. 4. Sensor head not aimed correctly. | 1. Reduce sensitivity (if applicable) or adjust detection area. 2. Relocate sensor or remove heat sources/reflective objects. 3. Adjust sensor angle to exclude ground level. 4. Re-aim sensor head to cover only desired area. |
| Detection range is too short. | 1. Mounting height too low. 2. Sensor obstructed. 3. Sensor head angle incorrect. | 1. Ensure mounting height is between 1.8m and 2.5m. 2. Clear obstructions. 3. Adjust sensor head for wider coverage. |
11. Warranty and Support
For warranty information, please refer to the terms and conditions provided at the point of purchase or contact your retailer. If you encounter any issues that cannot be resolved using the troubleshooting guide, please contact SEBSON customer support or your authorized dealer for assistance. Keep your purchase receipt as proof of purchase.
Manufacturer: SEBSON
Country of Origin: China


