1. Introduction
This manual provides essential information for the safe and efficient operation of your POOLEX Poolstar Nano Action 3 kW heat pump. Please read this manual thoroughly before installation and use, and keep it for future reference. This heat pump is designed for heating small outdoor pools with a volume ranging from 10 to 21 m³.

Figure 1.1: POOLEX Poolstar Nano Action 3 kW Heat Pump. This image shows the compact design of the heat pump with its front fan and side connections.
2. Safety Information
Always adhere to the following safety precautions to prevent injury or damage to the unit:
- Ensure the power supply matches the specifications of the heat pump.
- Do not operate the unit if the power cord or plug is damaged.
- Keep children and pets away from the unit during operation.
- Do not block the air intake or exhaust vents.
- Disconnect power before performing any maintenance or cleaning.
- Installation must comply with local electrical and plumbing codes.
- The unit is equipped with a 10 mA differential protection for safety. Do not bypass this feature.
3. Package Contents
Verify that all items are present in the package:
- POOLEX Poolstar Nano Action 3 kW Heat Pump Unit
- Power cable with 10 mA differential protection
- PVC connectors (diameter 32 mm)
- Hose clamps
- Multilingual instruction manual

Figure 3.1: Product Packaging. The image displays the retail box of the POOLEX Nano Action heat pump, highlighting its features and included accessories.
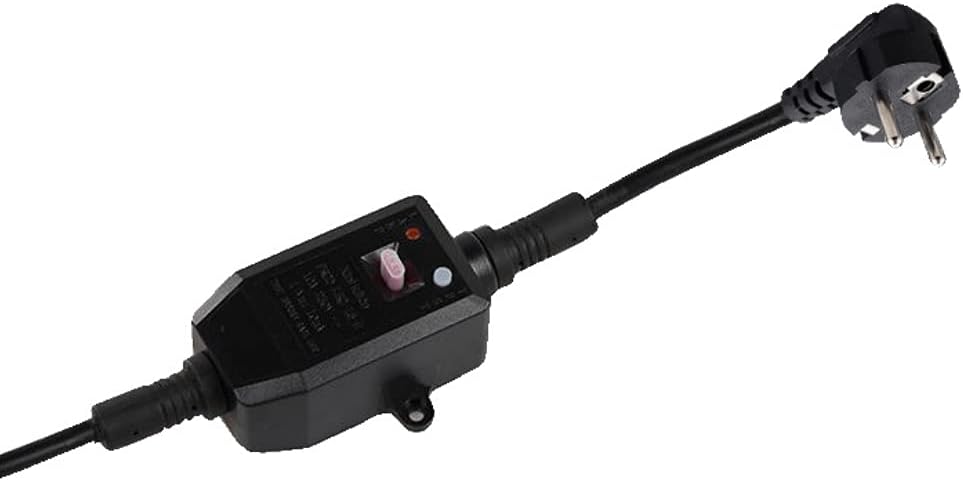
Figure 3.2: Power Cable. This image shows the power cable equipped with a safety differential protection device.

Figure 3.3: Included Accessories. This image displays the PVC connectors and hose clamps provided for installation.
4. Setup and Installation
The POOLEX Poolstar Nano Action heat pump is designed for easy "Plug & Play" installation. No bypass is required.
- Placement: Position the heat pump on a stable, level surface near your pool. Ensure adequate air circulation around the unit. Avoid placing it in enclosed spaces.
- Connections:
- Connect the pool's filtration system outlet to the "IN" port of the heat pump using the provided PVC connectors and hoses (not included).
- Connect the "OUT" port of the heat pump back to the pool's return inlet.
- Secure all connections with the provided hose clamps to prevent leaks.
- Power Connection: Plug the heat pump's power cable into a suitable electrical outlet. The 5-meter cable includes a 10 mA differential protection for safety.
- Initial Check: Before starting, ensure all connections are tight and there are no visible leaks.

Figure 4.1: Typical Installation. This image illustrates the heat pump connected to an above-ground pool's filtration system in a garden setting.

Figure 4.2: Plug & Play Setup. This image demonstrates the simple electrical connection of the heat pump to a power outlet, highlighting its ease of use.
5. Operating Instructions
The Poolstar Nano Action heat pump is designed for straightforward operation.
- Start-up: Once connected, ensure your pool's filtration system is running. The heat pump requires water flow to operate.
- Temperature Setting: Use the control panel on the unit to set your desired water temperature. Refer to the specific instructions on the unit's display for navigation.
- Heating Process: The heat pump will begin to heat the water as it circulates through the unit. Heating time will vary depending on pool volume, initial water temperature, and ambient air temperature. The unit is capable of operating in temperatures as low as 8°C.
- Automatic Operation: The heat pump will automatically turn on and off to maintain the set temperature, provided the filtration system is running.

Figure 5.1: Extending the Season. This image suggests the heat pump's ability to extend the swimming season into cooler weather, even with snow in the background.
6. Maintenance
Regular maintenance ensures optimal performance and longevity of your heat pump.
- Cleaning: Periodically clean the exterior of the unit with a soft, damp cloth. Do not use abrasive cleaners or solvents.
- Air Vents: Ensure the air intake and exhaust vents are free from debris, leaves, or other obstructions. Blocked vents can reduce efficiency and damage the unit.
- Water Connections: Regularly check hose connections for leaks and tighten clamps if necessary.
- Winterization: Before freezing temperatures, drain all water from the heat pump and disconnect it from the pool system. Store the unit in a dry, protected area.
7. Troubleshooting
Refer to the table below for common issues and their solutions. If the problem persists, contact customer support.
| Problem | Possible Cause | Solution |
|---|---|---|
| Unit not turning on | No power, tripped circuit breaker, differential protection activated. | Check power connection, reset circuit breaker, check differential protection switch. |
| Poor heating performance | Insufficient water flow, low ambient temperature, blocked air vents, pool too large. | Ensure filtration pump is running, check for blockages in hoses/vents, verify pool volume is within specified range. |
| Unusual noise | Debris in fan, loose components. | Disconnect power and inspect fan for obstructions. If noise persists, contact support. |
| Water leaks | Loose hose connections, damaged O-rings. | Tighten hose clamps, inspect and replace O-rings if damaged. |
8. Specifications
| Feature | Detail |
|---|---|
| Model Number | PC-NANO-A3 |
| Heating Capacity | 3 kW |
| Power Consumption | 600 W (approx.) |
| Recommended Pool Volume | 10 to 21 m³ |
| Minimum Operating Temperature | 8°C |
| Product Dimensions (L x W x H) | 40 x 28 x 38.5 cm |
| Weight | 17.02 kg |
| Power Source Type | CC/CA (AC/DC) |

Figure 8.1: Ultra Compact Design. This image visually represents the compact size of the heat pump, shown next to a dog for scale, emphasizing its small footprint.
9. Warranty and Support
Your POOLEX Poolstar Nano Action heat pump comes with a manufacturer's warranty. Please refer to the warranty card included in your package for specific terms and conditions.
For technical support, spare parts, or warranty claims, please contact POOLEX customer service. Contact details can typically be found on the manufacturer's official website or on the product packaging.
Manufacturer: POLLSTAR
Date First Available: 12 March 2021


