
1. Setup
Before beginning your treasure hunt, ensure all components are present and correctly assembled. The PalliPartners Metal Detector is designed for straightforward assembly.

Figure 1: All components of the PalliPartners Metal Detector, including the main unit, search coil, control panel, armrest, foldable shovel, carrying bag, and batteries.
Assembly Instructions:
- Attach the Search Coil: Securely connect the 12-inch search coil to the lower stem of the detector.
- Connect the Shaft Sections: Assemble the adjustable stem sections. The stem can be adjusted from 41.3 inches to 47.6 inches to suit different user heights.
- Mount the Control Box: Attach the control box, which houses the LCD display and operational buttons, to the upper part of the shaft.
- Install the Armrest: Secure the ergonomically designed armrest to the shaft for comfortable and less stressful operation.
- Connect the Cables: Carefully connect the cable from the search coil to the control box. Ensure a secure connection.
- Insert Batteries: Open the battery compartment on the control box and insert the two required 9V batteries.
- Optional Headphone Connection: For private listening and clearer audio signals, plug your headphones into the designated jack on the control panel.
Video 1: A customer demonstration showing the unboxing and assembly process of the PalliPartners Metal Detector. This video also illustrates basic operation.
2. Operating Instructions
The PalliPartners Metal Detector features an intuitive LCD display and multiple operating modes for efficient metal detection.
Control Panel Overview:
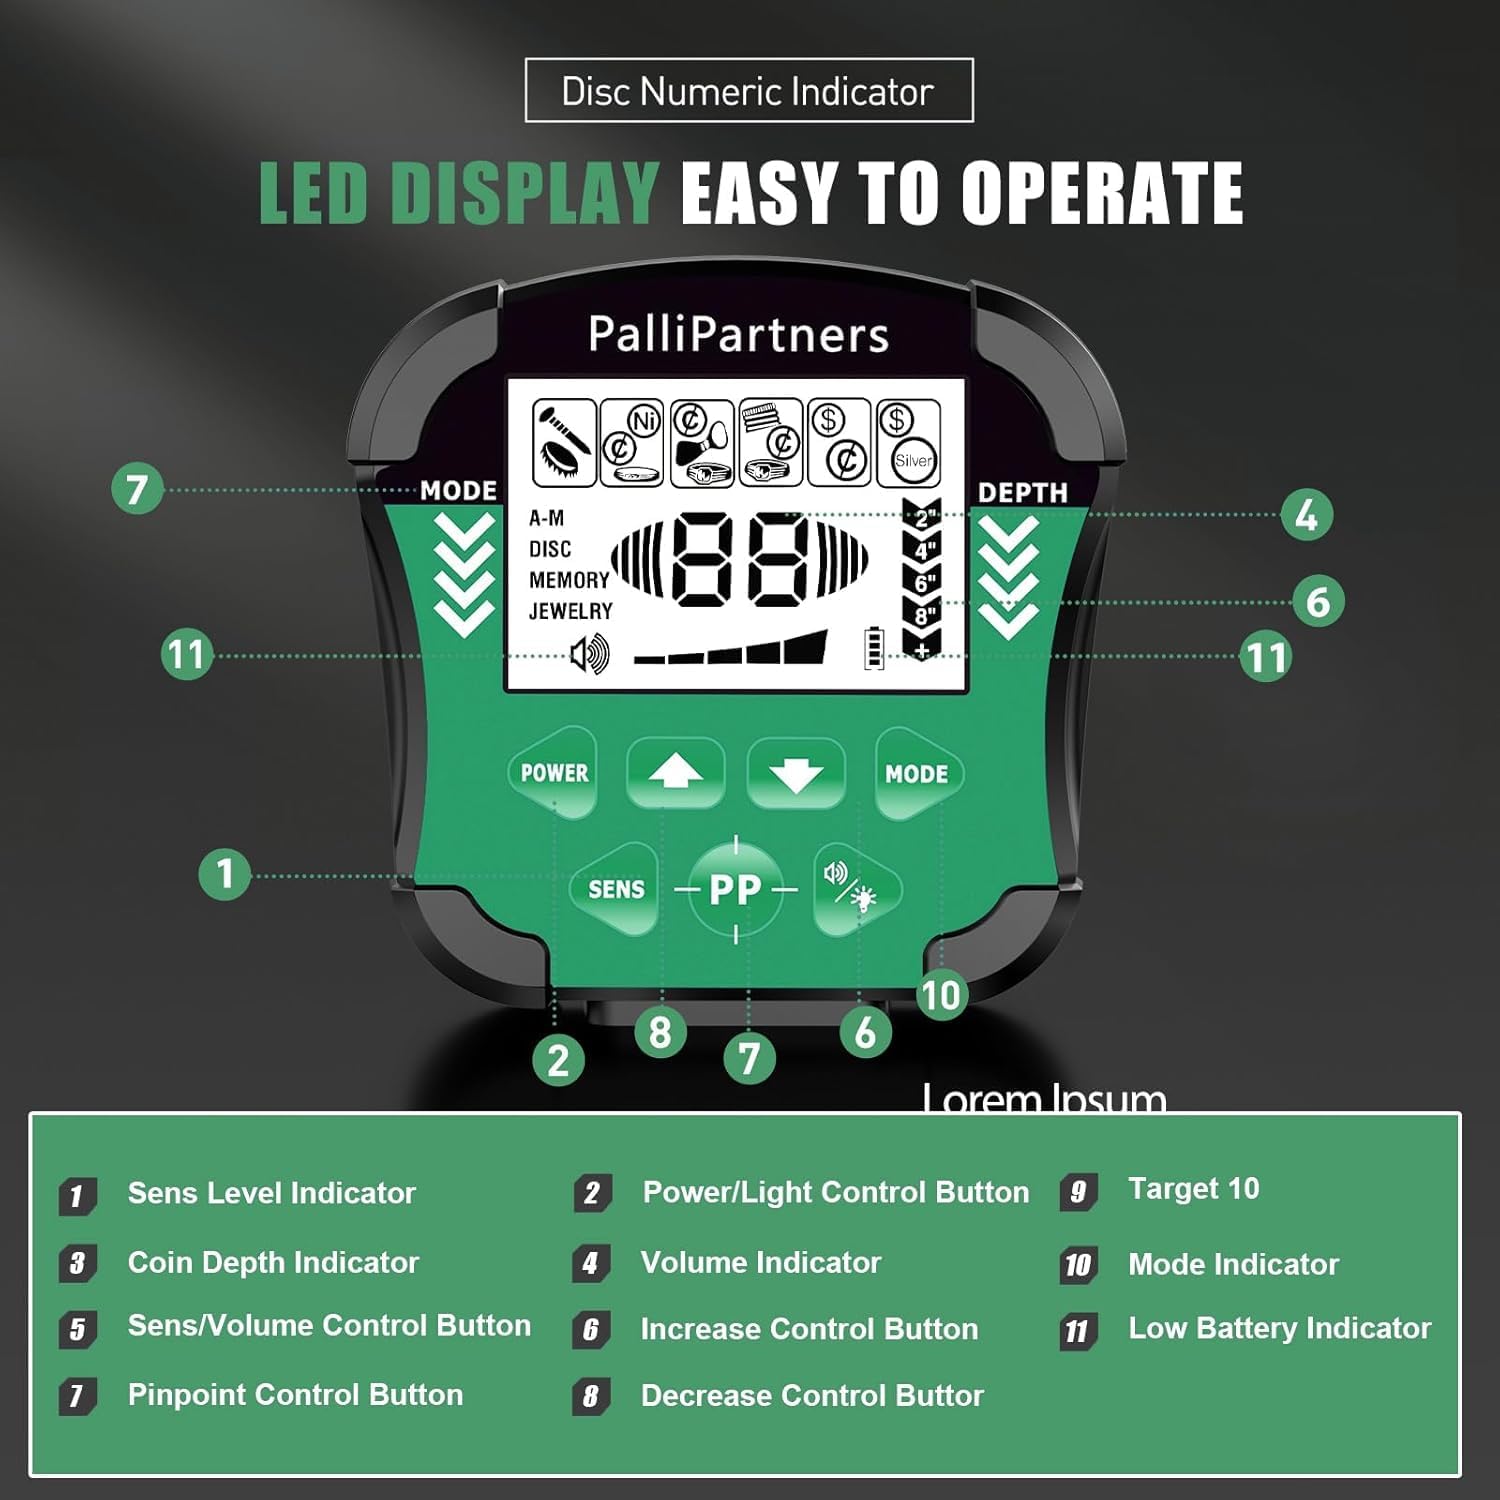
Figure 2: The main control panel of the metal detector, showing the LCD screen, mode buttons, sensitivity controls, and volume knob.
- Power/Light Control Button: Used to turn the device on/off and activate the backlight for low-light conditions.
- Mode Button: Cycles through the different detection modes.
- SENS/Volume Control Button: Adjusts the sensitivity level and volume.
- Increase/Decrease Buttons (+/-): Used to adjust sensitivity, volume, or select targets in Notch mode.
- Pinpoint Control Button (PP): Used for precisely locating detected targets.
- LCD Display: Shows detection mode, sensitivity level, battery condition, volume level, and target identification.
Detection Modes:
The detector offers five distinct operation modes to optimize your search for various metal types.
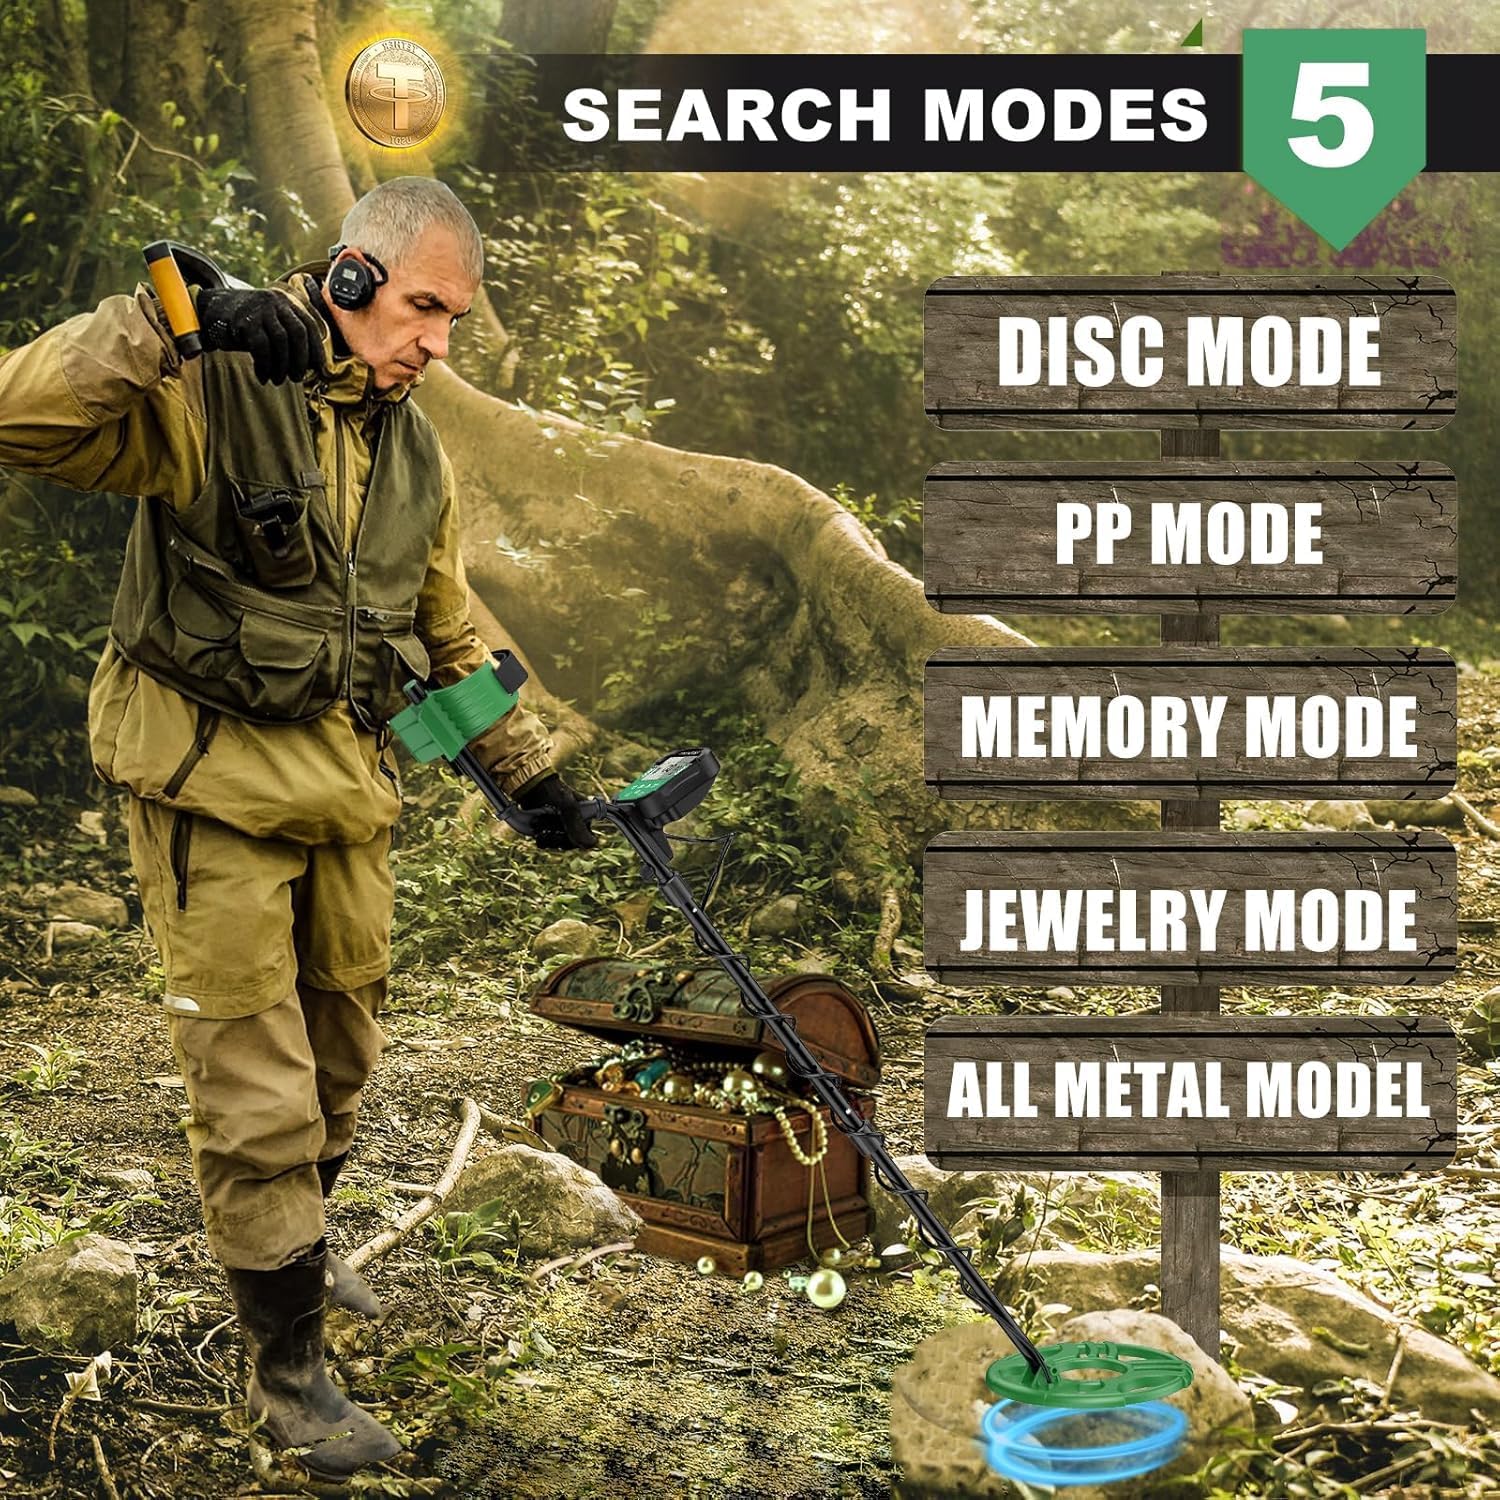
Figure 3: Visual representation of the five available search modes and their primary functions.
- All Metal Mode: Detects all types of metal without discrimination. This mode offers the highest sensitivity and is ideal for general searching.
- Disc Mode (Discrimination): Allows you to eliminate certain types of metal from detection. This is useful for ignoring junk metal like iron and focusing on valuable targets.
- Notch Mode: Provides more precise control over discrimination. You can select specific target categories to be ignored by pressing "NOTCH" and using the +/- buttons.
- Memory Mode: Specifically configured to search for specific metal types you have previously identified and stored, while eliminating others.
- Jewelry Mode: Specifically configured to eliminate iron signals and primarily respond to other metals commonly found in jewelry.
- PP Mode (Pinpoint): Used to precisely locate the exact position of a detected target before digging.
Target Identification and Depth:
The LCD display provides visual cues for target identification and estimated depth, enhancing your detection efficiency.

Figure 4: The LCD screen provides a numeric indicator for discrimination, showing different metal types and their corresponding target IDs. It also displays signal strength and estimated depth.
- Target ID: The display shows a numeric value (00-99) and an icon indicating the probable type of metal detected (e.g., iron, zinc, silver, gold).
- Depth Indicator: Provides an estimated depth of the target, up to 8.7 inches.
- Audio Tones: The detector produces different audio tones for various metal types, allowing for auditory identification.

Figure 5: The detector provides distinct audio tones for different target IDs, helping to identify the type of metal without looking at the screen.
Using the Detector:
Hold the detector comfortably with the armrest supporting your forearm. Sweep the search coil slowly and steadily from side to side, keeping it parallel to the ground and about 1-2 inches above the surface. When a target is detected, the display will show information, and an audio tone will sound.

Figure 6: The 12-inch search coil allows for detection up to 8.7 inches deep, providing good coverage for various terrains.
3. Maintenance
Proper maintenance ensures the longevity and optimal performance of your PalliPartners Metal Detector.
- Cleaning the Search Coil: The 12-inch search coil is waterproof (IP54 rated). After use, especially in wet or muddy conditions, you can rinse the coil with fresh water.
- Important Note: The control box is NOT waterproof. Do not submerge the control box or expose it to heavy rain.
- Cleaning the Control Box and Shaft: Wipe the control box and shaft with a soft, damp cloth. Avoid using abrasive cleaners or solvents.
- Battery Replacement: When the battery indicator on the LCD display shows low power, replace the two 9V batteries promptly to ensure consistent performance.
- Storage: When not in use, disassemble the detector and store it in the provided carrying bag. Store in a cool, dry place away from direct sunlight and extreme temperatures.

Figure 7: The waterproof search coil allows for detection in shallow water, but the control box must remain dry.
4. Troubleshooting
If you encounter issues with your metal detector, refer to the following common problems and solutions:
| Problem | Possible Cause | Solution |
|---|---|---|
| No power/Device does not turn on. | Batteries are dead or incorrectly installed. | Check battery orientation. Replace with fresh 9V batteries. |
| False signals or erratic beeping. | High sensitivity setting; electromagnetic interference; mineralized ground. | Reduce sensitivity. Move away from power lines or other electronic devices. Try adjusting the discrimination or notch settings. |
| No detection or weak signals. | Low sensitivity; incorrect mode; coil not parallel to ground; deep target. | Increase sensitivity. Ensure you are in the correct detection mode (e.g., All Metal). Keep the search coil parallel to the ground. |
| Display is dim or unreadable. | Low battery; no backlight activated. | Replace batteries. Press the Power/Light button to activate the backlight. |
5. Specifications
- Brand: PalliPartners
- Model Number: 940G
- Color: Black & Green
- Material: Metal, Plastic
- Power Source: Battery Powered
- Batteries: 2 x 9V batteries (required)
- Item Weight: 3.9 Pounds
- Product Dimensions (L x W x H): 17" x 11" x 5.9"
- Extended Length: 60.2 Inches
- Adjustable Length: Yes
- International Protection Rating: IP54 (Search Coil only)
- Operating Frequency: 7.69 KHz
- Display Type: LCD
- Number of Programs/Modes: 5
- Search Coil Size: 12 Inches
- UPC: 723117923450, 723117234457
6. Warranty and Support
For warranty information, please refer to the documentation included with your product packaging. If you have any questions regarding the PalliPartners Metal Detector or require technical assistance, please feel free to contact PalliPartners customer support. Contact details can typically be found on the product packaging or the official PalliPartners website.