
Yinleader 3000W12V
Yinleader 3000W 12V to 230V Pure Sine Wave Power Inverter User Manual
Model: 3000W12V
1. Introduction
This manual provides essential information for the safe and efficient operation of your Yinleader 3000W 12V to 230V Pure Sine Wave Power Inverter. This device converts 12V DC battery power into 230V AC household power, allowing you to operate various electrical appliances from your vehicle, boat, or off-grid setup. Please read this manual thoroughly before installation and use.
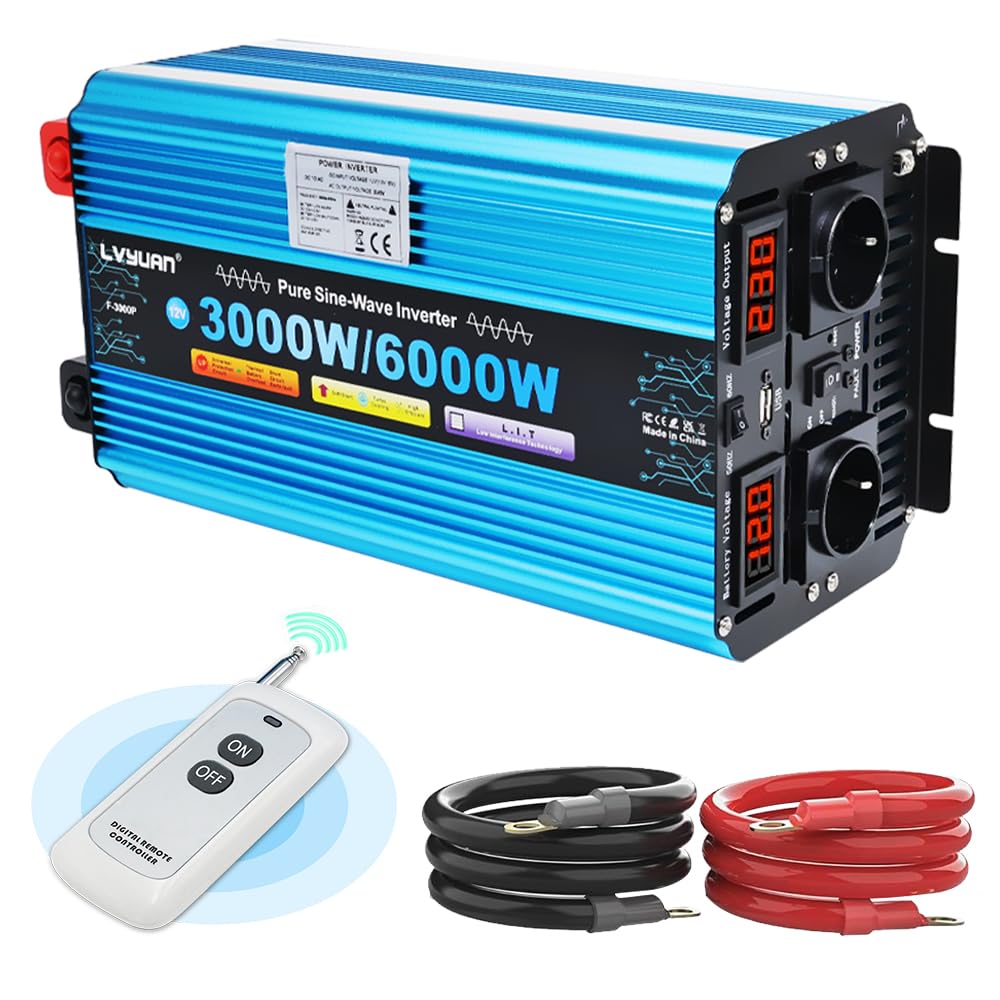
Image 1.1: Yinleader 3000W Pure Sine Wave Power Inverter, showcasing its design and power rating.
2. Safety Instructions
Failure to follow these safety instructions can result in serious injury or damage to the inverter and connected devices. Always exercise caution when working with electricity.
- Ventilation: Ensure the inverter is installed in a well-ventilated area. Do not block the ventilation openings.
- Moisture: Do not expose the inverter to water, rain, snow, or spray.
- Heat: Avoid placing the inverter near heat sources or in direct sunlight.
- Flammable Materials: Do not operate the inverter near flammable materials, gases, or vapors.
- Battery Connection: Connect the inverter only to a 12V DC battery. Ensure correct polarity (+ to + and - to -). Incorrect connection will damage the inverter.
- Load Capacity: Do not exceed the inverter's rated power output (3000W continuous, 6000W peak). Overloading can cause damage and fire hazards.
- Grounding: Ensure the inverter is properly grounded according to local electrical codes.
- Maintenance: Do not attempt to open or service the inverter yourself. Refer all servicing to qualified personnel.
- Children: Keep the inverter out of reach of children.
3. Package Contents
Verify that all items are present in your package:
- 1 x Yinleader 3000W 12V to 230V Pure Sine Wave Power Inverter
- 2 x Battery Connection Cables (Red for Positive, Black for Negative)
- 6 x Spare Fuses
- 1 x Wireless Remote Control
- 1 x User Manual

Image 3.1: The inverter shown with its included battery connection cables and wireless remote control.
4. Setup and Installation
Follow these steps to properly set up your power inverter:
- Choose a Location: Select a dry, cool, and well-ventilated area for the inverter. Ensure it is away from direct sunlight, heat, and moisture.
- Prepare the Battery: Ensure your 12V DC battery is fully charged and in good condition.
- Connect Cables:
- Connect the red positive (+) cable to the positive (+) terminal of the inverter.
- Connect the other end of the red cable to the positive (+) terminal of the 12V battery.
- Connect the black negative (-) cable to the negative (-) terminal of the inverter.
- Connect the other end of the black cable to the negative (-) terminal of the 12V battery.
Important: Ensure all connections are tight and secure to prevent loose connections, which can cause overheating and damage.
- Grounding: Connect the inverter's grounding terminal to a proper earth ground.
- Initial Check: Before connecting any appliances, ensure the inverter's power switch is in the "OFF" position.

Image 4.1: Diagram illustrating the connection of the inverter to a 12V battery and subsequent connection of 230V appliances via Euro-plugs.
5. Operating Instructions
5.1. Front and Rear Panel Overview

Image 5.1: Detailed view of the inverter's front and rear panels, highlighting the positive/negative ports, dual cooling fans, battery voltage display, voltage output display, USB port, On/Off switch, AC sockets, and LED indicators.
- Positive Port: Red terminal for positive battery connection.
- Negative Port: Black terminal for negative battery connection.
- Dual Cooling Fans: Automatically activate based on temperature and load.
- Battery Voltage Display: Shows the current DC input voltage from the battery.
- Voltage Output Display: Shows the AC output voltage.
- USB Port: For charging USB-powered devices.
- On/Off Switch: Main power switch for the inverter.
- AC Sockets: Two 230V AC outlets for connecting appliances.
- LED Indicator: Indicates power status and fault conditions.
5.2. Powering On and Connecting Appliances
- Ensure all battery connections are secure.
- Flip the On/Off switch on the inverter to the "ON" position. The LED indicator should light up, and the voltage displays will show readings.
- Plug your 230V AC appliances into the inverter's AC sockets.
- For USB charging, connect your device to the USB port.
- To power off, first turn off all connected appliances, then flip the inverter's On/Off switch to the "OFF" position.
5.3. Using the Wireless Remote Control
The wireless remote control allows you to turn the inverter on and off from a distance.
- Press button 'A' to turn the inverter ON.
- Press button 'B' to turn the inverter OFF.
- The remote control only functions when the inverter's main switch is in the 'OFF' position.
6. Key Features
- Pure Sine Wave Output: This inverter produces a pure sine wave output, which is identical to the AC power supplied by utility companies. This makes it suitable for sensitive electronics, motors, and inductive loads that may not operate correctly or efficiently with modified sine wave inverters.
- High-Quality Components: Equipped with high-quality MOSFET/IGBT transistors and active cooling control, ensuring stable performance and low heat generation.
- Intelligent Cooling System: Features dual cooling fans that operate based on temperature and load, reducing noise and ensuring efficient heat dissipation.

Image 6.1: Close-up of the inverter's silent cooling fans, designed for noise reduction and steady heat dissipation.
6.1. Applications
The Yinleader Pure Sine Wave Inverter is ideal for powering a wide range of devices in various settings:
- Office Communications: Computers, printers, monitors, fax machines, scanners.
- Consumer Electronics: TVs, DVD players, game consoles, Hi-Fi systems, musical instruments, satellite receivers.
- Household Appliances: Vacuum cleaners, air conditioners, fans, shavers.
- Kitchen Appliances: Toasters, ovens, kettles, microwaves.
- Outdoor Use: Camping, RVs, picnics, outdoor work.

Image 6.2: Examples of the inverter's use in various scenarios such as camping, RV travel, picnics, and outdoor work.

Image 6.3: Visual representation of various devices that can be powered by the inverter, including printers, drills, phones, tablets, portable fridges, computers, and fans.
7. Protection Functions
The inverter is equipped with multiple modern safety features to protect itself and your connected devices:
- Low Voltage Protection: Automatically shuts down if the input DC voltage drops too low, preventing battery over-discharge.
- High Temperature Protection: Activates if the internal temperature exceeds safe limits (e.g., 75°C), preventing overheating.
- High Voltage Protection: Protects against excessive input DC voltage.
- Short Circuit Protection: Safeguards against short circuits in the output.
- Reverse-Connection Protection: Protects against incorrect battery polarity connection (typically via a blown fuse).
- Overload Protection: Shuts down if the connected load exceeds the inverter's capacity.
- Soft Start: Ensures a gradual power-up to protect sensitive equipment.
- Automatic Voltage Regulation (AVR): Maintains stable output voltage.
- Intelligent Power Management (IPM): Optimizes power delivery.

Image 7.1: Overview of the six primary protection features: low voltage, high temperature, high voltage, short circuit, reverse-connection, and overload protection.
8. Maintenance
To ensure the longevity and optimal performance of your inverter, follow these maintenance guidelines:
- Cleaning: Keep the inverter clean and free from dust and debris. Use a dry, soft cloth for cleaning. Do not use liquid cleaners.
- Ventilation: Regularly check that the cooling vents are not obstructed.
- Connections: Periodically inspect battery and appliance connections to ensure they remain tight and free from corrosion.
- Storage: If storing the inverter for an extended period, disconnect it from the battery and store it in a cool, dry place.
- Battery Health: Ensure your 12V battery is well-maintained and charged to prolong its life and the inverter's efficiency.
9. Troubleshooting
If you encounter issues with your inverter, refer to the following common problems and solutions:
| Problem | Possible Cause | Solution |
|---|---|---|
| Inverter does not turn on. | Loose battery connection, low battery voltage, blown fuse, inverter switch off. | Check battery cables for secure connection. Charge battery. Replace fuses (refer to spare fuses provided). Ensure inverter switch is ON. |
| No AC output. | Overload, high temperature, low battery voltage, fault condition. | Reduce connected load. Allow inverter to cool down. Charge battery. Check LED indicators for fault codes. |
| Inverter shuts down unexpectedly. | Overload, high temperature, low battery voltage. | This is a protection feature. Reduce load, ensure proper ventilation, or charge battery. |
| Remote control not working. | Inverter's main switch is ON, remote battery dead. | Ensure the inverter's main switch is in the 'OFF' position for remote operation. Replace remote battery if necessary. |
If the problem persists after following these steps, please contact customer support.
10. Specifications
| Feature | Specification |
|---|---|
| Model Number | 3000W12V |
| Rated Power | 3000 W |
| Peak Power (Short-term) | 6000 W |
| DC Input Voltage | 12 V DC |
| AC Output Voltage | 190-240 V AC (for 220V/230V/240V) |
| Frequency | 50 Hz |
| Efficiency | 90% |
| No-Load Current | ≤ 1 A |
| Output Waveform | Pure Sine Wave |
| Temperature Protection | 75 °C |
| Net Weight | 5.5 kg |
| Dimensions (L x W x H) | 400 x 180 x 140 mm (approx.) |
| Total Power Outlets | 2 |

Image 10.1: Diagram showing the approximate dimensions of the inverter: 360mm length, 180mm width, and 140mm height.
11. Warranty and Support
Yinleader offers a 12-month warranty for this product. For warranty claims, technical support, or any questions not covered in this manual, please contact the seller or Yinleader customer service directly.
For more information about Yinleader products and services, you may visit their official channels or contact them through the platform where you purchased the product.
Related documents3000W12V


Ask a question about this manual
Ask about setup, troubleshooting, compatibility, parts, safety, or missing instructions. Manuals+ will review the question and use this page’s manual context to help answer it.