
1. Introduction
This manual provides detailed instructions for the setup, operation, and maintenance of the AVMatrix HVS0402U Micro 4-Channel HDMI Live Stream Multi-Format Video Switcher. This device is designed for professional video production, offering versatile input/output options and advanced features for live streaming and multi-format video switching.

Figure 1: AVMatrix HVS0402U Video Switcher
2. Product Overview
2.1 Front Panel Controls
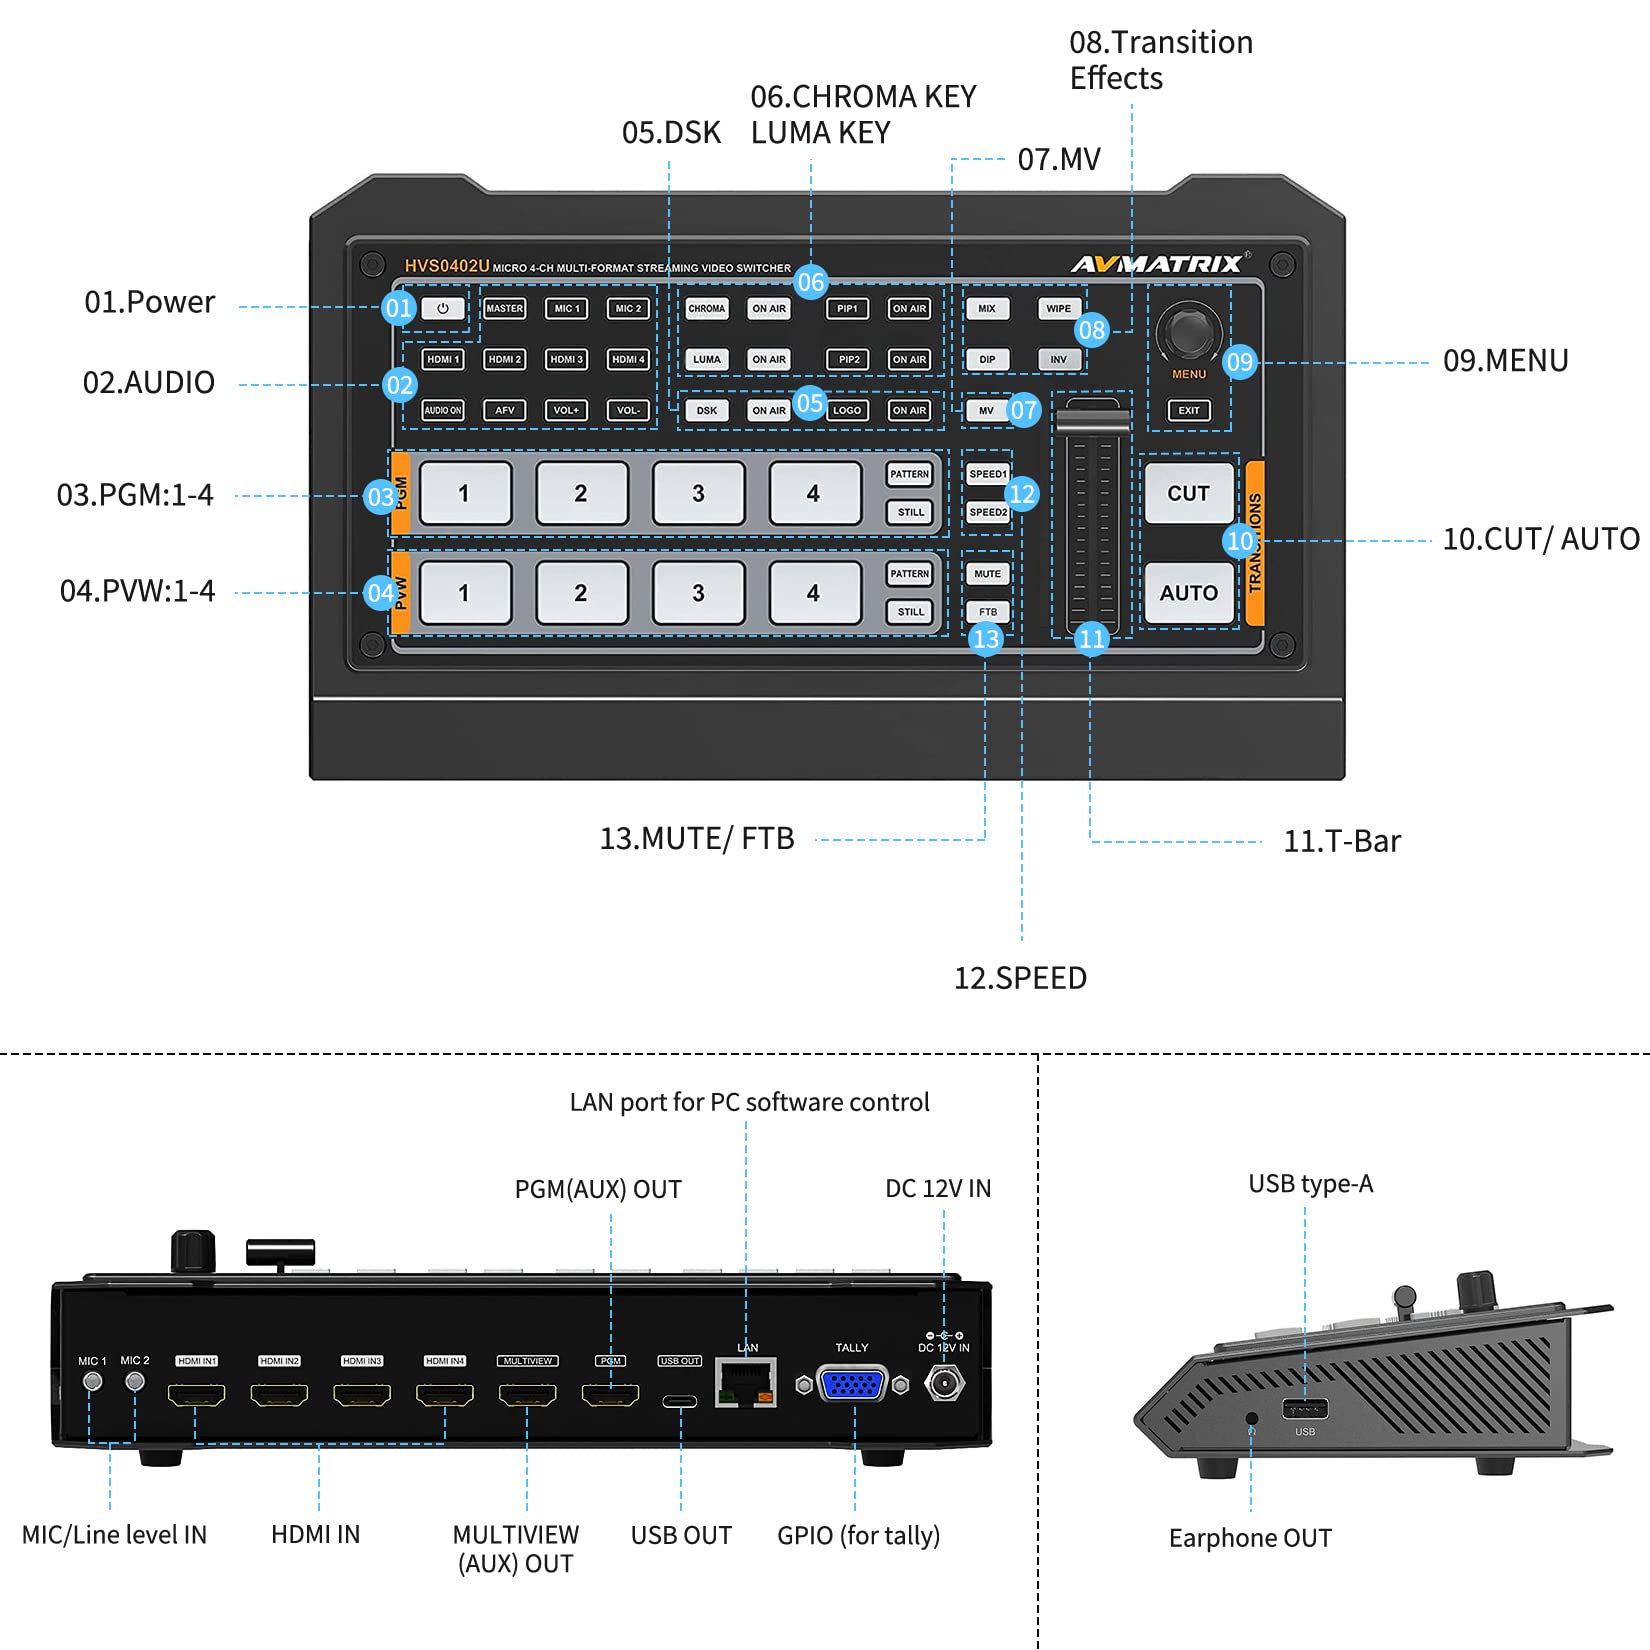
Figure 2: Front Panel Layout and Controls
- Power Button: Turns the device on or off.
- Audio Controls: Buttons for master audio, microphone inputs (MIC 1, MIC 2), and volume adjustment (VOL+, VOL-).
- PGM (Program) Selection: Buttons 1-4 to select the output source for the program feed.
- PVW (Preview) Selection: Buttons 1-4 to select the source for the preview monitor.
- Keying Controls: Buttons for Chroma Key, Luma Key, DSK (Downstream Key), PIP1, PIP2, and Logo overlay. Each has an 'ON AIR' button to activate.
- Transition Effects: Buttons for MIX, DIP, WIPE, INV (Invert).
- Multiview (MV) Button: Activates the multiview display.
- Speed Controls: SPEED1 and SPEED2 buttons to adjust transition speed.
- Menu/Exit: Navigation buttons for on-screen menu.
- Cut/Auto Transitions: CUT for instant transition, AUTO for programmed transition.
- T-Bar: Manual control for transitions.
- Mute/FTB: MUTE for audio mute, FTB (Fade to Black) for video fade.
2.2 Rear Panel Connections

Figure 3: Rear Panel Connections
- MIC/Line Level In: Two 3.5mm audio input jacks for microphones or line-level audio.
- HDMI IN 1-4: Four HDMI inputs for video sources.
- MULTIVIEW (AUX) OUT: HDMI output for monitoring multiple sources.
- PGM OUT: HDMI output for the program feed.
- USB OUT (Type-C): USB-C port for capturing and streaming to a PC.
- LAN: RJ45 port for PC software remote control.
- TALLY: DE-15/DB-15 port for tally light connection.
- DC 12V IN: Power input for the 12V DC adapter.
- USB (Type-A): USB-A port for firmware updates or connecting external devices.
3. Setup
- Power Connection: Connect the provided 12V DC power adapter to the 'DC 12V IN' port on the rear panel and plug it into a power outlet.
- Video Input Connection: Connect your HDMI video sources (e.g., cameras, computers) to the 'HDMI IN 1-4' ports. The switcher auto-detects input formats (1080p, 1080i, 720p, 576i, 480p).
- Audio Input Connection: If using external microphones or line-level audio, connect them to the 'MIC/Line Level In' 3.5mm jacks.
- Monitor Connection: Connect a display monitor to the 'MULTIVIEW (AUX) OUT' port to view all inputs, program, and status information.
- Program Output Connection: Connect your main output display or recording device to the 'PGM OUT' HDMI port.
- Streaming/Recording Connection: For live streaming or recording to a PC, connect the 'USB OUT (Type-C)' port to your computer.
- Network Connection (Optional): For PC software remote control, connect an Ethernet cable from your network to the 'LAN' port.
- Tally Connection (Optional): If using tally lights, connect them to the 'TALLY' port.
4. Operating Instructions
4.1 Basic Switching
- Press the Power Button to turn on the switcher.
- To select a source for the Program (PGM) output, press the corresponding numbered button (1-4) in the PGM row. The button will illuminate red.
- To select a source for the Preview (PVW) monitor, press the corresponding numbered button (1-4) in the PVW row. The button will illuminate green.
- Use the CUT button for an instant, hard cut transition between PVW and PGM.
- Use the AUTO button for a smooth, automatic transition between PVW and PGM, using the selected transition effect and speed.
- The T-Bar allows for manual control of transitions. Move the T-Bar up or down to smoothly transition between the PVW and PGM sources.
4.2 Audio Mixing
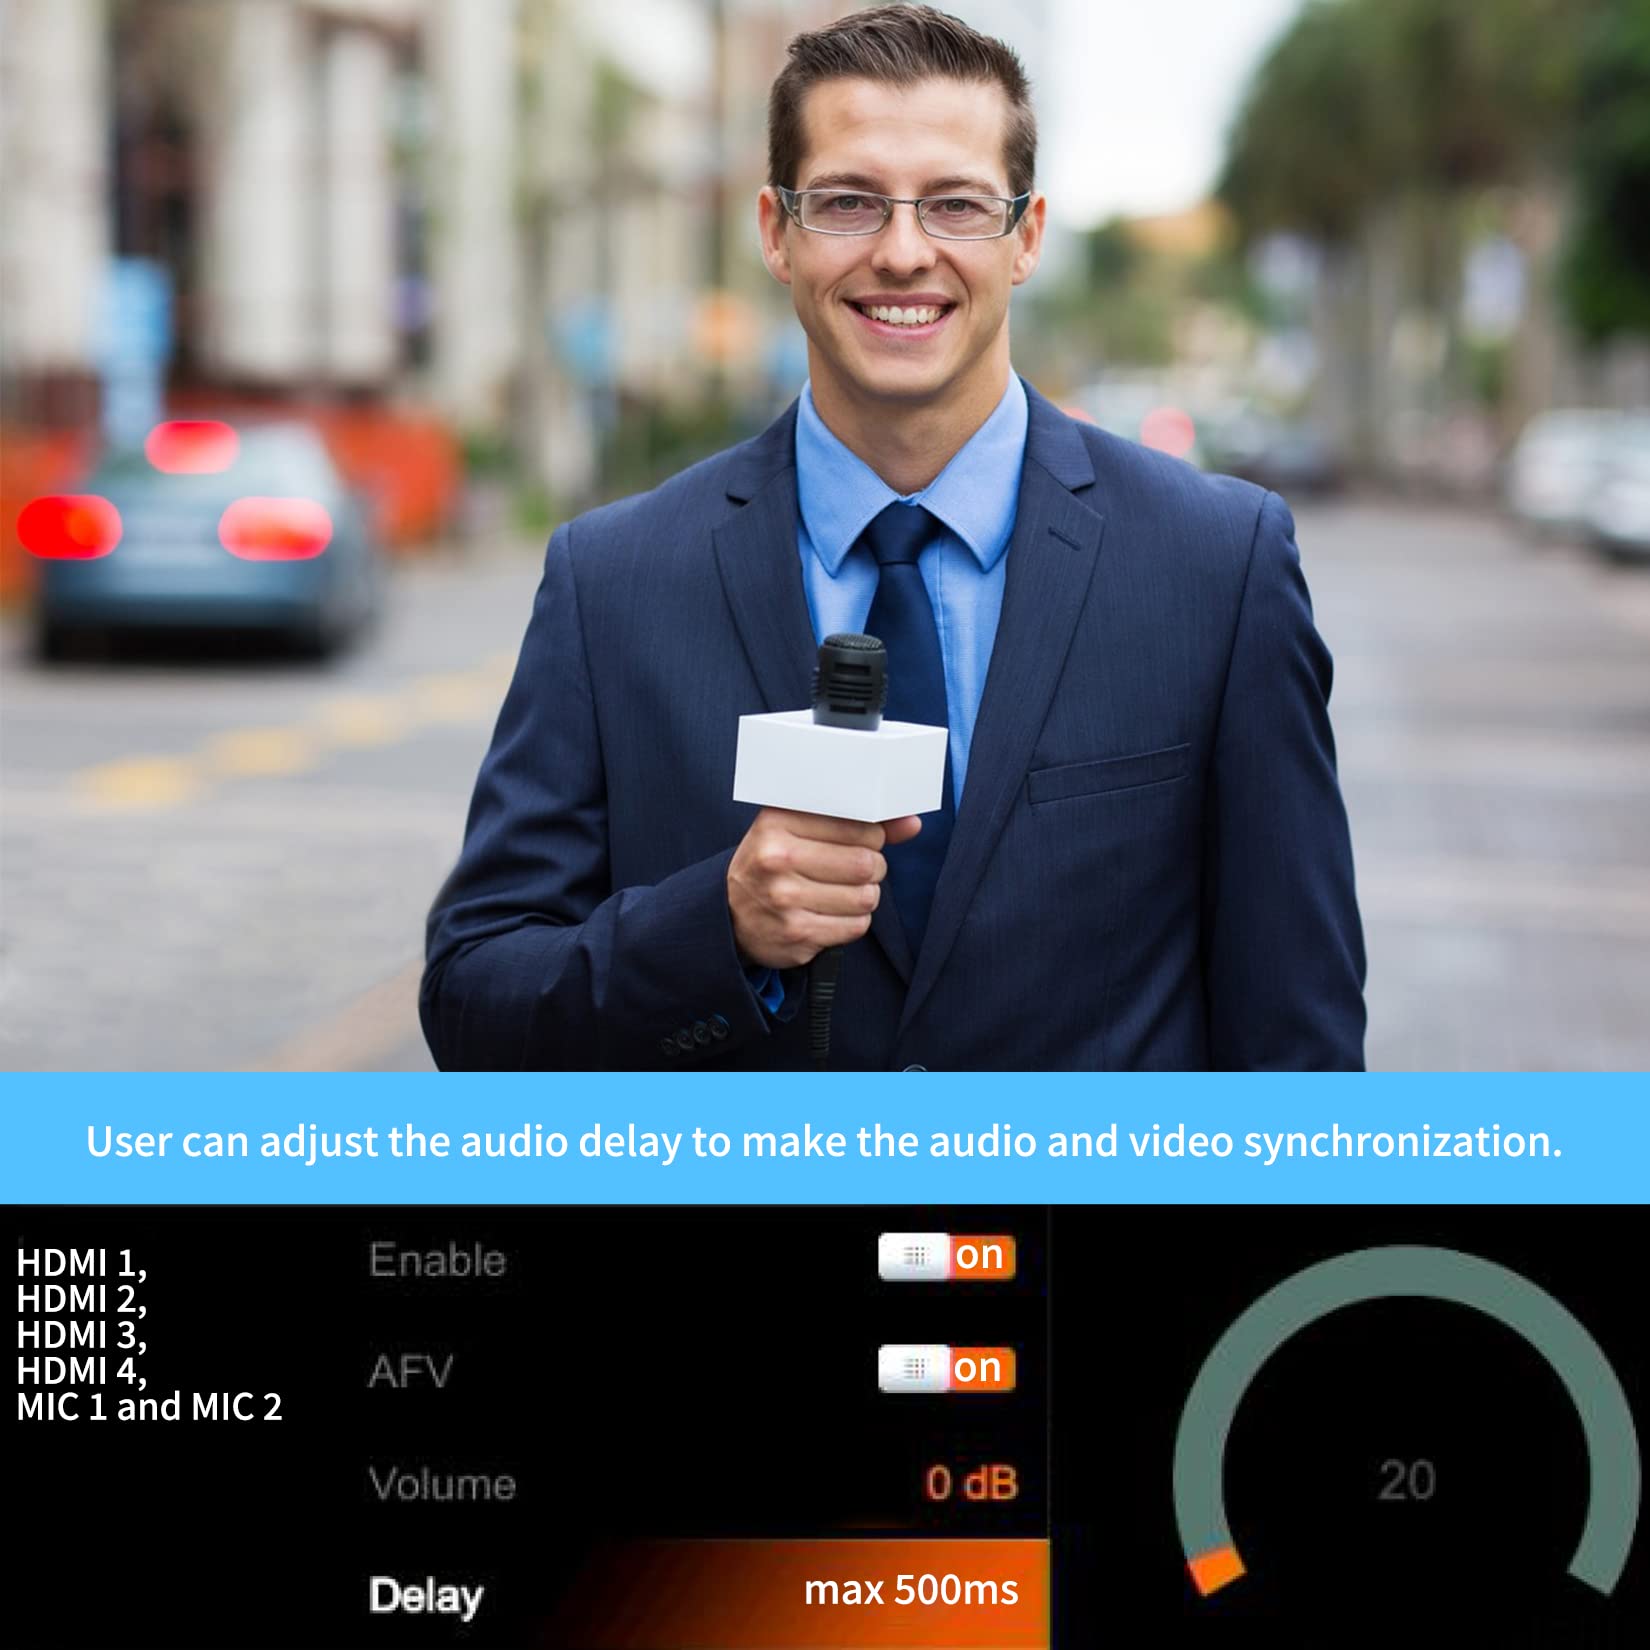
Figure 4: Multiview Display with Audio Mixer
- The switcher features an audio mixer for HDMI embedded audio and 2-channel MIC/line inputs.
- Use the AUDIO ON button to enable or disable audio for a specific HDMI input.
- Adjust the master audio level using the MASTER button and the VOL+ / VOL- buttons.
- Individual audio levels for HDMI inputs and MIC inputs can be adjusted via the on-screen menu, accessible by pressing the MENU button.
- Audio delay is available to synchronize audio with video. This can be adjusted in the menu.
4.3 Keying and Overlays
- Chroma Key: Use the CHROMA button and its 'ON AIR' button to activate green/blue screen keying. Adjust parameters via the menu.
- Luma Key: Use the LUMA button and its 'ON AIR' button for luminance-based keying.
- DSK (Downstream Key): Activate graphics or lower thirds using the DSK button and 'ON AIR'.
- PIP (Picture-in-Picture) / POP (Picture-outside-Picture): The switcher supports two PIP layers (PIP1, PIP2). Press the respective PIP button and 'ON AIR' to activate. Position and size can be adjusted in the menu.
- Logo Overlay: Use the LOGO button and 'ON AIR' to display a stored logo.
4.4 Transitions and Effects
- Select transition effects such as MIX, DIP, WIPE, or INV (Invert) using the dedicated buttons.
- Adjust the transition speed using the SPEED1 and SPEED2 buttons.
- The FTB (Fade to Black) button provides a quick fade to a black screen.
4.5 Multiview Display

Figure 5: Multiview Layout Options
- The multiview output allows you to monitor all input sources, program output, preview output, and various status indicators on a single screen.
- Layouts can be configured (e.g., horizontal or vertical) through the on-screen menu.
4.6 PC Software Remote Control
- Connect the switcher to a PC via the LAN port for advanced control and configuration using dedicated software.
- This allows for detailed adjustments of settings, media library management, and remote operation.
5. Maintenance
- Cleaning: Use a soft, dry cloth to clean the exterior of the device. Avoid liquid cleaners or abrasive materials.
- Storage: Store the switcher in a cool, dry place away from direct sunlight and extreme temperatures.
- Firmware Updates: Periodically check the manufacturer's website for firmware updates to ensure optimal performance and access to new features. Use the USB Type-A port for updates.
6. Troubleshooting
- No Power: Ensure the power adapter is securely connected to the device and a working power outlet. Check the power indicator light.
- No Video Input: Verify that HDMI cables are securely connected to both the source and the switcher. Confirm the input source is active and outputting a compatible video format (1080p, 1080i, 720p, 576i, 480p).
- No Video Output: Check HDMI connections to the monitor/recording device. Ensure the correct input is selected on the monitor.
- No Audio: Confirm audio is enabled for the selected input in the audio mixer settings. Check microphone connections and levels.
- PC Software Connection Issues: Ensure the LAN cable is properly connected and network settings are correct. Verify that the PC software is the correct version for your device.
7. Specifications
| Feature | Specification |
|---|---|
| Model Number | HVS0402U |
| Video Input Sources | 4 (HDMI) |
| Video Input Connectors | 4 x HDMI female |
| Input Video Format | HDMI 1080p, 1080i, 720p, 576i, 480p (auto-detected) |
| Audio Input Format | Analog (3.5mm Mic/Line In) |
| Video Output Channels | 2 (PGM, Multiview) |
| Output Audio Format | Analog |
| Monitor Output | 1 x HDMI (Multiview) |
| USB Output | 1 x USB Type-C (for capturing and streaming) |
| Other I/O | 1 x DE-15/DB-15 Tally Input, 1 x RJ45 LAN, 1 x USB Type-A (firmware/service) |
| Processing Resolution | 1080p |
| Graphics Memory | 32 Images |
| Audio Mixing | 2-Channel mixing |
| Compatible Services | Facebook Live, Livestream, Skype, Twitch, YouTube Live |
| Power Input | 12 VDC at 2 A (12 W device input) |
| Operating Temperature | -4 to 140°F (-20 to 60°C) |
| Storage Temperature | -22 to 158°F (-30 to 70°C) |
| Dimensions (L x W x H) | 9.63 x 5.64 x 1.75 inches (24.46 x 14.33 x 4.45 cm) |
| Weight | 2.3 lbs (1.04 kg) |
8. Product Video Overview
Watch this official product video for a visual demonstration of the AVMatrix HVS0402U's features and functionality.
Video: AVMatrix HVS0402U Micro 4-Channel HDMI Live Stream Multi-Format Video Switcher demonstration.


