
1. Introduction
This manual provides detailed instructions for the KAOLALI OBD2 + GPS Dual System Head-Up Display. This device offers a comprehensive display of vehicle data through both OBD2 and GPS systems, enhancing driving information accessibility. It is designed for universal compatibility with most vehicles manufactured after 2012.

Image 1.1: The KAOLALI OBD2+GPS Dual System Head-Up Display.
2. Package Contents
Verify that all items listed below are included in your package:
- 1x Car HUD Display
- 1x OBD2 Cable
- 1x Velcro Strip
- 1x User Manual
- 1x Installation Tool (plastic pry tool)
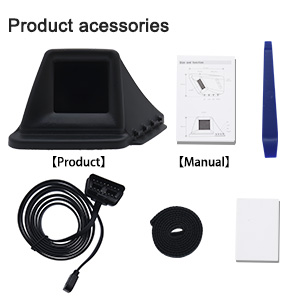
Image 2.1: Contents included in the KAOLALI HUD package.
3. Features
The KAOLALI Head-Up Display integrates both OBD2 and GPS systems to provide comprehensive vehicle data. The display interface can be switched between modes to show relevant information.
3.1. OBD2 Mode Data
When connected via OBD2, the device can display the following vehicle parameters:
- Speed
- RPM (Revolutions Per Minute)
- Water Temperature
- Voltage
- Fuel Consumption
- Oil Temperature
- Clock
- Single Trip Distance
- Single Trip Time
- Turbine Pressure
- Acceleration Test
- Brake Test
- Overspeed Alarm
- Engine Fault Alarm
- Fault Code Elimination
- Water Temperature Alarm
- Speed Alarm
- Voltage Alarm
- Kilometer Switch
- Driving Fatigue Reminder
- Automatic and Manual Brightness Adjustment

Image 3.1: Visual representation of data available in OBD2 mode.
3.2. GPS Mode Data
When operating in GPS mode, the device provides the following information:
- Speed (KM/H or MPH)
- Clock
- Driving Time
- Distance Traveled
- Satellite Number
- Altitude
- Compass

Image 3.2: Visual representation of data available in GPS mode.
Note: The default operating mode is OBD2.
4. Installation
The KAOLALI HUD offers two primary installation methods: A-pillar mounting and center console placement. Both methods are designed for simple plug-and-play setup.
4.1. General Installation Steps
- Connect the OBD2 Cable: Locate your vehicle's OBD2 port, typically found under the dashboard on the driver's side. Plug in the provided OBD2 cable.
- Route the Cable: Carefully route the OBD2 cable to your desired display location, ensuring it does not interfere with driving controls or airbags. Use the included plastic pry tool to tuck the cable neatly under trim panels.
- Mount the HUD: Choose your preferred mounting location (A-pillar or center console) and secure the HUD using the provided Velcro strip.
- Connect to HUD: Plug the other end of the OBD2 cable into the HUD device.
- Power On: Start your vehicle. The HUD should power on automatically and begin displaying data.

Image 4.1: Illustration of A-pillar and center console installation options.
Video 4.1: Demonstration of the installation process and various display modes in a vehicle.
Compatibility Note: This HUD is compatible with most vehicles manufactured after 2012. If you encounter compatibility issues, please refer to the troubleshooting section or contact customer support.
5. Operating Instructions
The device features a simple control interface with a power button and navigation buttons (M, Left, OK, Right) for menu interaction.
5.1. Device Layout and Controls

Image 5.1: Front and side views of the HUD with labeled components and dimensions.
- Power On/Off: Press and hold the power button to turn the device on or off. The device typically powers on/off with the vehicle ignition.
- M Button: Used to switch between different display interfaces or enter menu settings.
- Left/Right Buttons: Navigate through menu options or adjust values.
- OK Button: Confirm selections or enter sub-menus.
- Light Sensor: Automatically adjusts display brightness based on ambient light conditions.
5.2. Switching Display Modes
Press the M button to cycle through available display interfaces, showing different combinations of OBD2 or GPS data. The default mode is OBD2.
5.3. Accessing Settings
To access the settings menu, press and hold the M button. Use the Left/Right buttons to navigate and the OK button to select or confirm changes. Settings may include unit conversion (KM/H to MPH), alarm thresholds, and brightness adjustments.
6. Specifications
| Feature | Detail |
|---|---|
| Product Dimensions (L x W x H) | 11 x 7.5 x 11 cm |
| Item Weight | 220 Grams |
| Manufacturer | KAOLALI |
| Model Number | HUD_1 |
| Material Type | Acrylonitrile Butadiene Styrene (ABS) |
| System Compatibility | OBD2 (most vehicles after 2012) + GPS (universal) |
7. Troubleshooting
If you encounter issues with your KAOLALI HUD, please refer to the following common solutions:
- No Display/Power: Ensure the OBD2 cable is securely connected to both the vehicle's OBD2 port and the HUD. Check vehicle ignition status.
- Inaccurate Speed Reading: If using GPS mode, ensure the device has a clear view of the sky for satellite acquisition. In OBD2 mode, verify vehicle compatibility. Speed calibration options may be available in settings.
- OBD2 Data Not Displaying: Confirm your vehicle is compatible with OBD2 systems (generally vehicles manufactured after 2012). Try restarting the vehicle and the HUD.
- Alarms Triggering Incorrectly: Adjust alarm thresholds (e.g., overspeed, voltage) within the device settings.
- Display Brightness Issues: Check if automatic brightness adjustment is enabled. If so, ensure the light sensor is not obstructed. Manual brightness adjustment is also available in settings.
- Engine Fault Code: The device can display and clear engine fault codes. Consult your vehicle's manual or a qualified mechanic for persistent fault codes.
For issues not covered here, please contact customer support.
8. Warranty and Support
KAOLALI is committed to providing quality products. For warranty information or technical support, please refer to the contact details provided with your purchase or visit the official KAOLALI website. Keep your purchase receipt as proof of purchase for warranty claims.
