
A-Tech SNPMKYF9C/8G-ATC

A-Tech 8GB DDR4 SODIMM Memory Module User Manual
Model: SNPMKYF9C/8G-ATC
1. Product Overview
This manual provides essential information for the installation, operation, and maintenance of your A-Tech 8GB DDR4 2400MHz PC4-19200 Non-ECC SODIMM memory module. This module is specifically designed as a compatible RAM upgrade for Dell Latitude 14 Rugged 5424 laptops and other compatible systems, enhancing system performance by improving loading times, boosting responsiveness, and supporting greater workloads.

Figure 1: A-Tech 8GB DDR4 SODIMM Memory Module in its protective packaging.
A-Tech memory modules undergo extensive quality control testing to ensure dependable and reliable performance.

Figure 2: A-Tech memory modules are rigorously tested for reliability.
2. Specifications
The A-Tech 8GB DDR4 SODIMM module features the following technical specifications:
| Capacity | 8GB (1 x 8GB Module) |
| Memory Type | DDR4 SODIMM |
| Speed | 2400 MHz (PC4-19200 / PC4-2400T-S) |
| Pin Count | 260-Pin |
| ECC Type | Non-ECC Unbuffered |
| Rank | 1Rx8 - Single Rank x8 |
| Voltage | 1.2V |
| Model Number | SNPMKYF9C/8G-ATC |
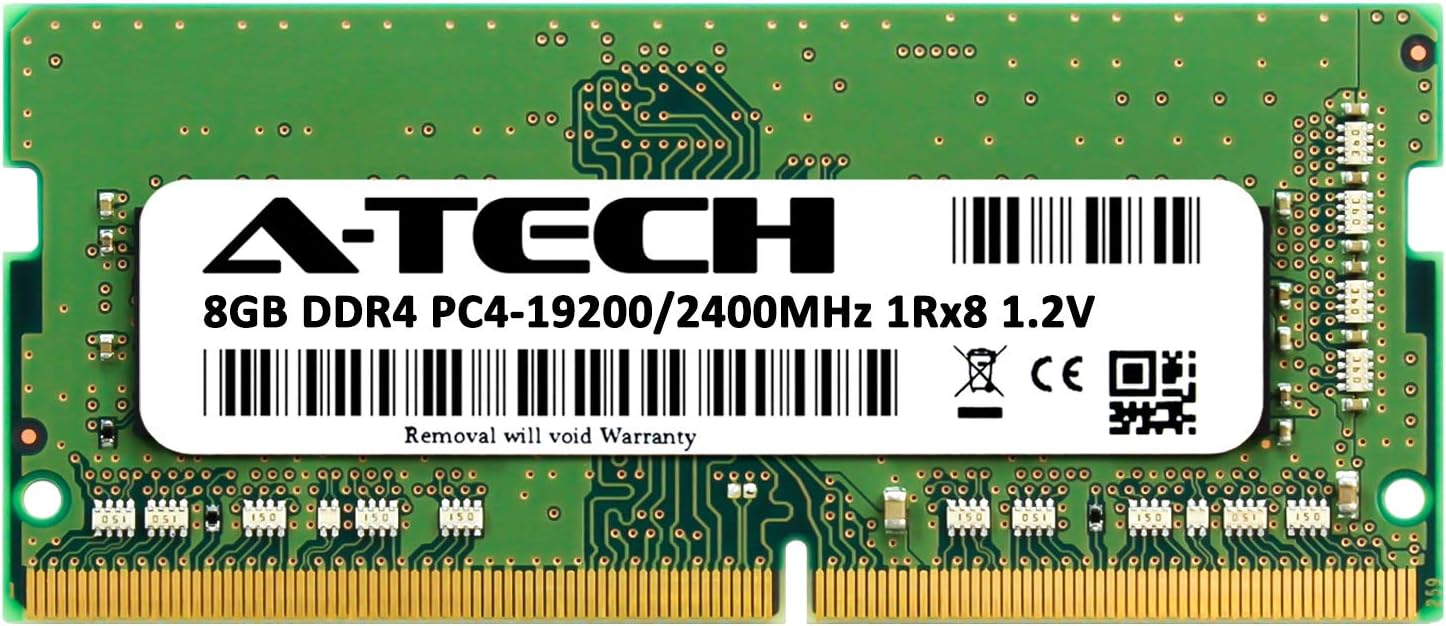
Figure 3: Top view of the A-Tech 8GB DDR4 SODIMM module, showing the product label.

Figure 4: Physical dimensions of the A-Tech 8GB DDR4 SODIMM module.
3. Setup and Installation
Before installing your new memory module, please read the following important notes and precautions:
- This module is a Non-ECC Laptop SODIMM and is designed for laptops, mini PCs, and All-in-One (AIO) systems.
- NOT COMPATIBLE WITH SERVER SYSTEMS or Desktop PCs.
- Always refer to your system's manual for proper memory seating and channel guidelines specific to your device.
- Ensure your system supports DDR4 SODIMM memory at 2400MHz and is Non-ECC.
- Handle the memory module by its edges to avoid touching the gold connectors or integrated circuits.
- Discharge any static electricity from your body before handling the module by touching a grounded metal object.
Installation Steps:
- Power Off and Disconnect: Completely shut down your laptop or AIO system. Disconnect the power adapter and remove the battery (if applicable).
- Access Memory Slots: Locate and open the memory compartment on your system. This usually involves removing a panel on the bottom of a laptop or the back of an AIO. Refer to your system's manual for exact instructions.
- Remove Existing Modules (if applicable): If replacing existing memory, gently push the retention clips outwards on both sides of the SODIMM module. The module will pop up at an angle. Carefully pull it out of the slot.
- Insert New Module: Align the notch on the A-Tech SODIMM module with the key in the memory slot. Insert the module at a 45-degree angle, applying firm but gentle pressure until it is fully seated.
- Secure Module: Push the module down until the retention clips on both sides snap into place, securing the module horizontally.
- Close Compartment: Replace the memory compartment cover and secure it.
- Reconnect Power: Reinsert the battery (if removed) and reconnect the power adapter.
- Power On: Turn on your system. The system should automatically detect the new memory. You may need to enter the BIOS/UEFI setup to confirm the new memory size.

Figure 5: A-Tech SODIMM modules are designed for Laptop, Mini PC, and AIO systems.
4. Operating Principles and Performance Benefits
Random Access Memory (RAM) serves as your computer's short-term data storage, allowing for quick access to information by the CPU. When you open applications, browse the web, or work on documents, your system temporarily stores data in RAM for rapid retrieval.
Upgrading your system's RAM with an A-Tech module provides several key benefits:
- Faster Loading Times: Applications and files load more quickly as more data can be pre-fetched and stored in accessible memory.
- Improved Responsiveness: Your system will feel snappier and more fluid, especially when multitasking or switching between applications.
- Greater Workload Capacity: More RAM allows your computer to handle more demanding tasks simultaneously, such as video editing, large spreadsheets, or running multiple virtual machines, without significant slowdowns.
- Reduced Bottlenecks: Insufficient RAM can be a major bottleneck, forcing your system to rely on slower storage (like an SSD or HDD) for virtual memory. An upgrade mitigates this.

Figure 6: Upgrade your system's performance with A-Tech Memory.
5. Maintenance
Memory modules are generally maintenance-free once installed. However, consider the following for optimal longevity and performance:
- Keep System Clean: Regularly clean the interior of your laptop or AIO to prevent dust buildup, which can impede airflow and lead to overheating. Use compressed air to gently clear dust from fans and vents.
- Avoid Physical Damage: Once installed, avoid unnecessary removal or re-insertion of the module. If handling is required, always follow proper anti-static precautions.
- Software Updates: Keep your operating system and drivers updated. While not directly related to RAM hardware, software optimization can ensure your system utilizes memory efficiently.
- Environmental Conditions: Operate your system within recommended temperature and humidity ranges to prevent component degradation.
6. Troubleshooting
If you encounter issues after installing your A-Tech memory module, consider the following troubleshooting steps:
- System Not Booting / No Display:
- Ensure the memory module is fully seated in its slot. Re-seat the module by removing it and re-inserting it firmly until the clips snap into place.
- Verify that the module is compatible with your system (DDR4 SODIMM, Non-ECC, correct speed). Refer to your system's manual.
- If you have multiple modules, try installing only the new A-Tech module to isolate the issue. If it works, try adding other modules one by one.
- Check if your system's BIOS/UEFI is up to date. An outdated BIOS might not fully support newer memory modules.
- System Instability / Blue Screens (BSOD):
- Run a memory diagnostic tool (e.g., Windows Memory Diagnostic or MemTest86) to check for errors.
- Ensure the module is correctly seated.
- Confirm that the module's specifications (voltage, speed) match your system's requirements.
- Incorrect Memory Size Detected:
- Verify the module is fully seated.
- Check your system's BIOS/UEFI settings to ensure the memory is recognized correctly.
- Ensure your operating system is 64-bit to fully utilize more than 4GB of RAM.
If these steps do not resolve the issue, please contact A-Tech customer support for further assistance.
7. Warranty and Support
A-Tech is committed to providing high-quality products and excellent customer service.
Lifetime Warranty:
All A-Tech memory modules are backed by a Lifetime Warranty. This warranty covers defects in materials and workmanship for the lifetime of the product. For detailed warranty terms and conditions, please refer to the official A-Tech website or contact customer support.
Customer Support:
A-Tech offers complimentary United States-based technical support to assist you before, during, and after your purchase. If you have any questions, require installation guidance, or need troubleshooting assistance, please do not hesitate to reach out.
Contact Information:
- Website: atechmemory.com
- QR Code Support: Scan the QR code on your product packaging or module label for quick access to support resources. (Link to QR support page)
- For specific contact methods (phone, email), please visit the A-Tech website.
Related documentsSNPMKYF9C/8G-ATC


Ask a question about this manual
Ask about setup, troubleshooting, compatibility, parts, safety, or missing instructions. Manuals+ will review the question and use this page’s manual context to help answer it.