
WiMiUS H7 Trail Camera
WiMiUS H7 Trail Camera User Manual
Model: H7 Trail Camera | Brand: WiMiUS
1. Introduction
Thank you for choosing the WiMiUS H7 Trail Camera. This manual provides detailed instructions for setting up, operating, and maintaining your camera to ensure optimal performance. The H7 Trail Camera is designed for wildlife monitoring, home security, and various outdoor surveillance applications, featuring 16MP photos, 1080P HD videos, infrared night vision, and an IP66 waterproof rating.
2. Package Contents
Please check the package to ensure all items are present:
- 1 x WiMiUS H7 Trail Camera
- 1 x USB Cable
- 1 x User Manual
- 1 x Mounting Strap
- 1 x Mounting Bracket
- 1 x Wall Mount
- 1 x Wrench
- 3 x Screws
- 3 x Wall Plugs
3. Product Overview
Familiarize yourself with the components and features of your WiMiUS H7 Trail Camera.

Figure 3.1: Front view of the WiMiUS H7 Trail Camera, showcasing its camouflage design and main lens.

Figure 3.2: Exploded view illustrating the internal components of the camera, including the shell, IR LEDs, battery box, battery compartment, PIR sensor, buckle, display, circuit chip, and mounting bracket.
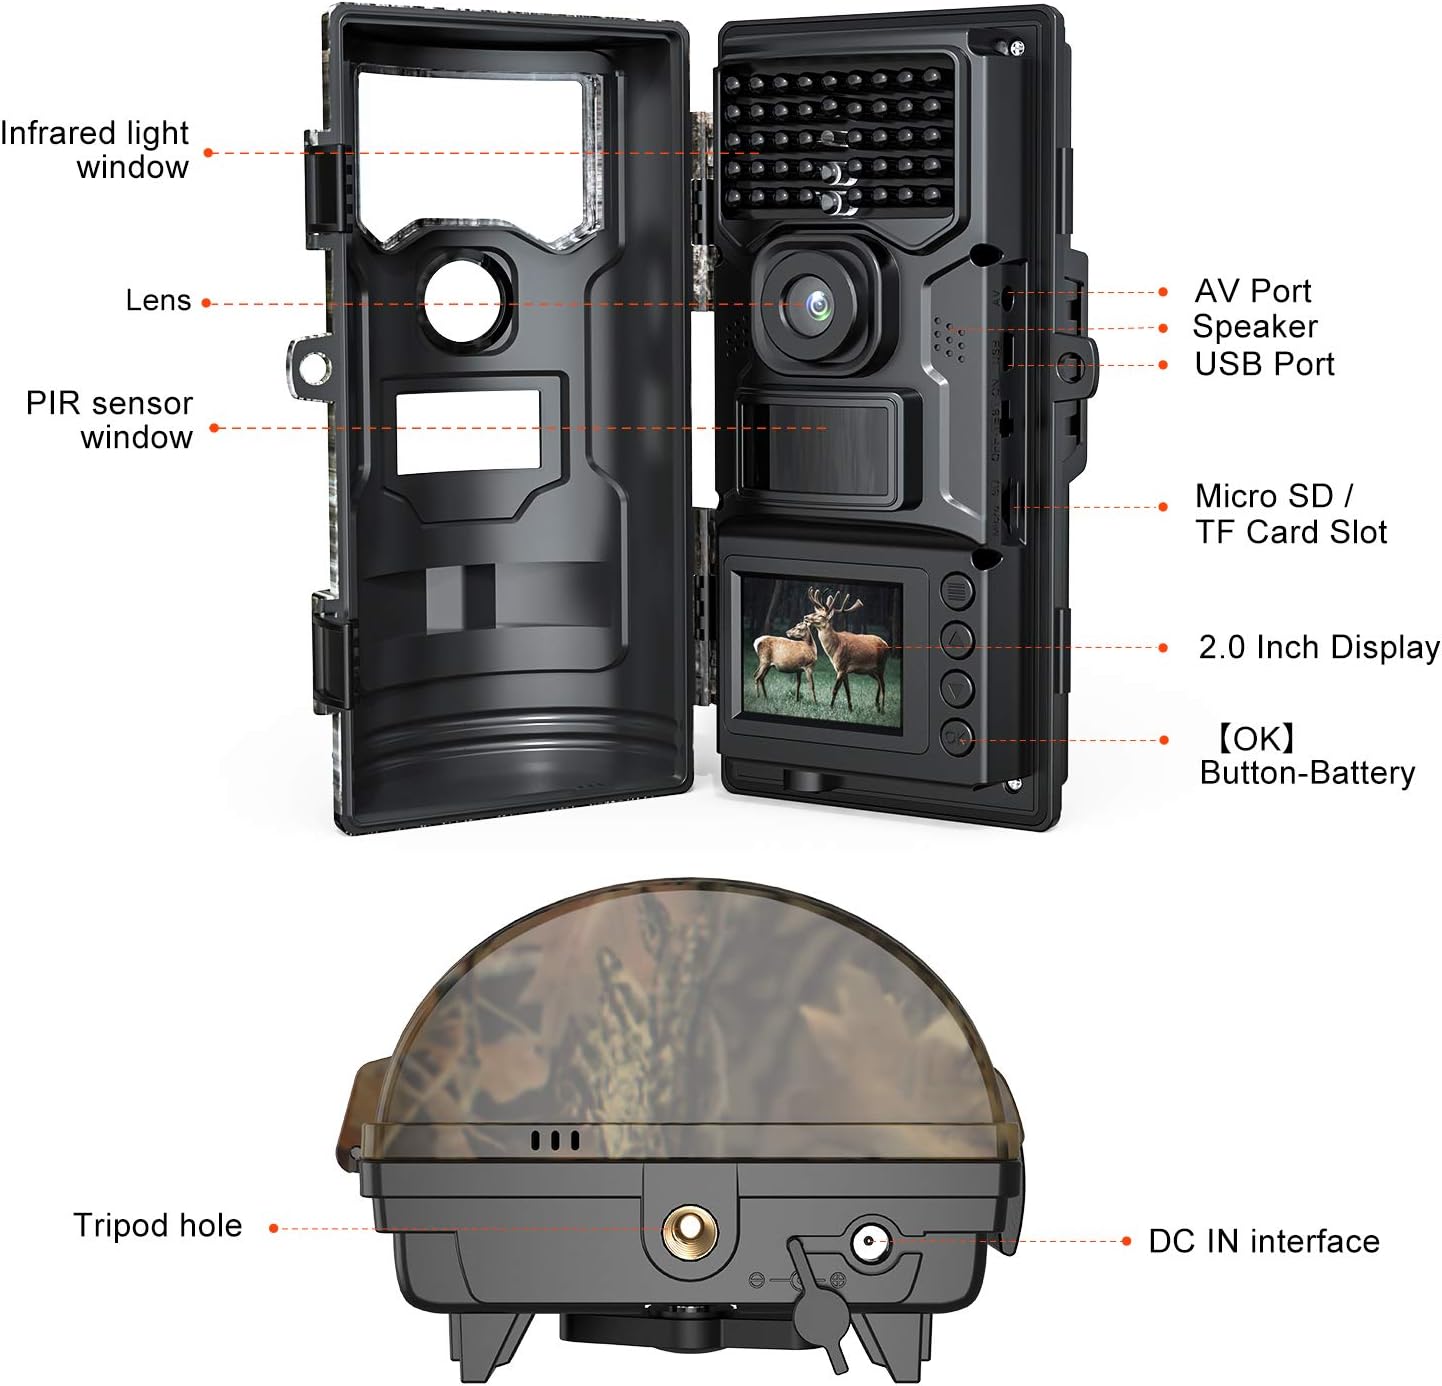
Figure 3.3: Internal view of the camera when opened, showing the infrared light window, lens, PIR sensor window, AV port, speaker, USB port, Micro SD/TF card slot, 2.0-inch display, and control buttons. The bottom view shows the tripod hole and DC IN interface.
Key Features:
- 16MP Photos & 1080P HD Videos: Captures high-quality images and native 1080P resolution videos.
- Super Infrared Night Vision: Equipped with 34pcs 850nm IR LEDs for clear black-and-white images at night, with a maximum trigger distance of 20m.
- Fast Trigger Speed: An impressive 0.5s trigger speed ensures minimal delay between captures. Supports continuous shooting of up to 3 images.
- IP66 Waterproof & Dustproof: Durable design suitable for various outdoor environments.
- Multiple Functions: Includes multi-shot, interval recording, time-lapse, timer, password protection, timestamp, and low battery LED indicator.
4. Setup
4.1 Power Supply
The camera can be powered by 8 AA batteries (not included) or an external 12V, 2A power adapter/solar panel (not included).
- Open the camera housing.
- Insert 8 AA batteries into the battery compartment, ensuring correct polarity (+/-).
- Alternatively, connect a 12V, 2A external power source to the DC IN interface at the bottom of the camera.
4.2 Micro SD Card Installation
A Micro SD card (not included) is required to store photos and videos. The camera supports cards up to a certain capacity (typically 32GB or 64GB, though not specified in input, common for these devices).
- With the camera powered off, locate the Micro SD/TF card slot inside the camera housing.
- Insert the Micro SD card with the gold contacts facing down until it clicks into place.
- To remove, push the card in again until it springs out.
4.3 Mounting the Camera
The camera can be mounted using the included strap or wall mount.
- Using the Mounting Strap: Thread the strap through the slots on the back of the camera and secure it around a tree or pole.
- Using the Wall Mount: Attach the wall mount to a flat surface using the screws and wall plugs. Then, secure the camera to the mounting bracket.
- Ensure the camera is positioned to capture the desired area, avoiding direct sunlight or heat sources that might trigger false detections.

Figure 4.1: The WiMiUS H7 Trail Camera securely mounted on a tree, ready for wildlife observation.
5. Operating Instructions
5.1 Powering On/Off and Mode Selection
The camera typically has an OFF/TEST/ON switch.
- OFF: Powers off the camera.
- TEST: Allows you to access the menu, view captured media, and adjust settings. The PIR sensor is active in this mode for testing detection.
- ON: Activates the camera for automatic recording based on motion detection. The screen will turn off after a few seconds to conserve power.
5.2 Menu Settings
In TEST mode, use the navigation buttons to access and adjust settings on the 2.0-inch display.
- Mode: Select Photo, Video, or Photo+Video.
- Photo Mode: Captures still images.
- Video Mode: Records video clips.
- Photo+Video Mode: Captures a photo followed by a video clip.
- Photo Resolution: Set to 16MP for high-quality images.
- Video Resolution: Set to 1080P for high-definition video recording.
- PIR Interval: Adjust the delay between detections to prevent excessive recordings.
- PIR Sensitivity: Set to High, Medium, or Low based on environmental conditions to optimize motion detection.
- Multi-shot: Capture 1, 2, or 3 photos per trigger.
- Time-Lapse: Set intervals for capturing images over a long period.
- Timer: Schedule specific times for the camera to be active.
- Password Protection: Set a password to prevent unauthorized access.
- Timestamp: Enable or disable date, time, and temperature stamps on photos/videos.
- Format SD Card: Format the Micro SD card before first use and periodically to ensure optimal performance.
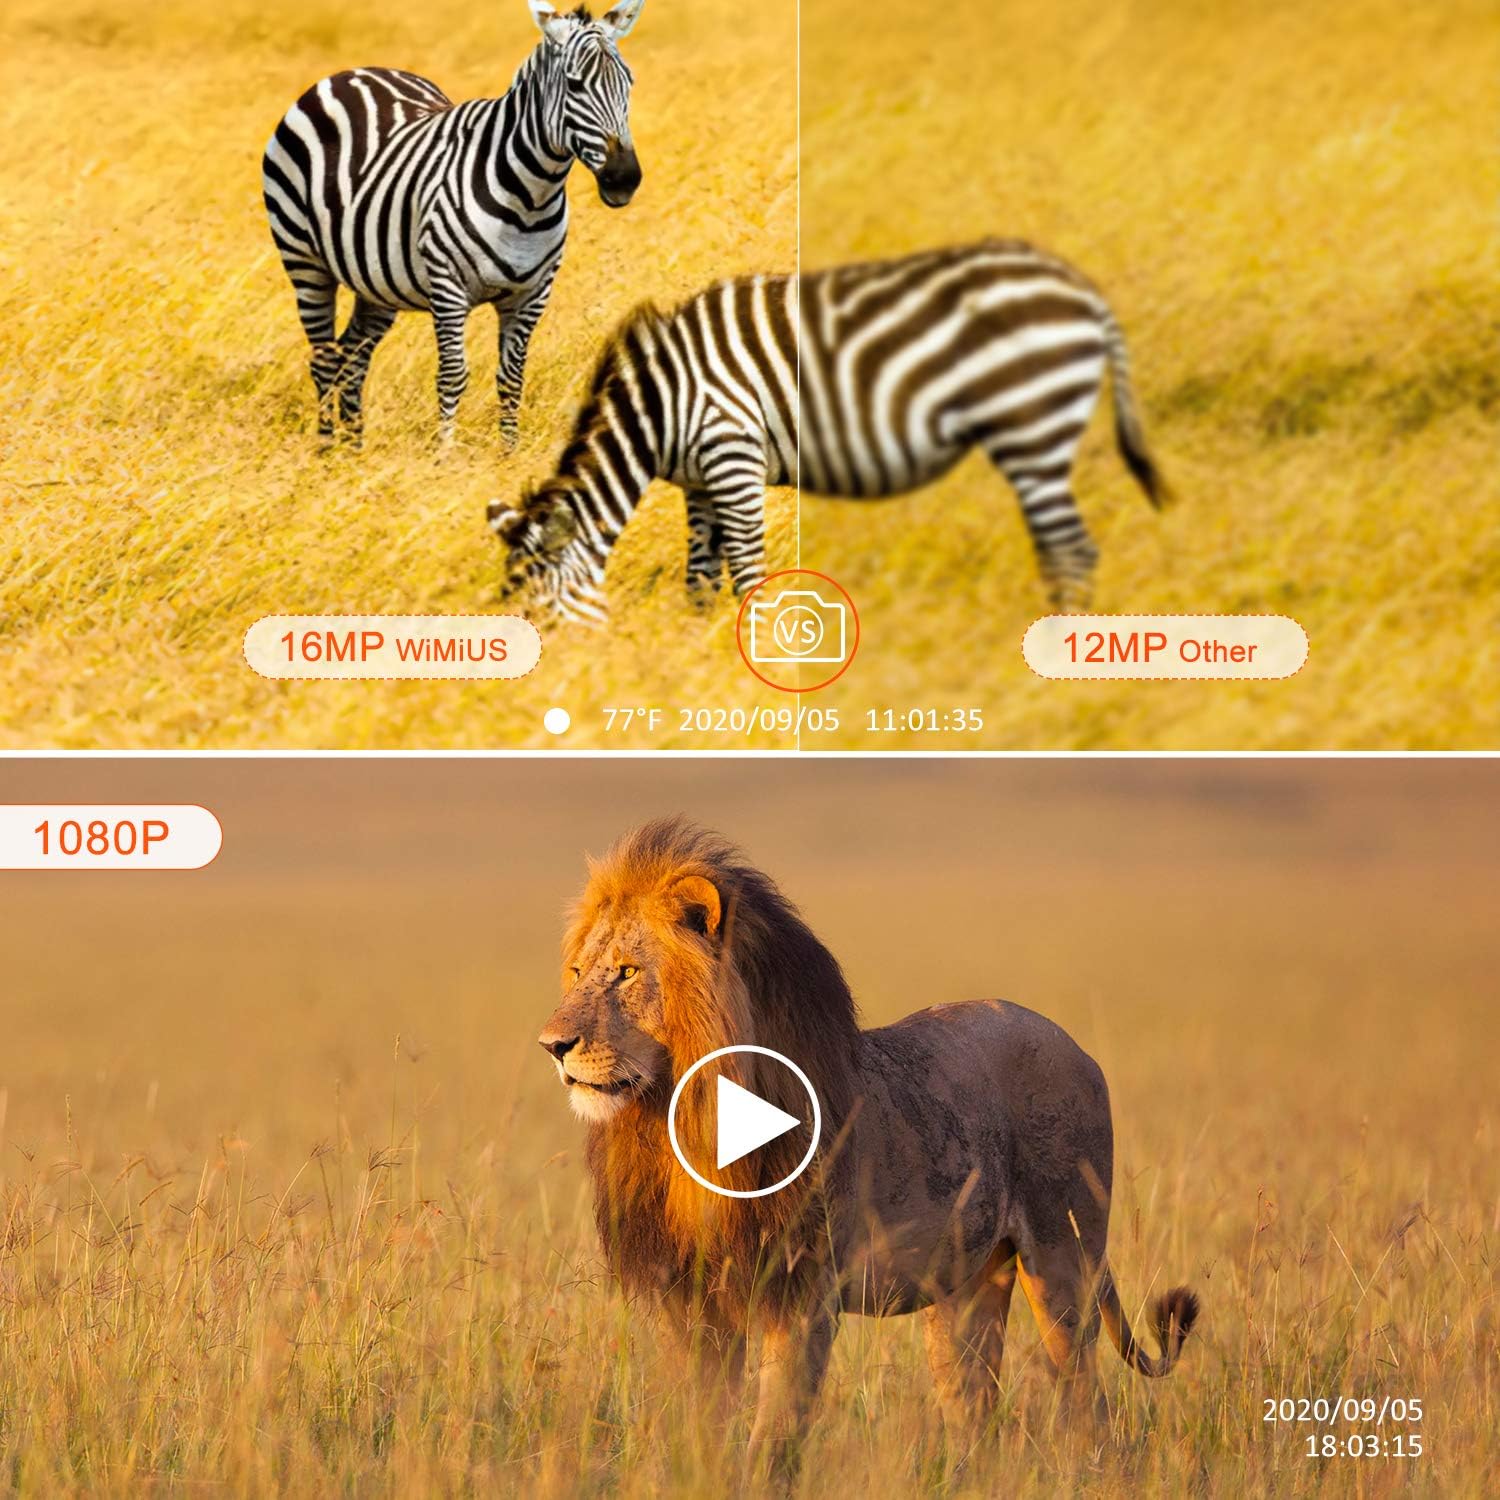
Figure 5.1: Visual representation of the camera's 16MP photo resolution compared to 12MP, and its 1080P video recording capability.

Figure 5.2: Examples of images captured by the camera, demonstrating clear daytime color photos of a rabbit and deer, and high-resolution black-and-white infrared night vision images of lions.

Figure 5.3: Illustration of the camera's incredible trigger sensitivity, featuring a 0.5s trigger time, fast acquisition, three shooting modes, a 90° PIR detection angle, and 70ft infrared distance.
6. Maintenance
- Cleaning: Regularly clean the lens and PIR sensor window with a soft, dry cloth to ensure clear images and accurate detection. Avoid abrasive cleaners.
- Battery Replacement: Replace all batteries when the low battery indicator appears to ensure continuous operation. Do not mix old and new batteries.
- SD Card Management: Periodically back up and format your Micro SD card to prevent data corruption and ensure sufficient storage space.
- Environmental Protection: Although IP66 waterproof, avoid submerging the camera in water. Ensure the battery compartment and ports are securely closed to maintain water resistance.
7. Troubleshooting
| Problem | Possible Cause | Solution |
|---|---|---|
| Camera does not power on. | Batteries are low or inserted incorrectly; external power supply issue. | Check battery polarity, replace with fresh batteries, or verify external power connection. |
| Camera is not recording. | SD card full, corrupted, or not inserted; camera in wrong mode; PIR sensitivity too low. | Format or replace SD card; ensure card is inserted correctly; switch to ON mode; increase PIR sensitivity. |
| Poor image/video quality. | Lens dirty; incorrect resolution settings; insufficient light for night vision. | Clean the lens; set photo/video resolution to maximum (16MP/1080P); ensure IR LEDs are not obstructed. |
| False triggers. | PIR sensitivity too high; camera facing heat sources (e.g., direct sun, moving branches). | Decrease PIR sensitivity; reposition camera to avoid heat sources or moving objects. |
8. Specifications
| Feature | Detail |
|---|---|
| Brand | WiMiUS |
| Model Name | H7 Trail Camera |
| Power Source | Battery Powered (8x AA) / External 12V, 2A |
| Video Capture Resolution | 1080p |
| Color | Brown-01 (Camouflage) |
| Included Components | 1 * WiMiUS Trail Camera, 1 * USB Cable, 1 * Manual, 1 * Mounting Strap, 1 * Mounting Bracket, 1 * Wall Mount, 1 * Wrench, 3 * Screws, 3 * Wall Plugs |
| Form Factor | Box |
| Effective Video Resolution | 1080 Pixels |
| Night Vision Range | 20 Meters |
| Material | Plastic |
| Voltage | 12 Volts |
| Connectivity Technology | Wireless |
| Special Feature | Night Vision |
| Recommended Uses | Motion Detection, Home Security, Wildlife Monitoring |
9. Warranty and Support
The WiMiUS H7 Trail Camera comes with a 12-month customer service warranty from the date of purchase. Please retain your proof of purchase for warranty claims.
For technical support, troubleshooting assistance, or warranty inquiries, please contact WiMiUS customer service. You can find more information and contact details on the official WiMiUS store page: WiMiUS Store on Amazon.
Related documentsH7 Trail Camera

Ask a question about this manual
Ask about setup, troubleshooting, compatibility, parts, safety, or missing instructions. Manuals+ will review the question and use this page’s manual context to help answer it.