
Introduction
This manual provides essential information for the safe and efficient installation, operation, and maintenance of your Dayton G1674811 Belt Drive Motor. Please read these instructions thoroughly before attempting to install or operate the motor. Retain this manual for future reference.
Safety Information
WARNING: Electrical shock hazard. Disconnect power before servicing. Failure to do so can result in serious injury or death.
WARNING: Moving parts hazard. Keep hands and clothing clear of rotating parts. Failure to do so can result in serious injury.
- Always ensure the motor is properly grounded according to local and national electrical codes.
- Do not operate the motor in wet or damp conditions unless it is specifically designed for such environments. This motor is Open Dripproof.
- Ensure all wiring connections are secure and insulated.
- Wear appropriate personal protective equipment (PPE) such as safety glasses and gloves during installation and maintenance.
- Do not exceed the specified voltage or current ratings.
- Ensure adequate ventilation around the motor to prevent overheating.
Product Overview
The Dayton G1674811 is a single-phase, split-phase belt drive motor designed for various industrial and home improvement applications, particularly fan motors. It features a robust rolled steel frame and offers dual-speed operation for versatility.
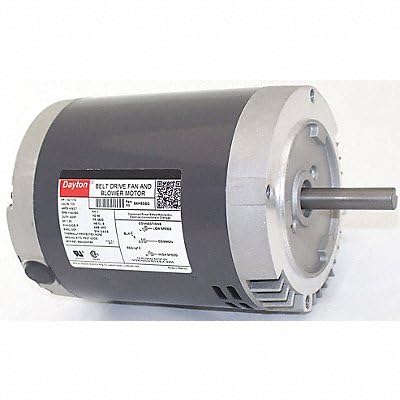
Image: Dayton G1674811 Belt Drive Motor. This image displays the motor from a side angle, showing its main body, shaft, and mounting points.
Key Features:
- Motor Design: Split-Phase
- Horsepower: 1/4 HP and 1/10 HP (dual rating)
- RPM: 1140/850 (dual speed)
- Voltage: 115V AC
- Frame: 56CZ
- Enclosure: Open Dripproof
- Shaft Diameter: 5/8 inch
- Rotation: CW/CCW (reversible)
- Duty Cycle: Continuous
Specifications
| Specification | Value |
|---|---|
| Brand | Dayton |
| Model Name | G1674811 |
| Horsepower | 0.13 HP (1/4 HP, 1/10 HP) |
| Speed | 1140/850 RPM |
| Voltage | 115 Volts AC |
| Full Load Amps | 4.6/3.7 A |
| Frame | 56CZ |
| Frequency | 60 Hz |
| Motor Service Factor | 1.35 |
| Thermal Protection | None |
| Insulation Class | B |
| Max. Ambient Temp. | 104 Degrees F (40 Degrees C) |
| Duty Cycle | Continuous |
| Shaft Rotation | CW/CCW |
| Enclosure Design | Open Dripproof |
| Mounting Type | Face |
| Mounting Position | All Angle |
| Frame Material | Rolled Steel |
| Shaft Diameter | 5/8 inch |
| Item Weight | 27.7 Pounds |
| Product Dimensions | 15.3 x 10.5 x 10.88 inches |
| UPC | 190735373309 |
Setup and Installation
1. Unpacking and Inspection:
- Carefully remove the motor from its packaging.
- Inspect for any visible damage during shipping. Report any damage to the carrier immediately.
- Verify that all components are present.
2. Mounting:
- The motor is designed for face mounting and can be installed in any angle.
- Ensure the mounting surface is flat, rigid, and capable of supporting the motor's weight (27.7 lbs) and operational forces.
- Use appropriate fasteners to secure the motor firmly to prevent vibration and misalignment.
- Ensure proper alignment of the motor shaft (5/8 inch diameter) with the driven equipment (e.g., fan pulley) to prevent premature bearing wear and vibration.
3. Electrical Connection:
WARNING: All electrical work must be performed by a qualified electrician and comply with all applicable electrical codes.
- Ensure the power supply is disconnected at the source before making any connections.
- Verify the power supply voltage matches the motor's rated voltage (115V AC).
- Connect the motor wiring according to the wiring diagram provided on the motor's nameplate or inside the terminal box cover.
- Properly ground the motor frame using a dedicated ground wire.
- This motor has no internal thermal protection. Consider installing external overload protection in the control circuit to prevent motor damage from overheating.
4. Shaft Rotation:
- The motor supports both Clockwise (CW) and Counter-Clockwise (CCW) rotation.
- Refer to the motor's wiring diagram for instructions on how to reverse the rotation direction, if necessary. This typically involves changing connections of specific winding leads.
Operating Instructions
1. Pre-Operation Check:
- Before applying power, ensure all mounting bolts are tight and electrical connections are secure.
- Confirm that the driven equipment is free to rotate and not obstructed.
- Verify that the motor's ventilation openings are clear.
2. Starting the Motor:
- Apply power to the motor. The motor should start smoothly and reach its operating speed.
- Listen for any unusual noises or vibrations. If detected, immediately shut off power and investigate the cause.
3. Speed Selection:
- This motor offers two operating speeds: 1140 RPM and 850 RPM.
- The method for selecting between these speeds will depend on the specific wiring configuration and control system implemented during installation. Refer to the motor's wiring diagram for details on speed control connections.
4. Continuous Operation:
- The motor is rated for continuous duty.
- Monitor the motor's temperature during initial operation to ensure it does not exceed the maximum ambient temperature of 104°F (40°C).
5. Stopping the Motor:
- Disconnect power to the motor using the appropriate control switch or circuit breaker.
Maintenance
Regular maintenance helps ensure the longevity and reliable operation of your Dayton G1674811 motor.
1. Cleaning:
- Periodically clean the exterior of the motor to remove dust, dirt, and debris.
- Ensure that the ventilation openings remain clear to allow for proper airflow and cooling.
- Use a dry cloth or soft brush. Avoid using water or solvents directly on the motor.
2. Inspection:
- Regularly inspect the motor for signs of wear, damage, or loose connections.
- Check mounting bolts for tightness.
- Inspect the motor shaft and coupling for alignment and wear.
- Listen for unusual noises or vibrations during operation, which may indicate a problem.
3. Lubrication:
- This motor typically features sealed bearings that are lubricated for life and do not require additional lubrication. Consult the motor's nameplate or manufacturer's specifications for specific lubrication requirements if any.
Troubleshooting
Before performing any troubleshooting, ensure power is disconnected to prevent electrical shock.
| Problem | Possible Cause | Solution |
|---|---|---|
| Motor does not start | No power supply Incorrect wiring Blown fuse/tripped breaker Motor overload | Check power source Verify wiring against diagram Check and replace fuse/reset breaker Reduce load, check for binding |
| Motor overheats | Excessive load Insufficient ventilation High ambient temperature Incorrect voltage | Reduce load Clear obstructions, ensure airflow Operate within specified temperature limits Verify supply voltage |
| Excessive noise or vibration | Loose mounting bolts Misalignment of driven equipment Worn bearings Unbalanced load | Tighten all mounting bolts Check and correct alignment Contact qualified service personnel Balance the load |
| Motor runs slowly | Low voltage Overload Incorrect wiring for desired speed | Verify supply voltage Reduce load Check wiring diagram for speed selection |
Warranty and Support
For warranty information and technical support, please refer to the documentation provided with your purchase or contact Dayton customer service directly. Keep your purchase receipt as proof of purchase.
Dayton Customer Service: Refer to the official Dayton website or product packaging for current contact information.