
HURI Carburetor
HURI Carburetor Instruction Manual
For Ariens Snow Thrower Models: ST1032, ST824, 924050, 924082, 932101, 924073, 624e, 926LE, 11528LE, ST1028
1. Introduction
This manual provides essential information for the proper installation, operation, and maintenance of your HURI replacement carburetor. This carburetor is designed to be compatible with various Ariens snow thrower models. Please read this manual thoroughly before attempting any installation or maintenance procedures to ensure safe and effective use.
2. Safety Information
Always prioritize safety when working with fuel systems and internal combustion engines. Failure to follow safety precautions can result in serious injury or damage to equipment.
- Ensure the snow thrower engine is OFF and cool before beginning any work.
- Disconnect the spark plug wire to prevent accidental starting.
- Work in a well-ventilated area. Fuel vapors are flammable.
- Wear appropriate personal protective equipment, including safety glasses and gloves.
- Handle fuel with extreme care. Avoid spills and open flames.
- Refer to your snow thrower's original owner's manual for specific safety guidelines and procedures.
3. Package Contents
Verify that all components are present in the package:
- 1x Carburetor
- 1x Gasket
- 1x Fuel Line
- 2x Primer Bulbs
- 1x Fuel Filter
4. Compatibility
This HURI carburetor is a replacement part designed to fit the following Ariens snow thrower models:
- Ariens ST1032 (32" 10HP) with Tecumseh engine
- Ariens ST824
- Ariens 924050
- Ariens 924082
- Ariens 932101
- Ariens 924073 (ST1032 32")
- Ariens 624e (920001, 932039, 932042) with Tecumseh 6hp engine
- Ariens 926LE
- Ariens 11528LE
- Ariens ST1028 (10Hp 26" 28")
- Ariens 924086
- Ariens 924116
- Ariens 926001
- Ariens 926002
- Ariens 932015 (10Hp 26" 28")
- Ariens 932105
Please verify your snow thrower's model number and engine type to ensure proper fitment.
5. Setup and Installation
Replacing a carburetor requires mechanical aptitude. If you are unsure about any step, consult a qualified service technician. This section provides general guidance.
5.1 Preparation
- Park the snow thrower on a level surface.
- Ensure the engine is cool.
- Disconnect the spark plug wire to prevent accidental starting.
- Turn off the fuel supply valve (if equipped) and drain the fuel tank into an approved container.
- Take photos of the existing carburetor and hose connections for reference during reassembly.
5.2 Removing the Old Carburetor
- Remove any air filter housing or shrouds that obstruct access to the carburetor.
- Carefully disconnect the fuel line, throttle linkage, and choke linkage from the old carburetor. Be mindful of springs and small components.
- Unbolt the carburetor from the engine intake manifold. Note the position of any gaskets.
- Remove the old carburetor and discard the old gaskets.
5.3 Installing the New Carburetor
Refer to the images below for visual reference of the HURI carburetor components.

Figure 1: Front view of the HURI carburetor, showing the fuel inlet barb on the left and the main air intake bore with a brass throttle plate visible inside.

Figure 2: Side view of the HURI carburetor, illustrating the throttle and choke linkage mechanisms, along with the fuel bowl at the bottom.
- Install the new gasket(s) in the correct orientation between the carburetor and the engine intake manifold.
- Mount the new HURI carburetor onto the engine, ensuring it is seated properly. Tighten mounting bolts securely but do not overtighten.
- Reconnect the throttle linkage and choke linkage to the new carburetor. Refer to your photos taken during disassembly. Ensure linkages move freely without binding.
- Install the new fuel line, primer bulbs, and fuel filter as needed. Ensure all connections are secure to prevent fuel leaks.
- Reinstall any air filter housing or shrouds removed earlier.

Figure 3: Angled view of the HURI carburetor, highlighting the fuel inlet, throttle, and choke linkages from a different perspective.
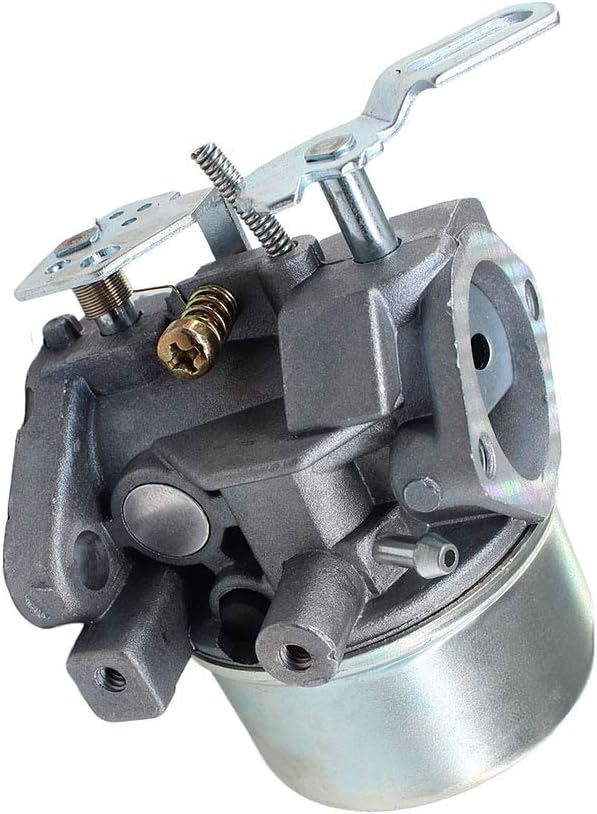
Figure 4: Rear angled view of the HURI carburetor, showing the mounting bolt holes and the overall compact design.
6. Operating Instructions (Post-Installation)
After installing the new carburetor, follow these steps to prepare for operation:
- Refill the fuel tank with fresh, appropriate fuel for your snow thrower.
- Open the fuel supply valve.
- Prime the carburetor by pressing the primer bulb several times until fuel is visible in the bulb or fuel lines.
- Reconnect the spark plug wire.
- Follow your snow thrower's original starting procedure. The engine may require a few extra pulls to start initially as the fuel system purges air.
- Once started, allow the engine to warm up and check for smooth operation and any fuel leaks.
7. Maintenance
Proper maintenance ensures the longevity and performance of your carburetor and snow thrower.
- Fuel Quality: Always use fresh, clean fuel. Stale fuel can cause carburetor clogging. Consider using a fuel stabilizer, especially during storage.
- Fuel Filter: Regularly inspect and replace the fuel filter (included in package) to prevent contaminants from reaching the carburetor.
- Air Filter: Ensure the air filter is clean and free of debris. A clogged air filter can affect engine performance and fuel mixture.
- Storage: Before long-term storage, drain the fuel system or run the engine until it runs out of fuel to prevent gumming and varnish buildup in the carburetor.
8. Troubleshooting
If you encounter issues after carburetor replacement, consider the following:
| Symptom | Possible Cause | Solution |
|---|---|---|
| Engine will not start | No fuel, clogged fuel filter, incorrect choke/throttle setting, spark plug issue, air leak. | Check fuel level, replace fuel filter, adjust choke/throttle, check spark plug, ensure all connections are tight. |
| Engine runs rough or stalls | Improper fuel mixture, air leak, dirty air filter, fuel quality issue. | Verify carburetor installation, check for air leaks around gaskets, clean/replace air filter, use fresh fuel. |
| Fuel leaks | Loose fuel line connection, damaged gasket, cracked fuel line. | Tighten fuel line clamps, replace gasket, replace fuel line. |
| Primer bulb not working | Cracked bulb, clogged primer line. | Replace primer bulb, clear primer line. |
If problems persist, it is recommended to consult a professional small engine mechanic.
9. Specifications
- Brand: HURI
- Product Type: Replacement Carburetor
- Compatible Vehicle Type: Snowblower / Snow Thrower
- Recommended Uses: Snowblower engine fuel delivery
10. Warranty and Support
As this is a replacement part, warranty coverage is typically provided by the seller or manufacturer for defects in materials and workmanship. Please retain your proof of purchase. For specific warranty details or technical support, please contact the HURI customer service or the retailer from whom the product was purchased.
Ask a question about this manual
Ask about setup, troubleshooting, compatibility, parts, safety, or missing instructions. Manuals+ will review the question and use this page’s manual context to help answer it.