
1. Introduction
This manual provides detailed instructions for the proper installation, operation, and maintenance of your Gravity G5-12D4 12-inch Car Audio Subwoofer and Gravity WZ3000.1D Warzone Class D Amplifier, along with the included 4 Gauge Amplifier Installation Kit. Please read this manual thoroughly before beginning installation to ensure correct setup and optimal performance.
2. Safety Information
Always observe the following safety precautions during installation and operation:
- Disconnect the vehicle's negative battery terminal before any electrical work.
- Ensure all wiring is properly insulated to prevent short circuits.
- Mount components securely to prevent movement during vehicle operation.
- Avoid installing components in locations exposed to excessive heat, moisture, or direct sunlight.
- Use appropriate gauge wiring as specified in this manual and the installation kit.
- Consult a professional car audio installer if you are unsure about any part of the installation process.
3. Package Contents
Verify that all items are present in your package:
- Gravity G5-12D4 12-inch Car Audio Subwoofer
- Gravity WZ3000.1D Warzone Class D Amplifier
- Remote Bass Knob Control
- Audiobank 4 Gauge Amplifier Installation Kit, including:
- 17 ft. 4 Gauge Power Cable
- 3 ft. 4 Gauge Ground Cable
- Inline AGU Fuse Holder & 80A + 100A Fuses
- 17 ft. Double Shielded RCA Cable
- 17 ft. 18 GA Turn-On Cable
- 20 ft. 16 GA Speaker Wire
- All necessary accessories and terminals
4. Product Features
Gravity G5-12D4 Subwoofer
- 12-inch Dual Voice Coil (DVC) design
- Competition Grade Pressed Paper Cone
- High Roll Foam Surround
- Advanced Air Flow Cooling System
Gravity WZ3000.1D Amplifier
- Class D Monoblock Amplifier
- 1 Ohm Stable operation
- Variable Low Pass Crossover (LPF)
- Variable Bass Boost
- Subsonic Filter
- High and Low Level Inputs
- Remote Bass Knob Control included
5. Setup & Installation
Proper installation is crucial for performance and safety. Follow these steps carefully.
5.1. Mounting the Subwoofer
The G5-12D4 subwoofer requires a suitable enclosure (not included) for optimal performance. Ensure the enclosure is properly sealed and sized according to subwoofer specifications. Mount the subwoofer securely to the enclosure using appropriate hardware.

Image: Front-side view of the Gravity G5-12D4 12-inch subwoofer, highlighting its cone and high-roll foam surround.

Image: Rear-side view of the Gravity G5-12D4 12-inch subwoofer, illustrating the robust basket design and cooling features.
5.2. Mounting the Amplifier
Select a dry, well-ventilated location for the WZ3000.1D amplifier, away from direct heat sources or moving parts. Secure the amplifier firmly to a solid surface using screws. Ensure adequate airflow around the amplifier for cooling.

Image: Top view of the Gravity WZ3000.1D Class D Amplifier, featuring its branding and sleek design.
5.3. Wiring the System
Use the provided 4 Gauge Amplifier Installation Kit for all connections. Ensure all connections are tight and properly insulated.
5.3.1. Power and Ground Connections
- Power Cable: Connect the 17 ft. 4 Gauge Power Cable from the vehicle's positive battery terminal to the 'BATT+' terminal on the amplifier. Install the inline AGU Fuse Holder within 18 inches (45 cm) of the battery.
- Ground Cable: Connect the 3 ft. 4 Gauge Ground Cable from the 'GND' terminal on the amplifier to a clean, unpainted metal surface on the vehicle chassis. Ensure a good electrical connection.
- Remote Turn-On Cable: Connect the 17 ft. 18 GA Turn-On Cable from your head unit's remote output to the 'REM' terminal on the amplifier. This cable turns the amplifier on and off with your head unit.

Image: Rear view of the Gravity WZ3000.1D Amplifier, detailing the power, ground, and remote turn-on terminals for electrical connections.
5.3.2. Audio Input Connections
Connect the 17 ft. Double Shielded RCA Cable from your head unit's RCA pre-outs to the 'INPUT' RCA jacks on the amplifier. If your head unit does not have RCA outputs, use the high-level input option (refer to amplifier manual for specific high-level input wiring).
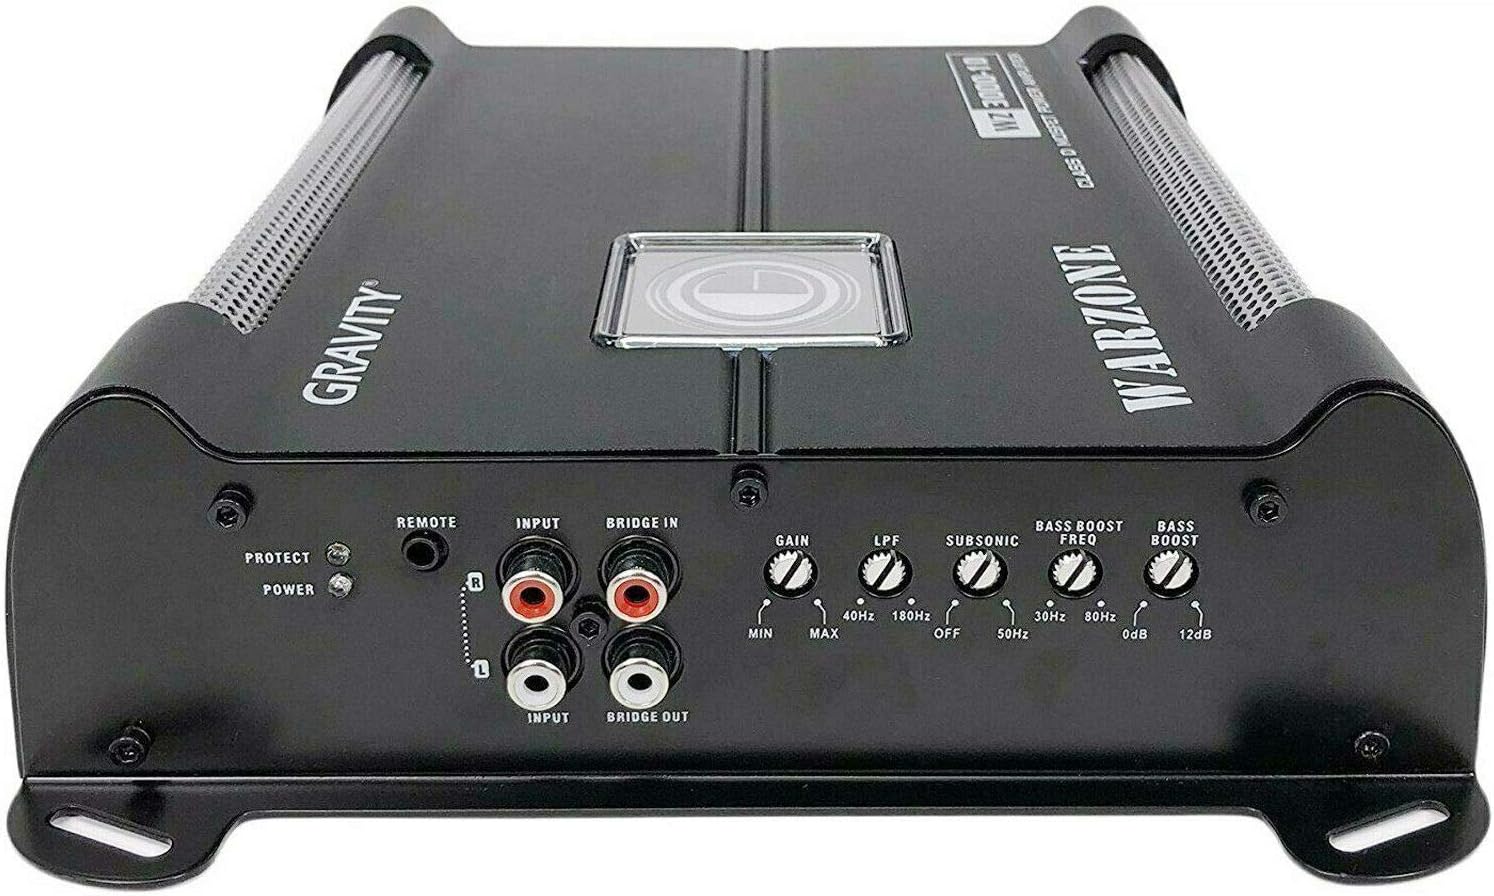
Image: Front view of the Gravity WZ3000.1D Amplifier, displaying the RCA input jacks and various control knobs for audio adjustments.
5.3.3. Subwoofer Speaker Connections
Connect the 20 ft. 16 GA Speaker Wire from the amplifier's 'SPEAKER' output terminals to the G5-12D4 subwoofer. Ensure correct polarity (+ to + and - to -). The G5-12D4 is a Dual Voice Coil (DVC) subwoofer; refer to the amplifier's manual or online resources for appropriate wiring configurations (e.g., parallel for 1 Ohm load, series for 4 Ohm load) to match the amplifier's stable impedance.

Image: Rear view of the Gravity G5-12D4 12-inch subwoofer, clearly showing the dual voice coil terminals for speaker wire connections.
5.3.4. Remote Bass Knob Connection
Connect the remote bass knob to the 'REMOTE' port on the amplifier. Mount the remote bass knob in an accessible location for easy adjustment of bass levels from the driver's seat.

Image: The Gravity remote bass knob with its connecting cable, featuring the control dial for adjusting bass levels.
6. Operating Instructions
After installation, adjust the amplifier settings for optimal sound.
- GAIN: Start with the gain control at minimum. Gradually increase it until the desired volume is achieved without distortion. This matches the amplifier's input sensitivity to your head unit's output.
- LPF (Low Pass Filter): Adjust the LPF to filter out high frequencies from the subwoofer, typically between 40 Hz and 180 Hz. This ensures the subwoofer only reproduces bass frequencies.
- SUBSONIC FILTER: Set the subsonic filter to protect the subwoofer from playing frequencies below its resonant frequency, which can cause damage. A common setting is around 25-30 Hz.
- BASS BOOST: Use the bass boost sparingly. Excessive bass boost can lead to distortion and potential damage to the subwoofer. Adjust the frequency and level to enhance bass output as desired.
- REMOTE BASS KNOB: This allows for convenient real-time adjustment of the bass level from your listening position.
7. Maintenance
Regular maintenance ensures longevity and performance:
- Keep the amplifier and subwoofer clean and free of dust and debris. Use a soft, dry cloth.
- Periodically check all wiring connections for tightness and corrosion.
- Ensure the amplifier's cooling fins are not obstructed to prevent overheating.
- Avoid exposing components to extreme temperatures or moisture.
8. Troubleshooting
If you experience issues, refer to the following common problems and solutions:
| Problem | Possible Cause | Solution |
|---|---|---|
| No Sound | No power to amplifier; RCA cables disconnected; remote turn-on not connected; amplifier in protect mode. | Check power, ground, and remote connections. Verify fuse. Ensure RCA cables are securely connected. |
| Distorted Sound | Gain set too high; bass boost too high; improper LPF setting; damaged speaker wire. | Reduce gain and bass boost. Adjust LPF. Inspect speaker wiring for damage. |
| Amplifier Overheating | Insufficient ventilation; impedance mismatch; prolonged high output. | Ensure proper airflow around amplifier. Verify speaker impedance matches amplifier's stable range. Reduce volume. |
| Weak Bass | Incorrect gain setting; LPF set too high; phase issue; subwoofer wiring incorrect. | Adjust gain. Lower LPF setting. Check subwoofer wiring polarity. |
9. Specifications
Gravity G5-12D4 Subwoofer
- Peak Power: 3000 Watts (each)
- Voice Coil Configuration: Dual 4 Ohm
- Frequency Response: 30 - 500 Hz
- Sensitivity: 87 dB
Gravity WZ3000.1D Amplifier
- Max Power: 3000W
- Class: D
- Stable Impedance: 1 Ohm, 2 Ohm, 4 Ohm
- S/N Ratio: 70 dB
- Frequency Response: 8 Hz ~ 180 Hz
- THD: 0.2%
- Bass Boost Level: 0 ~ 12 dB
- LPF (Low Pass Filter): 40 Hz ~ 180 Hz
- Subsonic Filter: 0 ~ 50 Hz
- Dimensions (L×W×H): 223.5mm (8.8 in) × 211mm (8.3 in) × 64.5 mm (2.5 in)
Audiobank 4 Gauge Amplifier Installation Kit
- Power Cable: 17 ft. 4 Gauge
- Ground Cable: 3 ft. 4 Gauge
- Fuse Holder: Inline AGU with 80A + 100A Fuses
- RCA Cable: 17 ft. Double Shielded
- Turn-On Cable: 17 ft. 18 Gauge
- Speaker Wire: 20 ft. 16 Gauge
10. Warranty & Support
For warranty information and technical support, please refer to the documentation included with your purchase or contact Gravity customer service directly. Keep your proof of purchase for warranty claims.

