
Ariens 920029
Ariens 920029 Compact Series Gas Snow Blower User Manual
Model: 920029 | Brand: Ariens
1. Introduction
This manual provides essential instructions for the safe and efficient operation, assembly, and maintenance of your Ariens 920029 Compact Series Gas Snow Blower. This 2-stage snow blower features a 223cc engine and a 24-inch clearing width, designed for effective snow removal. Please read this manual thoroughly before using the equipment.
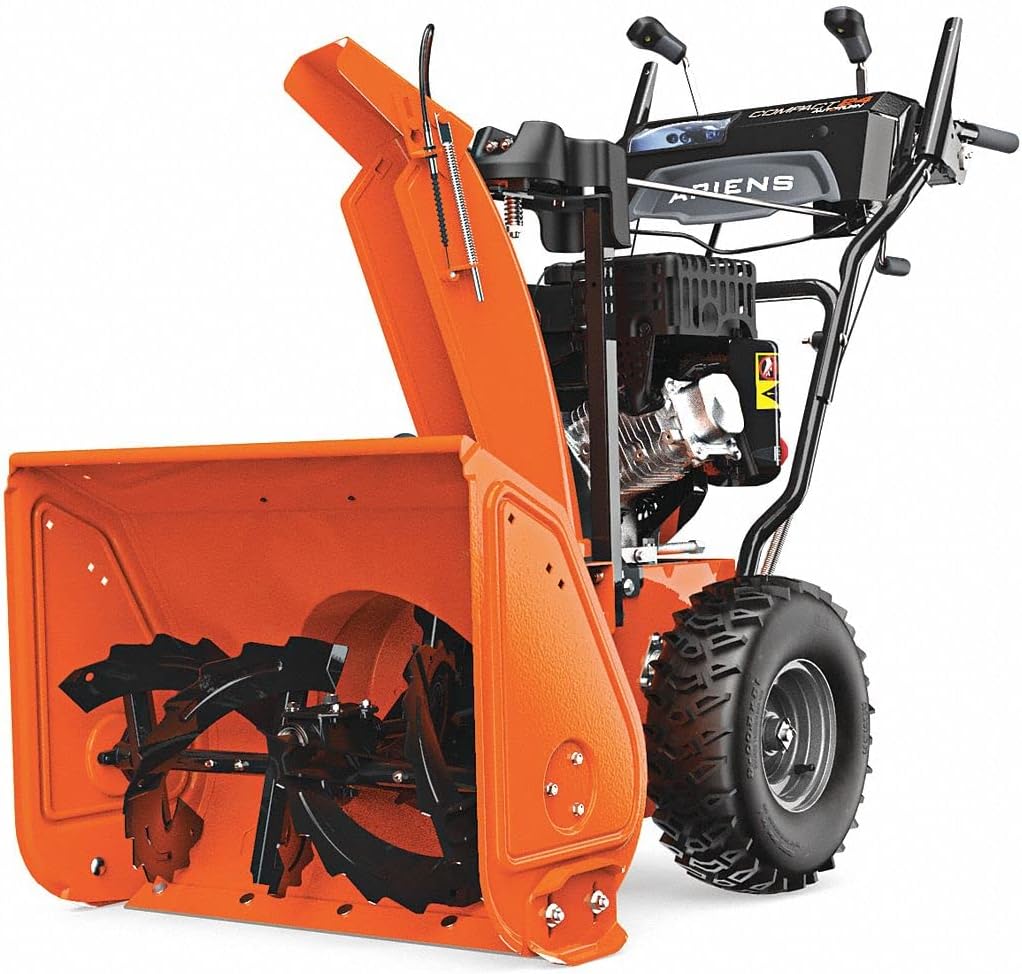
Figure 1: Ariens 920029 Compact Series Gas Snow Blower, showcasing its orange and black design with large wheels and snow chute.
2. Safety Information
WARNING: Failure to follow these safety instructions could result in serious injury or death.
General safety warnings include potential injuries from rotating parts, carbon monoxide poisoning from gasoline models, and fire hazards due to hot engine components. Protective equipment such as gloves, safety glasses, and sturdy footwear is recommended during operation. Always consult the user manual for specific safety instructions and warnings provided with your product.
- Always wear appropriate personal protective equipment (PPE), including safety glasses, gloves, and sturdy footwear.
- Never operate the snow blower indoors or in poorly ventilated areas due to the risk of carbon monoxide poisoning.
- Keep hands, feet, and clothing away from all moving parts.
- Ensure the area is clear of debris, rocks, and other objects before operation.
- Do not allow children or untrained individuals to operate the snow blower.
3. Specifications
| Feature | Detail |
|---|---|
| Brand | Ariens |
| Model Name | 920029 Compact Series |
| Power Source | Gas Powered |
| Engine Type | 2-stage |
| Engine Displacement | 223 Cubic Centimeters |
| Number of Speeds | 8 |
| Clearing Width | 24 Inches |
| Ideal Snow Depth | 24 Inches |
| Item Dimensions (LxWxH) | 48 x 28 x 36 inches |
| Handle Material | Metal |
| UPC | 751058045504 |
4. Setup and Assembly
Follow these steps for initial setup and assembly of your snow blower. Refer to the assembly video for visual guidance.
- Install Choke Lever Plastic Part: Attach the small plastic piece onto the 2-in-1 choke lever.
- Install Wheels: Install the bushing and tire onto the wheel shaft, ensuring the tire valve faces outward.
- Secure Wheels: Secure each wheel with a lynch pin.
- Attach Lower Handle: Remove the 4 pre-installed bolts from the gearbox. Attach the lower handle to the gearbox and secure it with the bolts.
- Attach Upper Handle: Remove the bolts and knobs from the lower handle. Attach the upper handle to the lower handle.
- Secure Lower Handle: Secure the lower handle with the rocking fixing rod, bolts, and knobs, ensuring the rod is placed in the lower hole on the left side.
- Connect Drive Cable: The drive cable is on the right side of the gearbox. Install the end of the drive cable into the hole on the right handle, then insert the threaded part into the cable holder and tighten the nuts.
- Connect Auger Cable: The auger cable is on the left side of the gearbox. Install the end of the auger cable into the hole on the left handle, then insert the threaded part into the cable holder and tighten the nuts.
- Assemble Drive Speed Control Rod: Connect the two parts of the drive speed control rod.
- Install Drive Speed Control Rod: Insert the flat end of the drive speed control rod into the shift connecting plate on the gearbox. Insert the other end into the connecting plate of the control panel on the right side and secure with a cotter pin and washer.
- Install Shift Lever Handle: Install the spring washer and handle to the shift lever.
- Install Chute Deflector: Remove the pre-installed screws from the chute deflector. Align the holes of the chute deflector and the rotator disk, then secure them with bolts, washers, and nuts.
- Install Chute Rotator Rod: Install the plastic bushing onto the front section of the chute rotator, and attach them to the hole near the chute deflector. Ensure the spiral part is fitted into the groove of the rotator disk, then secure with a cotter pin and washer. Insert the rear section into the rocking fixing rod, then attach it to the front section of the chute rotator and secure with cotter pins.
- Secure Drive Cable: Secure the drive cable with the cable clip.
- Connect LED Headlight: Connect the LED headlight wiring harness.
Video 1: Step-by-step assembly guide for a 2-stage gas snow blower, demonstrating how to attach various components including wheels, handles, cables, and the chute system.
5. Operating Instructions
5.1. Pre-Operation Checklist
- Check engine oil level and add if necessary (Engine Oil Capacity: 0.6L). Do not overfill.
- Fill the fuel tank with fresh gasoline (Fuel Tank Capacity: 3L). Do not overfill. Tighten the fuel cap securely to prevent fire risk.
- Ensure the engine key is fully inserted.
- Verify all controls are functioning correctly.
5.2. Starting the Engine
Your Ariens snow blower can be started using either the recoil (pull) start or the electric start.
Recoil Start:
- Turn the fuel switch to the ON position.
- Turn the choke lever to the START position.
- Press the primer bulb 1-3 times (do not exceed 3 times).
- Pull the recoil starter rapidly to manually start the engine.
- Once started, run the engine for 30-40 seconds at idle speed, then turn the choke lever to the RUN position.
Electric Start:
Please complete Steps 1 through 8 of the recoil start procedure before using the electric start.
Note: Do not press the electric start button for more than 5 seconds, as this may cause spark plug damage.
- Connect the machine to a power source.
- Press the red electric start button for 1-3 seconds to start the engine.
- Once started, run the engine for 30-40 seconds at idle speed, then turn the choke lever to the RUN position.
5.3. Operating Controls
- Drive Control: Engage the drive lever to propel the snow blower forward or backward. Your model features 8 speeds for optimal control.
- Auger Control: Engage the auger lever to activate the rotating auger, which collects and feeds snow into the impeller.
- Chute Control: Use the chute crank to adjust the direction of snow discharge. Adjust the deflector on the chute to control the height and distance of the snow throw.
Video 2: Demonstrates the process of preparing and starting a gas snow blower, including checking oil, adding fuel, and using both recoil and electric start methods.
6. Maintenance
Regular maintenance ensures optimal performance and extends the life of your snow blower.
- Engine Oil: Check the oil level before each use. Change the engine oil annually or after every 50 hours of operation.
- Spark Plug: Inspect and clean the spark plug annually. Replace if worn or fouled.
- Fuel System: Use fresh, stabilized gasoline. Drain the fuel system or use a fuel stabilizer for off-season storage.
- Auger and Impeller: Regularly inspect the auger and impeller for wear or damage. Clear any debris or ice buildup.
- Shear Pins: Keep spare shear pins on hand. Replace immediately if the auger stops rotating but the engine is running.
- Tires: Check tire pressure regularly to ensure proper traction.
- General Cleaning: Clean the snow blower after each use, removing snow and ice buildup from all surfaces.
7. Troubleshooting
Here are solutions to common issues you might encounter:
- Engine Fails to Start:
- Check fuel level and ensure fresh gasoline is used.
- Verify the engine key is fully inserted.
- Ensure the choke lever is in the START position for cold starts.
- Check the spark plug for fouling or damage.
- If starting in extremely cold conditions, ensure the engine is sufficiently primed.
- Snow Blower Not Throwing Snow:
- Check if the auger is rotating. If not, a shear pin may be broken.
- Clear any clogs in the auger housing or discharge chute using a clean-out tool.
- Loss of Drive:
- Inspect the drive belt for wear or damage.
- Ensure the drive lever is fully engaged.
8. Warranty and Support
8.1. Warranty Information
This Ariens snow blower comes with a manufacturer's warranty. Please refer to the warranty documentation included with your product for specific terms, conditions, and duration.
8.2. Customer Support
For further assistance, technical support, or to inquire about replacement parts, please contact Ariens Customer Support. Refer to your product documentation for the most current contact information.
Related documents920029


Ask a question about this manual
Ask about setup, troubleshooting, compatibility, parts, safety, or missing instructions. Manuals+ will review the question and use this page’s manual context to help answer it.