
1. Introduction
This manual provides essential information for the proper installation, operation, and maintenance of your new AISEN Carburetor. This carburetor is specifically designed as a replacement part for Coleman Powermate PM0401853, PM0401852, 1850, and 1500 Watt Generators. Adhering to these instructions will help ensure optimal performance and longevity of your generator.
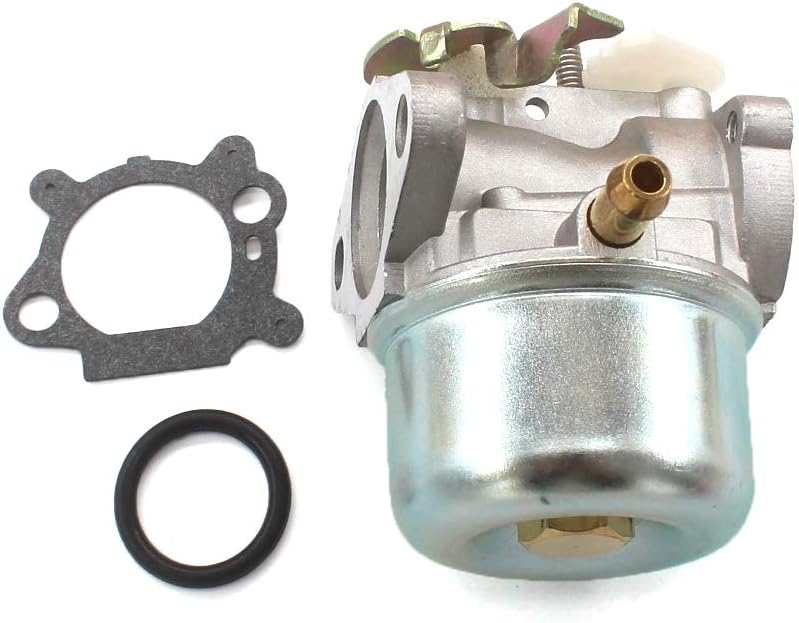
Figure 1.1: AISEN Carburetor with accompanying gasket and O-ring, ready for installation.
The carburetor is a crucial component in your generator's fuel system, responsible for mixing air and fuel in the correct proportions for combustion. A properly functioning carburetor is vital for efficient engine operation.
Video 1.1: A 360-degree view of the AISEN Carburetor, showcasing its design and various connection points.
2. Specifications
| Feature | Detail |
|---|---|
| Brand | AISEN |
| Model Compatibility | Coleman Powermate PM0401853, PM0401852, 1850 Watt, 1500 Watt Generators |
| Item Weight | 7 ounces |
| Package Dimensions | 3.54 x 3.23 x 2.64 inches |
| Flange Type | Bolt On |
3. Safety Information
Always prioritize safety when working with fuel systems and power equipment. Failure to follow safety precautions can result in serious injury or property damage.
- Ensure the generator is turned off, cooled down, and disconnected from any power source before beginning any work.
- Work in a well-ventilated area to avoid inhaling fuel fumes.
- Wear appropriate personal protective equipment, including safety glasses and gloves.
- Keep open flames, sparks, and other ignition sources away from fuel and fuel system components.
- Handle fuel with extreme care. Clean up any spills immediately.
- Refer to your generator's original owner's manual for specific safety guidelines and procedures.
4. Setup and Installation
This section outlines the general steps for replacing the carburetor. If you are unsure about any part of the installation process, it is recommended to seek assistance from a qualified technician.
4.1. Preparation
- Turn off the generator and allow the engine to cool completely.
- Disconnect the spark plug wire to prevent accidental starting.
- Locate the fuel shut-off valve and turn it to the "OFF" position.
- Place a suitable container under the carburetor to catch any residual fuel when disconnecting fuel lines.
4.2. Removal of Old Carburetor
- Carefully disconnect the fuel line(s) from the carburetor.
- Remove any air filter housing components that obstruct access to the carburetor.
- Disconnect the throttle linkage and choke linkage from the carburetor. Take note of their original positions for reassembly.
- Unbolt the carburetor from the engine manifold. Be careful not to lose any gaskets or spacers.
- Inspect the old gaskets and O-rings. The new AISEN Carburetor typically includes new gaskets for a proper seal.

Figure 4.1: Side view of the AISEN Carburetor, highlighting the fuel inlet and mounting bolt holes.
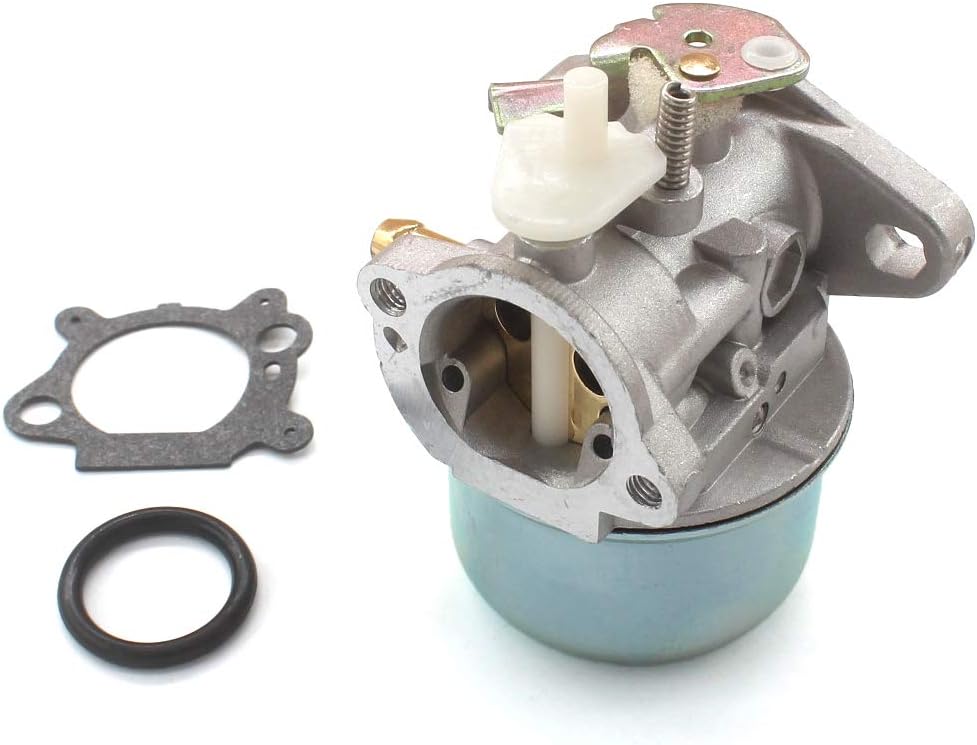
Figure 4.2: Front view of the AISEN Carburetor, detailing the choke and throttle plate mechanisms.
Video 4.1: A close-up demonstration of the carburetor's choke and throttle mechanisms, showing their movement and function.
4.3. Installation of New Carburetor
- Install the new carburetor using the provided gaskets and O-rings. Ensure all surfaces are clean and free of debris.
- Securely bolt the carburetor to the engine manifold. Do not overtighten.
- Reconnect the throttle linkage and choke linkage to their correct positions. Verify smooth operation of both.
- Reconnect the fuel line(s) to the carburetor. Ensure connections are tight to prevent leaks.
- Reinstall any air filter housing components removed earlier.
- Reconnect the spark plug wire.
Video 4.2: A visual guide demonstrating the process of replacing a carburetor on a generator, including the removal of old components and installation of new ones. This video also shows other related parts like air filters and spark plugs.
5. Operating Instructions (Post-Installation)
After successful carburetor installation, follow these general steps to start and operate your generator. Always refer to your generator's specific owner's manual for detailed starting procedures.
- Ensure the generator is on a level surface and in a well-ventilated area, away from any combustible materials.
- Open the fuel shut-off valve.
- Set the choke lever to the "CHOKE" or "START" position (if applicable).
- Set the engine switch to the "ON" position.
- Pull the recoil starter handle firmly and smoothly until the engine starts. If equipped with electric start, press the start button.
- Once the engine starts, gradually move the choke lever to the "RUN" position as the engine warms up.
- Allow the engine to run for a few minutes to stabilize before applying a load.
If the engine does not start after several attempts, refer to the Troubleshooting section or your generator's owner's manual.
6. Maintenance
Regular maintenance of your carburetor and generator fuel system is essential for reliable performance.
- Fuel Quality: Always use fresh, clean fuel. Stale or contaminated fuel is a common cause of carburetor issues. Consider using a fuel stabilizer if storing the generator for extended periods.
- Fuel Filter: Regularly inspect and replace the fuel filter according to your generator's maintenance schedule. A clogged fuel filter can restrict fuel flow to the carburetor.
- Air Filter: Ensure the air filter is clean and free of debris. A dirty air filter can cause the engine to run rich and affect carburetor performance.
- Carburetor Cleaning: If the generator experiences fuel-related issues, the carburetor may need cleaning. This typically involves disassembling the carburetor, cleaning jets and passages with carburetor cleaner, and replacing gaskets. This procedure should only be performed by individuals with mechanical experience.
- Storage: Before long-term storage, drain the fuel tank and carburetor bowl, or run the engine until it runs out of fuel to prevent fuel degradation and gumming in the carburetor.
7. Troubleshooting
If your generator is experiencing problems after carburetor replacement, consider the following common issues:
| Problem | Possible Cause | Solution |
|---|---|---|
| Engine won't start | No fuel, clogged fuel filter, incorrect choke setting, spark plug issue, improper linkage connection. | Check fuel level, replace fuel filter, adjust choke, inspect/replace spark plug, verify throttle/choke linkages are correctly attached and move freely. |
| Engine runs rough/stalls | Dirty air filter, stale fuel, carburetor jets clogged, air leak around carburetor gaskets. | Clean/replace air filter, use fresh fuel, clean carburetor (professional recommended), check for proper gasket seating and tightness. |
| Fuel leaks | Loose fuel line connections, damaged fuel line, improperly seated carburetor bowl gasket, float needle issue. | Tighten fuel line clamps, replace damaged fuel lines, ensure carburetor bowl gasket is correctly installed and not pinched, inspect float and needle valve. |
| Engine lacks power | Restricted fuel flow, dirty air filter, carburetor not properly adjusted. | Check fuel filter, clean air filter, ensure carburetor linkages are not binding. |
For persistent issues, consult a professional small engine mechanic or refer to your generator's original service manual.
8. Warranty Information
The AISEN Carburetor is covered by the manufacturer's standard warranty against defects in materials and workmanship. Please retain your proof of purchase for warranty claims. For specific warranty terms and conditions, refer to the product packaging or contact the seller directly.
This warranty does not cover damage resulting from improper installation, misuse, neglect, unauthorized modifications, or normal wear and tear.
9. Customer Support
If you have any questions regarding the installation, operation, or maintenance of your AISEN Carburetor, please contact the seller or manufacturer for assistance. When contacting support, please have your product model information and purchase details readily available.
For general generator-related inquiries not directly pertaining to the carburetor, please consult your generator's original manufacturer's support channels.