
Armor3 M07467-RR
Armor3 "Nuchamp" Wireless Game Controller User Manual
Model: M07467-RR
Welcome
Thank you for purchasing the Armor3 "Nuchamp" Wireless Game Controller. This controller is designed to enhance your gaming experience on Nintendo Switch and Nintendo Switch Lite consoles, offering wireless connectivity, motion controls, force feedback, and remappable paddle buttons. Please read this manual carefully before use to ensure proper operation and to maximize your enjoyment of the product.
Key Features
- Wireless Bluetooth connectivity for seamless gaming.
- Integrated motion controls for immersive gameplay.
- Responsive force feedback (vibration) for enhanced realism.
- Convenient turbo function for rapid button presses.
- Long-lasting rechargeable battery providing 8-10 hours of playtime.
- Two remappable Pro paddle buttons on the back for custom control schemes.
Package Contents
- 1 x Armor3 "Nuchamp" Wireless Game Controller
- 1 x USB Charging Cable
- 1 x User Manual (this document)
Setup
Charging the Controller
Before first use, fully charge the controller. Connect the included USB charging cable to the USB-C port on the controller and the other end to a USB power source (e.g., Nintendo Switch dock, computer USB port, or USB wall adapter). The indicator lights on the controller will show charging status and turn off when fully charged. A full charge typically takes approximately 2-3 hours.

Image: Front view of the Armor3 Nuchamp Wireless Game Controller, illustrating its design and button layout.
Pairing with Nintendo Switch/Lite
- On your Nintendo Switch/Lite, go to the HOME Menu.
- Select "Controllers" > "Change Grip/Order".
- Press and hold the SYNC button on the top of the Armor3 Nuchamp controller for 3-5 seconds until the LED indicators begin to flash rapidly.
- Once the controller is successfully paired, the corresponding player LED(s) on the controller will remain solid.
- The controller is now ready for use.
Operating Instructions
Basic Controls
The Armor3 Nuchamp controller features standard button layouts for intuitive gameplay:
- Left Analog Stick: Movement and camera control.
- Right Analog Stick: Camera control and aiming.
- D-Pad: Directional input.
- A/B/X/Y Buttons: Action buttons.
- L/R Buttons: Shoulder buttons.
- ZL/ZR Buttons: Trigger buttons.
- + (Plus) Button: Start/Pause.
- - (Minus) Button: Select/Menu.
- HOME Button: Returns to the Switch HOME Menu.
- Screenshot Button: Captures screenshots.
Advanced Features
Motion Controls
The controller supports motion sensing, allowing for interactive gameplay in titles that utilize gyroscope and accelerometer features. Ensure your game supports motion controls for this feature to function.
Force Feedback (Vibration)
The built-in motors provide tactile feedback during gameplay, enhancing immersion. Vibration intensity is typically controlled by the game itself.
Turbo Function
The turbo function allows a button to be pressed repeatedly as long as it is held down. To activate turbo for a button, press and hold the Turbo button, then press the desired action button (A, B, X, Y, L, R, ZL, ZR, D-Pad directions). To deactivate, repeat the process. Some games may not support the turbo function.
Remappable Paddle Buttons
The Armor3 Nuchamp controller features two remappable paddle buttons on the back (P1 and P2). These can be assigned to mimic any other button on the controller for quick access and personalized control schemes.
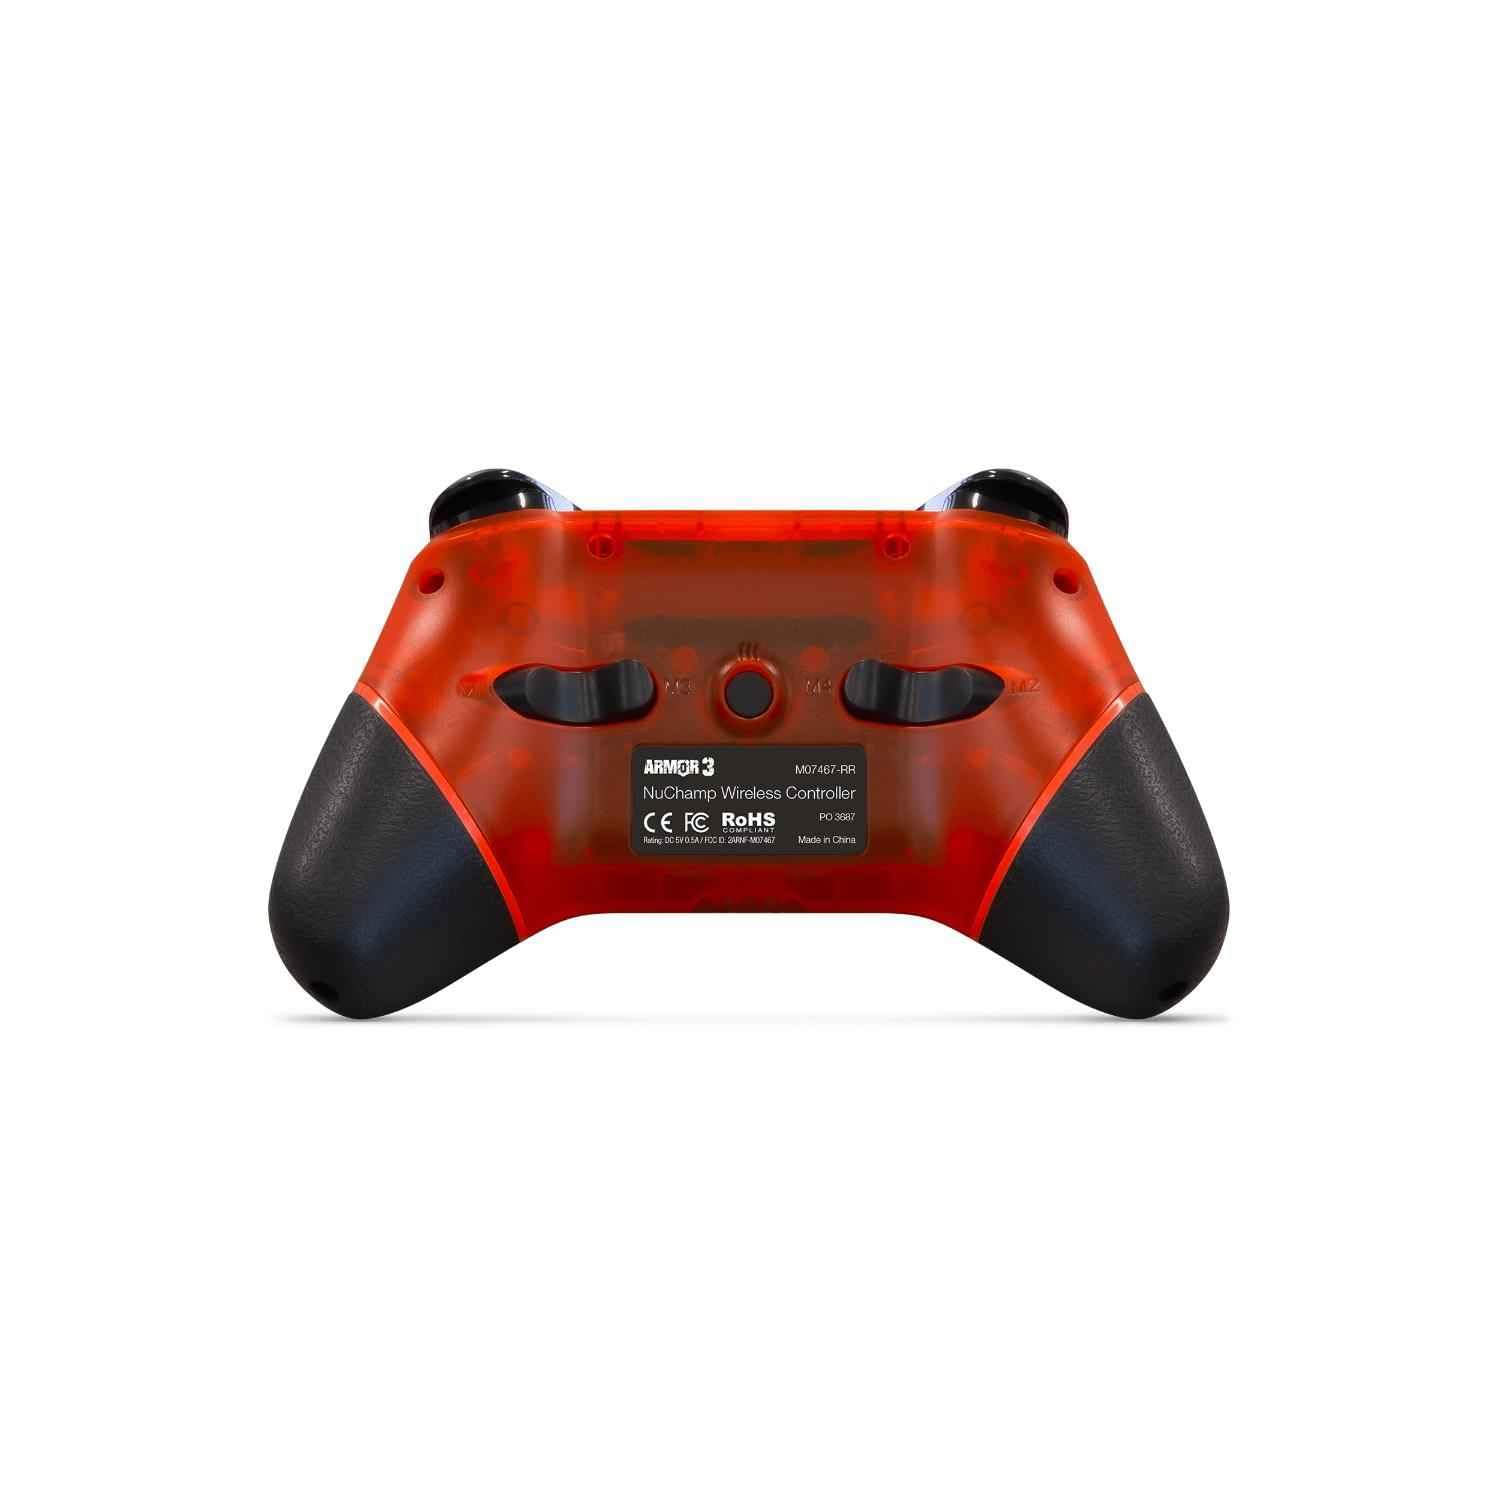
Image: Rear view of the Armor3 Nuchamp Wireless Game Controller, highlighting the remappable paddle buttons.
To remap a paddle button:
- Press and hold the M button (located between the paddle buttons) until the indicator light starts flashing slowly.
- Press the paddle button (P1 or P2) you wish to remap. The indicator light will flash rapidly.
- Press the button you want to assign to the paddle (e.g., A, B, X, Y, L, R, ZL, ZR, D-Pad).
- Press the M button again to confirm and exit remapping mode. The indicator light will stop flashing.
The paddle button is now remapped. Repeat the process for the other paddle if desired.
Maintenance
Care and Storage
- Keep the controller away from extreme temperatures, direct sunlight, and high humidity.
- Avoid dropping or subjecting the controller to strong impacts.
- Do not disassemble the controller. Unauthorized disassembly will void the warranty.
Cleaning
Use a soft, dry cloth to clean the controller. For stubborn dirt, a slightly damp cloth can be used, but ensure no moisture enters the controller's openings. Do not use chemical cleaners or abrasive materials.
Battery Care
- Charge the controller regularly, even if not in frequent use, to maintain battery health.
- Do not leave the controller uncharged for extended periods.
- If the controller will not be used for a long time, charge it to about 50% before storing.
Troubleshooting
| Problem | Solution |
|---|---|
| Controller won't turn on or charge. | Ensure the USB cable is securely connected to both the controller and a working power source. Try a different USB port or cable. Allow the controller to charge for at least 30 minutes before attempting to turn it on. |
| Controller won't pair with Nintendo Switch. | Ensure the Switch is in "Change Grip/Order" mode. Press and hold the SYNC button on the controller for 3-5 seconds. If issues persist, try restarting your Nintendo Switch console. Ensure the controller is sufficiently charged. |
| Input lag or frequent disconnections. | Ensure the controller is within a reasonable range of the Nintendo Switch (typically within 10 meters/30 feet) and there are no major obstructions. Avoid strong electromagnetic interference from other devices. Ensure the controller is fully charged. |
| Motion controls are not working correctly. | Ensure the game you are playing supports motion controls. Try recalibrating the motion controls within the Nintendo Switch system settings if available. |
Technical Specifications
| Feature | Detail |
|---|---|
| Model Number | M07467-RR |
| Connectivity | Wireless Bluetooth |
| Battery Type | Lithium Ion (included) |
| Battery Life | Approximately 8-10 hours (depending on usage) |
| Charging Time | Approximately 2-3 hours |
| Dimensions | 4.45 x 3.5 x 7.01 inches |
| Weight | 11.2 ounces |
| Compatibility | Nintendo Switch, Nintendo Switch Lite |
Warranty Information
Armor3 products are manufactured to high-quality standards. This product comes with a limited warranty against defects in materials and workmanship under normal use. The specific terms and duration of the warranty may vary by region. Please retain your proof of purchase for warranty claims. For detailed warranty information, please refer to the official Armor3 website or contact customer support.
Customer Support
If you encounter any issues or have questions regarding your Armor3 "Nuchamp" Wireless Game Controller that are not covered in this manual, please visit the official Armor3 website for frequently asked questions, troubleshooting guides, and contact information for customer support. You can also reach out to the retailer where you purchased the product for assistance.
© 2024 Armor3. All rights reserved. Nintendo Switch is a trademark of Nintendo.
Ask a question about this manual
Ask about setup, troubleshooting, compatibility, parts, safety, or missing instructions. Manuals+ will review the question and use this page’s manual context to help answer it.