
1. Introduction
Thank you for choosing the Giantex Full Automatic 2-in-1 Portable Laundry Washer & Spinner Combo. This manual provides essential information for the safe and efficient operation, installation, and maintenance of your new appliance. Please read this manual thoroughly before use and retain it for future reference.
Safety Precautions
- Ensure the washing machine is placed on a stable, level surface.
- Do not operate the machine if the power cord or plug is damaged.
- Keep children and pets away from the machine during operation.
- Unplug the machine from the power outlet before cleaning or performing any maintenance.
- Do not wash clothes with flammable or explosive substances.
2. Product Overview
The Giantex portable washing machine is designed for convenience and efficiency in small living spaces. It combines washing and spinning functions in a single tub, offering a compact laundry solution.
Key Features:
- 2-in-1 Functionality: Washes and spins clothes in one unit.
- Large Capacity: Up to 8.8 lbs (1.04 cu.ft) of laundry.
- Multiple Programs: 10 washing modes for various fabric types.
- Water Level Selection: 5 adjustable water levels.
- Built-in Drain Pump: Facilitates easy water drainage.
- Child Lock: Enhances safety during operation.
- Adjustable Feet: For stability on uneven surfaces.
- Transparent Lid: Allows observation of the washing process.
Components and Parts Identification:

Figure 2.1: Top view of the washing machine with key components identified.
- Top Cover: Transparent lid for viewing wash cycles.
- Operation Panel: Digital display and push-button controls for programs and settings.
- Stainless Steel Tub: Durable inner tub designed to prevent rusting and snagging clothes.
- Lint Filter: Collects lint during washing for cleaner clothes.
- Water Inlet Hole: Connection point for the water supply hose.
- Drain Hose: For expelling wastewater.
- Adjustable Bottom Feet: Allows leveling the machine on uneven surfaces.

Figure 2.2: Detailed view of specific components including the adjustable foot, lint filter, drain hose, and water inlet.
3. Setup and Installation
3.1 Unpacking and Placement
Carefully remove the washing machine from its packaging. Inspect for any damage. Place the machine on a firm, level surface. The compact size (18"L x 18.5"W x 31"H) makes it suitable for small spaces like apartments or dormitories.

Figure 3.1: Product dimensions and capacity.
Important: Before first use, locate and remove the motor transport protection device, typically found at the bottom of the machine. This device is for shipping stability and must be removed for proper operation.

Figure 3.2: Included accessories and motor transport protection device.
Install the provided bottom cover to help decrease noise and provide anti-rat protection.
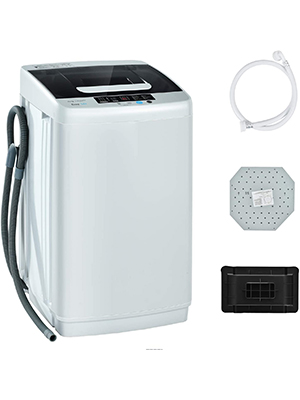
Figure 3.3: Installation of the bottom cover and adjustable foot.
Adjust the bottom feet to ensure the machine is perfectly level. This is crucial for stable operation and to prevent excessive vibration.
3.2 Water Supply Connection
Connect the water inlet hose to the water inlet hole on the back of the machine and to a suitable faucet. An adapter is provided for common faucet types (Female Thread 15/16"-27T (24mm) and Male Thread 55/64"-27T (22mm)).

Figure 3.4: Adaptable faucet types for water connection.
Note: This machine is not compatible with faucets that have non-removable aerators, pull-out faucets, spout faucets, or shower pipes. Ensure a secure connection to prevent leaks.
3.3 Drainage Connection
Position the drain hose to direct wastewater into a sink, tub, or floor drain. Ensure the hose is not kinked or blocked to allow for proper drainage.
4. Operating Instructions
4.1 Loading Laundry
Open the top cover and place clothes loosely into the stainless steel tub. Do not overload the machine; the maximum capacity is 8.8 lbs. Overloading can affect washing performance and cause imbalance.
Add appropriate detergent to the dispenser. The machine is designed to use less water and detergent, contributing to energy saving.
Video 4.1: Demonstration of the Giantex Full Automatic Washing Machine in operation, highlighting its features and ease of use.
4.2 Control Panel and Programs
The control panel features an HD LED display and push buttons for various settings.

Figure 4.1: Control panel with wash cycle and water level options.
- Water Level Selection: Choose from 5 water levels (1/17L, 2/22L, 3/27L, 4/32L, 5/37L) based on load size.
- Washing Modes (10 Programs):
- Normal
- Standard
- Strong
- Fast
- Soak & Wash
- Wash
- Wash & Rinse
- Rinse & Spin
- Spin
- Air Dry
- Child Lock: Activate to prevent accidental changes to settings during operation.
- Program Delay: Set a delayed start time for your wash cycle.
Select the desired program and water level, then press the Start/Pause button to begin the cycle.
The "Air Dry" function is designed to remove excess water, leaving clothes damp for quicker line drying or reduced dryer time. It does not fully dry clothes.
5. Maintenance
5.1 Cleaning the Lint Filter
Regularly clean the lint filter to ensure optimal washing performance and prevent lint buildup on clothes. The lint filter is located inside the tub.
- Remove the lint filter from the tub.
- Open the filter and remove any accumulated lint.
- Rinse the filter under running water.
- Reinstall the filter securely in its position.
5.2 General Cleaning
- Wipe the exterior of the machine with a soft, damp cloth. Do not use abrasive cleaners.
- Clean the interior of the tub periodically to prevent mold and mildew. Run a self-clean cycle or a hot water wash with a washing machine cleaner.
- Ensure the drain hose is clear of obstructions.
6. Troubleshooting
Before contacting customer support, please refer to the following common issues and their solutions:
| Problem | Possible Cause | Solution |
|---|---|---|
| Machine does not start. | Power cord unplugged; lid not closed properly; child lock activated. | Check power connection; ensure lid is fully closed; deactivate child lock. |
| Excessive vibration or noise during spin cycle. | Machine is not level; clothes are unbalanced in the tub; transport device not removed. | Adjust bottom feet to level the machine; redistribute clothes evenly; ensure transport device is removed. |
| Water does not drain. | Drain hose is kinked, blocked, or improperly positioned; drain pump issue. | Straighten drain hose; clear any blockages; ensure hose is positioned correctly for gravity drain or pump operation. |
| Water leaks. | Water inlet hose not securely connected; drain hose loose or damaged. | Tighten all hose connections; inspect hoses for damage and replace if necessary. |
| Water inlet pipe joint not matched. | Faucet type is incompatible with the provided adapter. | Refer to Figure 3.4 for compatible faucet types. An alternative connection method (e.g., Add-A-Tee valve) may be required for certain faucet designs. |
7. Specifications
| Feature | Detail |
|---|---|
| Brand | Giantex |
| Model Number | GX24640US-PE |
| Type | Full Automatic 2-in-1 Washer & Spinner Combo |
| Capacity | 8.8 lbs / 1.04 Cubic Feet |
| Product Dimensions (L x W x H) | 18" x 18.5" x 31" |
| Item Weight | 43.5 pounds |
| Color | Grey |
| Material Type | Stainless Steel (Tub) |
| Control Console | Push Button |
| Standard Cycles | 10 |
| Water Levels | 5 |
| Access Location | Top Load |
| Voltage | 120 Volts |
| Included Components | Drain Shower, Drain Hose |
8. Warranty and Support
For warranty information and customer support, please refer to the documentation included with your purchase or visit the official Giantex website. Keep your purchase receipt for warranty claims.
For further assistance, you may contact Giantex customer service through their official channels. Please have your model number (GX24640US-PE) and purchase date ready when contacting support.

