1. Introduction
This manual provides detailed instructions for the installation, operation, and maintenance of your AWESAFE Android 10.0 Car Stereo Head Unit. Please read this manual thoroughly before using the product to ensure proper function and safety. This unit is designed for Toyota Camry models from 2007 to 2011 and Toyota Aurion models from 2007 to 2011.

Image 1.1: AWESAFE Car Stereo Head Unit installed in a Toyota Camry dashboard, highlighting compatibility with Toyota Camry (2007-2012) and Toyota Aurion (2007-2011).
2. Product Overview
2.1 Key Features
- Android 10.0 Operating System
- 8-inch Touch Screen Display
- Integrated Bluetooth for hands-free calling and audio streaming
- Wi-Fi Connectivity for online browsing and app access
- Steering Wheel Control compatibility
- Built-in Digital Sound Processor (DSP)
- GPS Navigation support
- DVD/CD Player
- AV Output Function for external displays
- Mirror Link functionality
2.2 Package Contents
Verify that all items are present in the package:

Image 2.1: Included components for the AWESAFE Android 10.0 Car Stereo Head Unit. This includes the head unit, power cable, RCA cable, microphone, GPS module, two USB cables, a crowbar tool, and the user manual. An optional JBL adapter is also shown.
- AWESAFE Android 10.0 Head Unit
- Power Cable
- RCA Cable
- External Microphone
- GPS Module
- USB Cables (x2)
- Installation Crowbar Tool
- User Manual
- Optional: JBL Adapter (required if your car has a JBL sound system)
3. Setup & Installation
Installation of the AWESAFE Car Stereo Head Unit requires basic automotive electrical knowledge. It is recommended to have the unit installed by a professional. Refer to the included detailed user manual for specific wiring diagrams and installation steps for your Toyota Camry/Aurion model.
3.1 Pre-Installation Checks
- Ensure the vehicle's ignition is off and the battery is disconnected.
- Confirm compatibility with your vehicle's year and model.
- Identify existing wiring harnesses and antenna connections.
3.2 Wiring Connections
Connect the power cable, RCA cables, GPS module, and USB cables to the corresponding ports on the head unit and your vehicle's wiring harness. Ensure all connections are secure.
Note: If your vehicle is equipped with a JBL sound system, a separate JBL adapter is required for proper audio functionality. This adapter is not included in the standard package and must be purchased separately (ASIN: B08TTMTSTP).
3.3 Mounting the Head Unit
Carefully insert the head unit into the dashboard opening, ensuring all cables are tucked away and not pinched. Secure the unit using the factory mounting brackets or provided hardware.
4. Operating Instructions
4.1 Main Interface
Upon startup, the unit will display the main interface with access to various applications such as Navigation, Radio, Video, Music, and Bluetooth Music. Swipe left or right to access additional apps and widgets.
4.2 Bluetooth Function
To use Bluetooth for hands-free calling or music streaming:
- Navigate to the 'Bluetooth' application on the main interface.
- Enable Bluetooth on your mobile device and search for available devices.
- Select the head unit (e.g., 'DEV:BT7268') from your device's list and pair.
- Once paired, you can make calls using the on-screen dial pad or stream audio from your device.
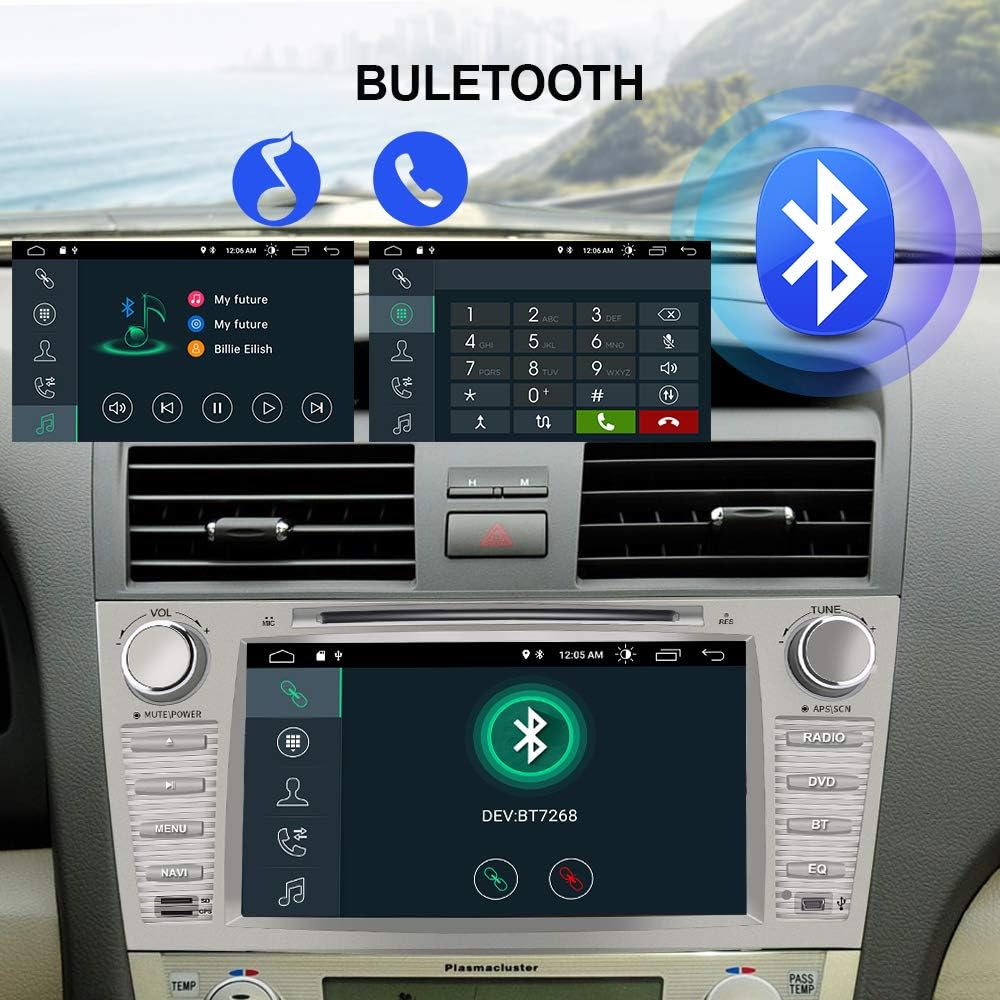
Image 4.1: The Bluetooth interface on the car stereo, demonstrating calling functionality with a dial pad and recent call history, as well as music playback controls.
4.3 Wi-Fi and Online Browsing
Connect the head unit to a Wi-Fi network to access online features, stream videos, and browse the internet.
- Go to 'Settings' > 'Network & Internet' > 'Wi-Fi'.
- Select your desired Wi-Fi network and enter the password if prompted.
- Once connected, open applications like YouTube or Chrome to access online content.

Image 4.2: The car stereo display showing the main interface with various applications and a prominent 'WiFi' label, indicating internet connectivity for apps like YouTube and social media.
4.4 DVD Playback
Insert a DVD or CD into the disc slot to play movies or music.
- Gently insert the disc into the slot above the screen.
- The unit will automatically detect the disc and launch the DVD/CD player application.
- Use the on-screen controls to play, pause, skip tracks, or adjust volume.

Image 4.3: The car stereo display showing a music track playing from a DVD, with the disc partially visible in the slot above the screen. The image emphasizes the DVD playback capability.
4.5 FM Radio (RDS/AM/FM)
Access the 'Radio' application to listen to FM or AM broadcasts. The unit supports RDS (Radio Data System) for displaying station information.
- Open the 'Radio' app.
- Use the on-screen controls or physical buttons to tune to desired frequencies.
- Save your favorite stations as presets for quick access.
4.6 Built-in Digital Sound Processor (DSP)
The integrated DSP allows for advanced audio customization to optimize your listening experience.
- Access the 'DSP' application.
- Adjust settings such as Equalizer (EQ), Smart Bass, Balance, Loudness, and Delay.
- The EQ offers various presets (Pop, Rock, Jazz, Classic) or a customizable user profile.
4.7 Steering Wheel Control (SWC)
Configure your vehicle's steering wheel buttons to control the head unit's functions.
- Go to 'Settings' > 'SWC'.
- Follow the on-screen instructions to map your steering wheel buttons to specific functions (e.g., volume up/down, track skip, mode).
4.8 GPS Navigation
Utilize the pre-installed navigation apps or download your preferred GPS software from the Play Store.
- Open the 'Navi' or 'Maps' application.
- Ensure the GPS antenna is properly connected and positioned for optimal signal reception.
- Enter your destination and follow the voice-guided directions.
4.9 Rear Camera Input
The unit supports a rear-view camera input for enhanced safety during parking. The rear camera is not included with the head unit.
- Connect a compatible rear camera to the designated video input.
- When the vehicle is shifted into reverse, the display will automatically switch to the camera feed.
4.10 Mirror Link (Easy Connection)
Mirror Link allows you to display your smartphone's screen directly on the head unit.
- Open the 'Easy Connection' application on the head unit.
- Follow the on-screen instructions to connect your iPhone or Android phone via USB.
- Once connected, your phone's screen will be mirrored on the head unit, allowing access to apps like navigation, calls, and music.

Image 4.4: Illustration of smartphone integration with the car stereo, demonstrating how Apple CarPlay and Android Auto allow for smart use of phone features like navigation, calls, and messages through a USB connection. Note: A USB dongle may be required for full functionality.
4.11 AV Output Function
The AV output allows you to connect external monitors, such as rear-seat entertainment screens, to display video content from the head unit.

Image 4.5: A car interior view demonstrating the AV output function, with two tablets mounted on the back of the front seats displaying video content, providing entertainment for rear passengers.
4.12 Features in Action Video
Watch this video for a visual demonstration of the AWESAFE Car Radio's key features and functionalities.
Video 4.1: An official product video demonstrating various features of the AWESAFE Car Radio for Toyota Camry, including the main interface, online browsing, Bluetooth functions, FM radio, built-in DSP, steering wheel control setup, GPS navigation, rear camera view, and mirror link.
5. Maintenance
To ensure the longevity and optimal performance of your AWESAFE Car Stereo Head Unit, follow these maintenance guidelines:
- Cleaning: Use a soft, dry cloth to clean the screen and exterior. Avoid abrasive cleaners or solvents that may damage the surface.
- Software Updates: Periodically check for software updates to ensure you have the latest features and bug fixes. Updates can usually be found in the system settings or on the manufacturer's website.
- Temperature: Avoid exposing the unit to extreme temperatures, both hot and cold, for extended periods.
- Disc Care: Handle DVDs/CDs by the edges to prevent scratches. Keep discs clean and free of dust.
6. Troubleshooting
If you encounter issues with your head unit, refer to the following common troubleshooting steps. For more complex problems, contact customer support.
6.1 No Power / Unit Not Turning On
- Check all power connections to ensure they are secure.
- Verify the vehicle's fuse for the stereo is intact.
- Ensure the vehicle battery is charged.
6.2 No Sound
- Check the volume level and ensure the unit is not muted.
- Verify speaker connections.
- If your car has a JBL sound system, ensure the JBL adapter is correctly installed.
6.3 Bluetooth Connection Issues
- Ensure Bluetooth is enabled on both the head unit and your mobile device.
- Delete previous pairings on both devices and attempt to re-pair.
- Move your mobile device closer to the head unit.
6.4 GPS Signal Loss
- Ensure the GPS antenna is properly connected and has a clear view of the sky.
- Check GPS settings within the navigation application.
6.5 Touchscreen Unresponsive
- Restart the head unit.
- Perform a factory reset (note: this will erase all user data and settings).
7. Specifications
| Feature | Specification |
|---|---|
| Model Number | acb15b19-4a11-41e6-a3f6-808a30555921 |
| Operating System | Android 10.0 |
| Display Size | 8 inches |
| Connectivity | Bluetooth, Wi-Fi, USB |
| Human Interface Input | Microphone, Touchscreen |
| Audio Output Mode | Stereo |
| Surround Sound Channel Configuration | 4.0 |
| Video Encoding | RM |
| Item Weight | 7.15 pounds |
| Package Dimensions | 12.8 x 10.35 x 7.87 inches |
| Color | Silver |
8. Warranty & Support
For warranty information, technical support, or service inquiries, please refer to the contact details provided in the packaging or visit the official AWESAFE website. Keep your purchase receipt as proof of purchase for warranty claims.


