1. Product Overview
The Rollerhouse 25mm Battery Roller Shade Motor is a wireless, quiet, and motorized system designed to convert existing interior shades into automated window coverings. It is compatible with 1-inch (25mm) shade tubes, offering effortless remote control and smart home integration.
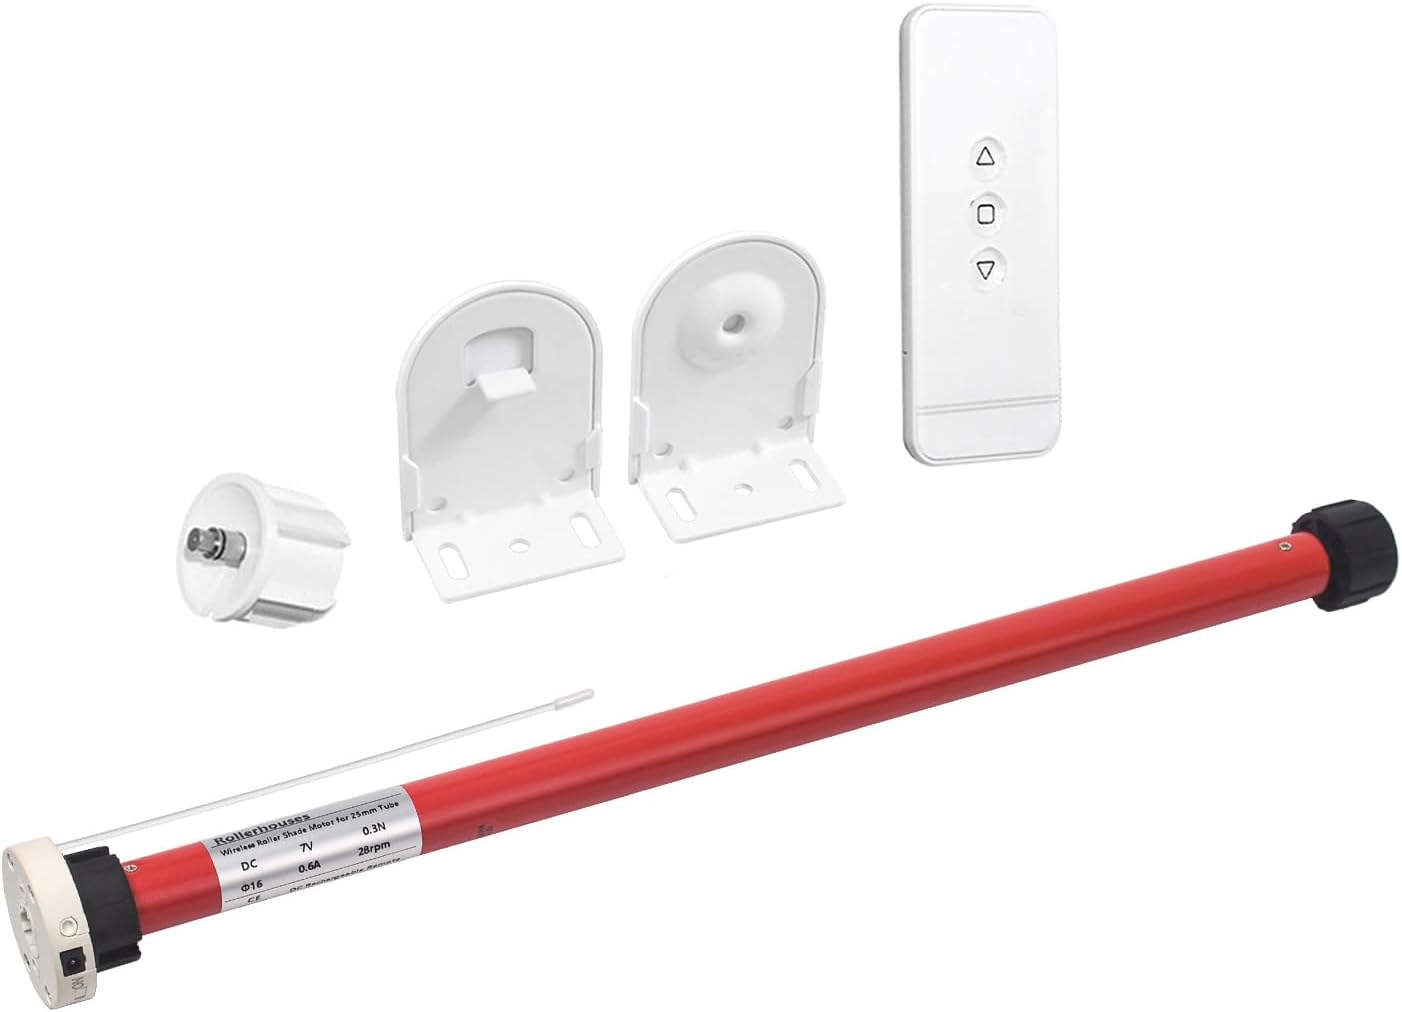
Image: Complete set of the Rollerhouse 25mm Battery Roller Shade Motor, including the motor unit, remote control, and mounting brackets.
Included Components:
- 1x Mini Blind Motor
- 1x Drive Wheels for 1-inch (25mm) Tube
- 1x Remote Control
- 1x 8.4V Charging Adapter
- 1x Roller Blind Hardware (25mm shade bracket, 25mm/28mm rubber fittings)
2. Installation
This section provides a step-by-step guide to installing your Rollerhouse motor into an existing shade tube. Ensure you have measured the inner (ID) and outer (OD) diameter of your shade tube to confirm compatibility with the 25mm motor.

Image: Visual comparison showing the replacement of a traditional chain drive system with the compact motorized unit.
Installation Steps:
- Remove Existing Chain Drive: Carefully unclip your blind from its mounting and remove the existing chain drive mechanism from the shade tube.
- Measure Shade Tube: Accurately measure the Inner Diameter (ID) and Outer Diameter (OD) of your shade tube. This is crucial for selecting the correct drive adapter and ensuring a perfect fit for the motor.
- Insert Motor: Gently insert the Rollerhouse motor into the shade tube. Ensure the charging port and setting button on the motor are facing upwards for easy access after installation.
- Reinstall End Cap and Mount: Reattach the end cap and secure the shade system back into its mounting brackets. Ensure all components are firmly in place.

Image: A detailed view of a shade tube, highlighting where to measure the Inner Diameter (ID) and Outer Diameter (OD) for proper motor selection.

Image: The motor being carefully slid into the shade tube, demonstrating the initial step of motor integration.

Image: The motorized shade system fully assembled with the motor inside the tube and the end cap secured, ready for mounting.
Visual Installation Guide:
Video: A comprehensive guide demonstrating how to motorize existing blinds and shades, including removal of old components and installation of the new motor.
3. Operation
Your Rollerhouse motor can be operated via the included remote control or integrated into a smart home system for enhanced convenience.
Remote Control:
Use the remote to raise, lower, and tilt your shades. Refer to the remote's specific instructions for pairing and setting upper and lower limits.

Image: The remote control alongside smart home devices, illustrating various control options for the motorized shades.
Smart Home Integration:
The motor is compatible with smart home systems like Amazon Alexa, Google Assistant, and Tuya via a compatible Wi-Fi IR+RF Remote Control hub (sold separately). This allows for voice control and automated routines.

Image: A Smart Home Bridge Automation hub, which enables RF+IR Wi-Fi remote control for integrating the shades into smart home ecosystems.
4. Maintenance
To ensure the longevity and optimal performance of your Rollerhouse motor, follow these simple maintenance guidelines:
- Charging: The motor features a rechargeable battery. Recharge it using the provided 8.4V charging adapter. For typical usage (two lifts per day), recharge approximately every 3-6 months. Optional solar charging is available (solar panel sold separately).
- Cleaning: Spot clean the motor and shade components as needed. Avoid using harsh chemicals or abrasive materials.
5. Troubleshooting
If you encounter issues with your Rollerhouse motor, refer to the following common problems and solutions:
| Problem | Possible Cause | Solution |
|---|---|---|
| Motor not responding to remote | Low battery, remote not paired, remote battery dead | Charge motor, re-pair remote, replace remote battery (CR2450) |
| Shade not moving to set limits | Limits not set or incorrectly set | Refer to remote instructions to reset and set limits |
| Motor makes noise but shade doesn't move | Motor not properly seated in tube, drive adapter issue | Check motor seating and drive adapter fit within the shade tube |
| Motor runs in wrong direction | Direction setting incorrect | Refer to remote instructions to reverse motor direction |
6. Specifications
| Feature | Detail |
|---|---|
| Brand | Rollerhouse |
| Model Number | 612289935760 |
| Material | Plastic, Metal |
| Product Dimensions | 21"L x 78"W (Shade dimensions, motor is smaller) |
| Color | Red (Motor casing) |
| Operation Mode | Automatic |
| Control Type | Remote |
| Size Compatibility | Compatible for 1in (25mm) OD shade tube |
| Item Weight | 1.25 pounds |
7. Warranty & Support
For detailed warranty information and further support, please refer to the official product documentation or contact Rollerhouse customer service. An Instructions for Use (IFU) PDF is available for download.

