
1. Introduction
Thank you for choosing the MEIKEE 25W LED Floodlight with Motion Sensor and Remote Control. This product is designed to provide efficient and reliable outdoor lighting with advanced features for enhanced security and convenience. Please read this manual carefully before installation and operation to ensure proper use and to maintain product longevity.
2. Safety Instructions
Always follow these safety precautions to prevent injury or damage to the product:
- Ensure the power supply is disconnected before installation, maintenance, or cleaning.
- Installation should be performed by a qualified electrician or a person with sufficient electrical knowledge.
- Do not modify or disassemble the product. Unauthorized modifications may void the warranty and pose safety risks.
- Keep the product away from flammable materials.
- Do not look directly into the LED light when it is illuminated, as it may cause eye strain or damage.
- Ensure the mounting surface is strong enough to support the weight of the floodlight.
- The product is rated IP66 for outdoor use, meaning it is protected against dust and powerful water jets. However, avoid submerging it in water.
- The cable cross-section is 1mm², exceeding the European standard of 0.75mm² for enhanced safety.
3. Package Contents
Verify that all components are present in the package:
- 2 x MEIKEE 25W LED Floodlights with Motion Sensor
- 2 x Remote Controls
- 1 x Screw Pack for Installation
- 1 x User Manual (English)
4. Product Overview
The MEIKEE LED Floodlight features a robust design for outdoor environments. It includes a high-brightness LED array, an integrated motion sensor, and a durable housing with excellent heat dissipation. The adjustable bracket allows for flexible mounting options.

Figure 4.1: Product components and features, highlighting heat dissipation, LED beads, nano cover, waterproof seal, and cable length.


Figure 4.2: Durability features including anti-drop design and efficient heat dissipation.
5. Setup and Installation
5.1 Mounting Location
Choose a suitable location for installation, considering the desired illumination area and motion detection range. The recommended installation height is 3.5-5 meters for optimal coverage. The floodlight has a 120° beam angle, and the sensor has a 180° detection angle.

Figure 5.1: Optimal installation parameters for beam angle, sensor range, and recommended height.
5.2 Mounting the Floodlight
- Mark the drilling points on the wall or ceiling using the floodlight's bracket as a template.
- Drill holes and insert the provided wall plugs.
- Secure the bracket firmly to the surface using the screws.
- Attach the floodlight to the bracket and adjust its angle (up to 180°) as needed.

Figure 5.2: Floodlight dimensions and various installation methods (wall and ceiling mount).

Figure 5.3: Adjustable bracket for flexible mounting options.
5.3 Electrical Connection
Connect the floodlight to a 230V AC power supply. Ensure all connections are secure and properly insulated to prevent electrical hazards. The cable is designed with a 1mm² cross-section for enhanced safety.
6. Operating Instructions
The MEIKEE floodlight can be operated and configured using the included remote control. The remote control has a range of approximately 8 meters.
6.1 Remote Control Functions
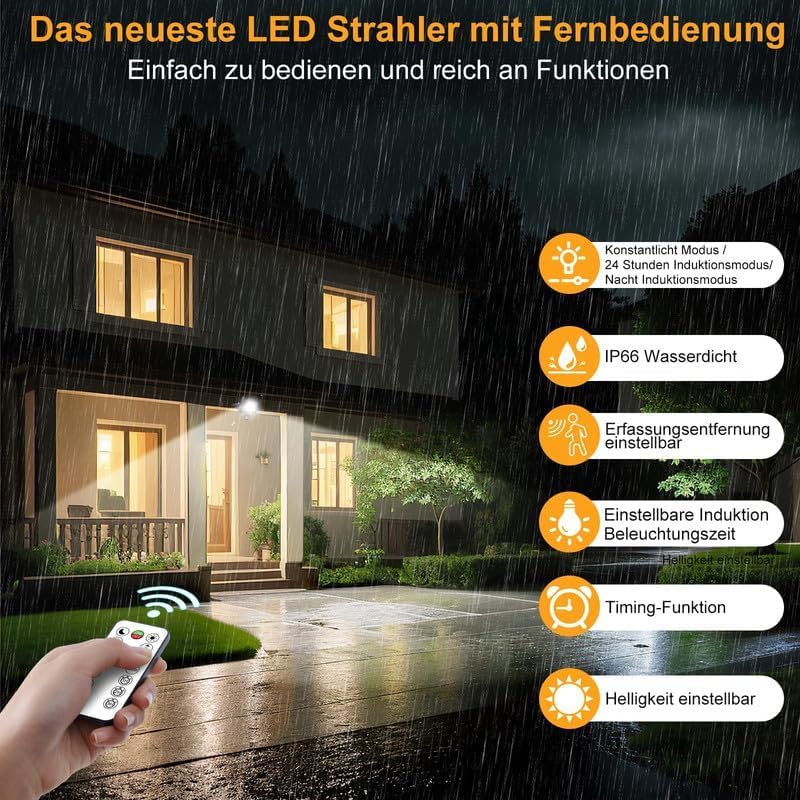
Figure 6.1: Remote control and its various functions.
- Constant Light Mode: The light remains on continuously, regardless of motion detection.
- 24-Hour Induction Mode: The light activates upon motion detection both during the day and at night.
- Night Induction Mode: The light activates only upon motion detection during nighttime.
- Adjustable Brightness: Adjust the light intensity as desired.
- Adjustable Detection Distance: Set the motion sensor's range to 6m, 9.6m, or 12m.
- Adjustable Induction Lighting Time: Configure how long the light stays on after motion detection (45s, 90s, 120s, 5 minutes, 10 minutes).
- Timer Function: Set the light to turn off automatically after 1 hour, 2 hours, or 3 hours.
6.2 Operating Modes Explained

Figure 6.2: Visual representation of the Constant Light, Night Induction, and 24-Hour Induction modes.

Figure 6.3: Detailed explanation of LUX, TIME, and INDUCTION sensor settings.
- LUX Mode: Controls whether the sensor activates during the day and night, or only at night to save energy.
- TIME Mode: Adjusts the duration the light stays on after motion is detected. Options include 10s, 45s, 120s, and 600s (10 minutes).
- INDUCTION Mode: Refers to the motion detection functionality, with a 180° PIR sensor and up to 12m detection range.
7. Maintenance
Regular maintenance ensures optimal performance and extends the lifespan of your floodlight.
- Cleaning: Periodically clean the floodlight's surface and sensor lens with a soft, damp cloth. Do not use abrasive cleaners or solvents.
- Inspection: Regularly check the power cable and connections for any signs of damage or wear. Ensure the mounting screws are tight.
- Environmental Protection: The IP66 rating ensures protection against rain, grit, and snow, allowing year-round outdoor use. The floodlight is also heat and frost resistant.

Figure 7.1: Floodlight's resistance to various weather conditions (IP66, heat, frost).
8. Troubleshooting
If you encounter issues with your MEIKEE floodlight, refer to the following common problems and solutions:
| Problem | Possible Cause | Solution |
|---|---|---|
| Light does not turn on. | No power supply, faulty wiring, sensor malfunction, remote control battery low. | Check power connection. Verify wiring. Ensure sensor is clean and unobstructed. Replace remote control battery. |
| Sensor not detecting motion. | Incorrect sensor settings (e.g., LUX mode set to night only during day), obstruction, sensor angle incorrect, detection distance too low. | Adjust LUX mode. Clear obstructions. Re-adjust sensor angle (360° horizontal, 180° vertical). Increase detection distance via remote. |
| Light stays on continuously. | Constant Light Mode activated, continuous motion in detection area, TIME setting too long. | Switch to an induction mode. Remove continuous motion sources. Reduce TIME setting via remote. |
| Remote control not working. | Battery depleted, remote out of range, obstruction between remote and floodlight. | Replace remote control battery. Ensure remote is within 8m range and has a clear line of sight to the floodlight. |
9. Specifications
| Feature | Specification |
|---|---|
| Brand | MEIKEE |
| Model Number | FLB020 |
| Power Consumption | 25 Watts |
| Luminous Flux | 2100 lm (max) |
| Color Temperature | 6500 Kelvin (Cool White) |
| Voltage | 230 Volts |
| IP Rating | IP66 |
| Beam Angle | 120° |
| Motion Sensor Angle | 180° (detection), 360° horizontal / 180° vertical (physical adjustment) |
| Detection Distance | Adjustable: 6m, 9.6m, 12m |
| Induction Lighting Time | Adjustable: 45s, 90s, 120s, 5 min, 10 min |
| Timer Function | 1H, 2H, 3H |
| Material | Aluminum + Nano (front frame) |
| Product Dimensions (L x W x H) | 6 x 3 x 4 cm |
| Weight | 970 g |
| Cable Cross-section | 1 mm² |
| Energy Efficiency Rating | F |

Figure 9.1: Energy efficiency label. For more details, scan the QR code or visit https://eprel.ec.europa.eu/qr/979497.
10. Warranty and Support
MEIKEE products are manufactured to high-quality standards. For warranty information or technical support, please refer to the purchase platform or contact MEIKEE customer service directly. Keep your proof of purchase for warranty claims.
For further assistance, please visit the official MEIKEE store: MEIKEE Store


