
ANRAN ANRAN 4CH DVR
ANRAN H.264 Network 960H 4CH DVR Security System
User Manual
1. Product Overview
This manual provides essential information for the installation, operation, and maintenance of your ANRAN H.264 Network 960H Full D1 Motion Detection 4CH DVR CCTV Surveillance Security System. This digital video recorder is designed to provide reliable surveillance for your property, supporting up to four high-resolution cameras.

Image 1.1: The ANRAN 4-channel Digital Video Recorder (DVR) unit.
2. Package Contents
Please verify that all items listed below are included in your package. If any items are missing or damaged, please contact customer support.
- ANRAN 4CH DVR Unit
- Power Adapter
- USB Mouse
- Remote Control
- Software CD (for drivers/utilities)
- Mounting Screws (for HDD installation)
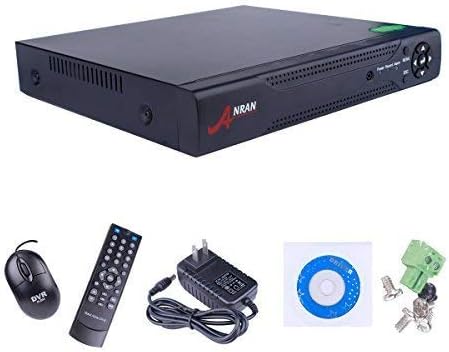
Image 2.1: The ANRAN DVR unit along with its standard accessories, including a USB mouse, remote control, power adapter, software CD, and mounting screws.
3. Setup Guide
3.1 Hard Drive Installation (HDD Not Included)
The DVR does not come with a pre-installed hard drive. A 3.5-inch SATA internal port HDD (up to 4 TB) is required for continuous recording. Follow these steps to install the HDD:
- Unplug the DVR from the power source.
- Remove the top cover of the DVR by unscrewing the screws on the back and sides.
- Carefully connect the SATA data cable and power cable from the DVR to the corresponding ports on the HDD.
- Secure the HDD inside the DVR chassis using the provided mounting screws.
- Replace the top cover and secure it with the screws.
3.2 Connecting the DVR
Refer to the rear panel diagram for port identification.

Image 3.1: Detailed view of the ANRAN DVR's rear panel, showing all input and output ports clearly labeled for easy connection.
- Video Input (BNC): Connect your CCTV cameras to these ports. The DVR supports 960H, AHD, and NVR camera types.
- Video Output (VGA/HDMI): Connect the DVR to a monitor or TV using either a VGA or HDMI cable for local viewing. The default resolution is 1280x1024.
- Audio Input/Output: Connect external microphones or speakers if audio recording/playback is desired.
- LAN Port: Connect an Ethernet cable from the DVR to your router for network access and remote viewing.
- USB Ports: Connect the included USB mouse for navigation. The second USB port can be used for a U-Disk (USB flash drive) for video backup.
- DC 12V: Connect the provided power adapter to this port.
- RS-485 (PTZ): For connecting PTZ (Pan-Tilt-Zoom) cameras, if supported.
3.3 Initial Power On
After all connections are made, plug the power adapter into an electrical outlet. The DVR will power on automatically. Follow the on-screen prompts for initial setup, including setting the date/time and formatting the newly installed hard drive.
4. Operating Instructions
4.1 User Interface Navigation
Use the connected USB mouse or the remote control to navigate the DVR's graphical user interface (GUI). The main menu provides access to various settings, live view, playback, and system configurations.

Image 4.1: The front panel of the ANRAN DVR, featuring indicator lights for power, record, and alarm, along with navigation buttons for menu control.
4.2 Recording and Playback
The DVR supports 4-channel real-time recording and playback simultaneously. Recording modes can be configured in the system settings, including continuous, scheduled, and motion detection recording. To play back recorded footage, access the 'Playback' option from the main menu and select the desired date and time.
4.3 Remote Viewing
For remote monitoring via smartphone or tablet, download the free 'XMeye' application. For PC monitoring, you can view the system through an IE browser. Ensure the DVR is connected to the internet via the LAN port and configured for network access. Refer to the DVR's on-screen network settings for details on port forwarding or cloud access.
4.4 Video Backup
To back up video footage, connect a U-Disk (USB flash drive) to one of the USB 2.0 interfaces. Navigate to the 'Backup' section in the DVR menu, select the desired footage, and initiate the backup process.
5. Maintenance
- Cleaning: Regularly clean the DVR unit with a soft, dry cloth. Avoid using liquid cleaners or aerosols. Ensure ventilation openings are clear of dust to prevent overheating.
- Data Management: Periodically review recorded footage and back up important data to an external storage device. The DVR will automatically overwrite the oldest footage when the HDD is full, unless configured otherwise.
- Firmware Updates: Check the ANRAN official website for any available firmware updates. Updating firmware can improve system stability and add new features. Follow update instructions carefully to avoid damaging the device.
- Power Cycle: If the DVR experiences minor issues, try power cycling the unit by unplugging it from the power source for a few minutes and then plugging it back in.
6. Troubleshooting
If you encounter issues with your ANRAN DVR, refer to the following common problems and solutions:
- No Video Output:
- Ensure the monitor/TV is powered on and set to the correct input (VGA/HDMI).
- Check that video cables are securely connected.
- Try a different video output port or cable.
- No Recording:
- Verify that a hard drive is installed and properly formatted.
- Check recording schedules and motion detection settings.
- Ensure cameras are properly connected and displaying live video.
- Remote Viewing Issues:
- Confirm the DVR is connected to the internet and has a stable network connection.
- Check network settings (IP address, gateway, DNS).
- Ensure port forwarding is correctly configured on your router if not using cloud access.
- Verify the 'XMeye' app is updated to the latest version.
- System Freezing/Unresponsive:
- Perform a power cycle (unplug and replug).
- Ensure adequate ventilation to prevent overheating.
- If persistent, consider a factory reset (note: this will erase settings).
For further assistance, please contact ANRAN technical support.
7. Specifications
| Feature | Specification |
|---|---|
| Model | ANRAN 4CH DVR |
| Video Compression | H.264 |
| Video Input | 4-channel (960H, AHD, NVR compatible) |
| Video Output | VGA, HDMI (Default 1280x1024) |
| Audio Input/Output | Yes |
| Storage | 1 x 3.5-inch SATA HDD (up to 4 TB, not included) |
| USB Interface | 2 x USB 2.0 |
| Network Interface | LAN Port |
| Remote Access App | XMeye |
| Product Dimensions | 14.17 x 3.54 x 11.42 inches |
| Item Weight | 3.2 pounds |
| UPC | 649661478195 |
8. Warranty and Support
Your ANRAN 4CH Security DVR comes with a One Year Warranty from the date of purchase. ANRAN also provides Lifetime Free Technical Support for this product.
If you require technical assistance, have questions about your warranty, or need to report an issue, please contact ANRAN customer support through their official website or the contact information provided with your purchase.
Related documentsANRAN 4CH DVR


Ask a question about this manual
Ask about setup, troubleshooting, compatibility, parts, safety, or missing instructions. Manuals+ will review the question and use this page’s manual context to help answer it.