1. Introduction
The rockspace AC1200 WiFi Range Extender is designed to expand your existing wireless network coverage and eliminate Wi-Fi dead zones. Utilizing dual-band technology, it supports both 2.4GHz and 5GHz bands, providing stable and high-speed connections for up to 20 wireless devices across an area of up to 2624 sq.ft. This manual provides detailed instructions for setting up, operating, and maintaining your device.

The rockspace AC1200 WiFi Range Extender expands your network coverage.
2. Safety Information
- Do not expose the device to water, fire, or high temperatures.
- Avoid placing the device near strong electromagnetic fields.
- Ensure proper ventilation; do not cover the device's vents.
- Use only the power adapter supplied with the device.
- Keep out of reach of children.
3. Package Contents
- 1 x rockspace AC1200 WiFi Range Extender
- 1 x Instruction Manual
4. Product Overview
The rockspace AC1200 WiFi Range Extender features a compact design with dual external antennas for enhanced signal reception and transmission. It includes a WPS button for quick setup, an Ethernet port for wired connections, and LED indicators to show device status.

Front view of the rockspace AC1200 WiFi Range Extender.
LED Indicators:
- Signal LED: Indicates the strength of the signal received from the router.
- WPS LED: Indicates WPS connection status.
- PWR LED: Indicates power status.
Ports and Buttons:
- WPS Button: For quick and easy setup with WPS-enabled routers.
- Ethernet Port: For connecting wired devices or setting up in Access Point mode.
5. Setup
Method 1: WPS Button Setup (Recommended)
- Plug the extender into an electrical outlet near your wireless router. Wait for the PWR LED to turn solid blue.
- Press the WPS button on the extender. The WPS LED will start blinking.
- Within 2 minutes, press the WPS button on your wireless router.
- Wait for the Signal LED on the extender to turn solid blue, indicating a successful connection.
- Once connected, you can unplug the extender and relocate it to a desired location within your router's Wi-Fi range. Ensure the Signal LED remains solid blue for optimal performance.

WPS setup for quick connection.
Method 2: Web-based Setup
- Plug the extender into an electrical outlet near your wireless router. Wait for the PWR LED to turn solid blue.
- Connect your computer or mobile device to the extender's default Wi-Fi network (e.g., 'rockspace_EXT' or 'rockspace_5G_EXT'). No password is required initially.
- Open a web browser and enter the default IP address (e.g., 192.168.0.254) or domain name (e.g., re.rockspace.local) in the address bar.
- Follow the on-screen instructions to create an administrator password, select your router's Wi-Fi network, and enter its password.
- Once configured, the extender will restart. Reconnect your devices to the new extended Wi-Fi network (usually your original network name with '_EXT' appended).
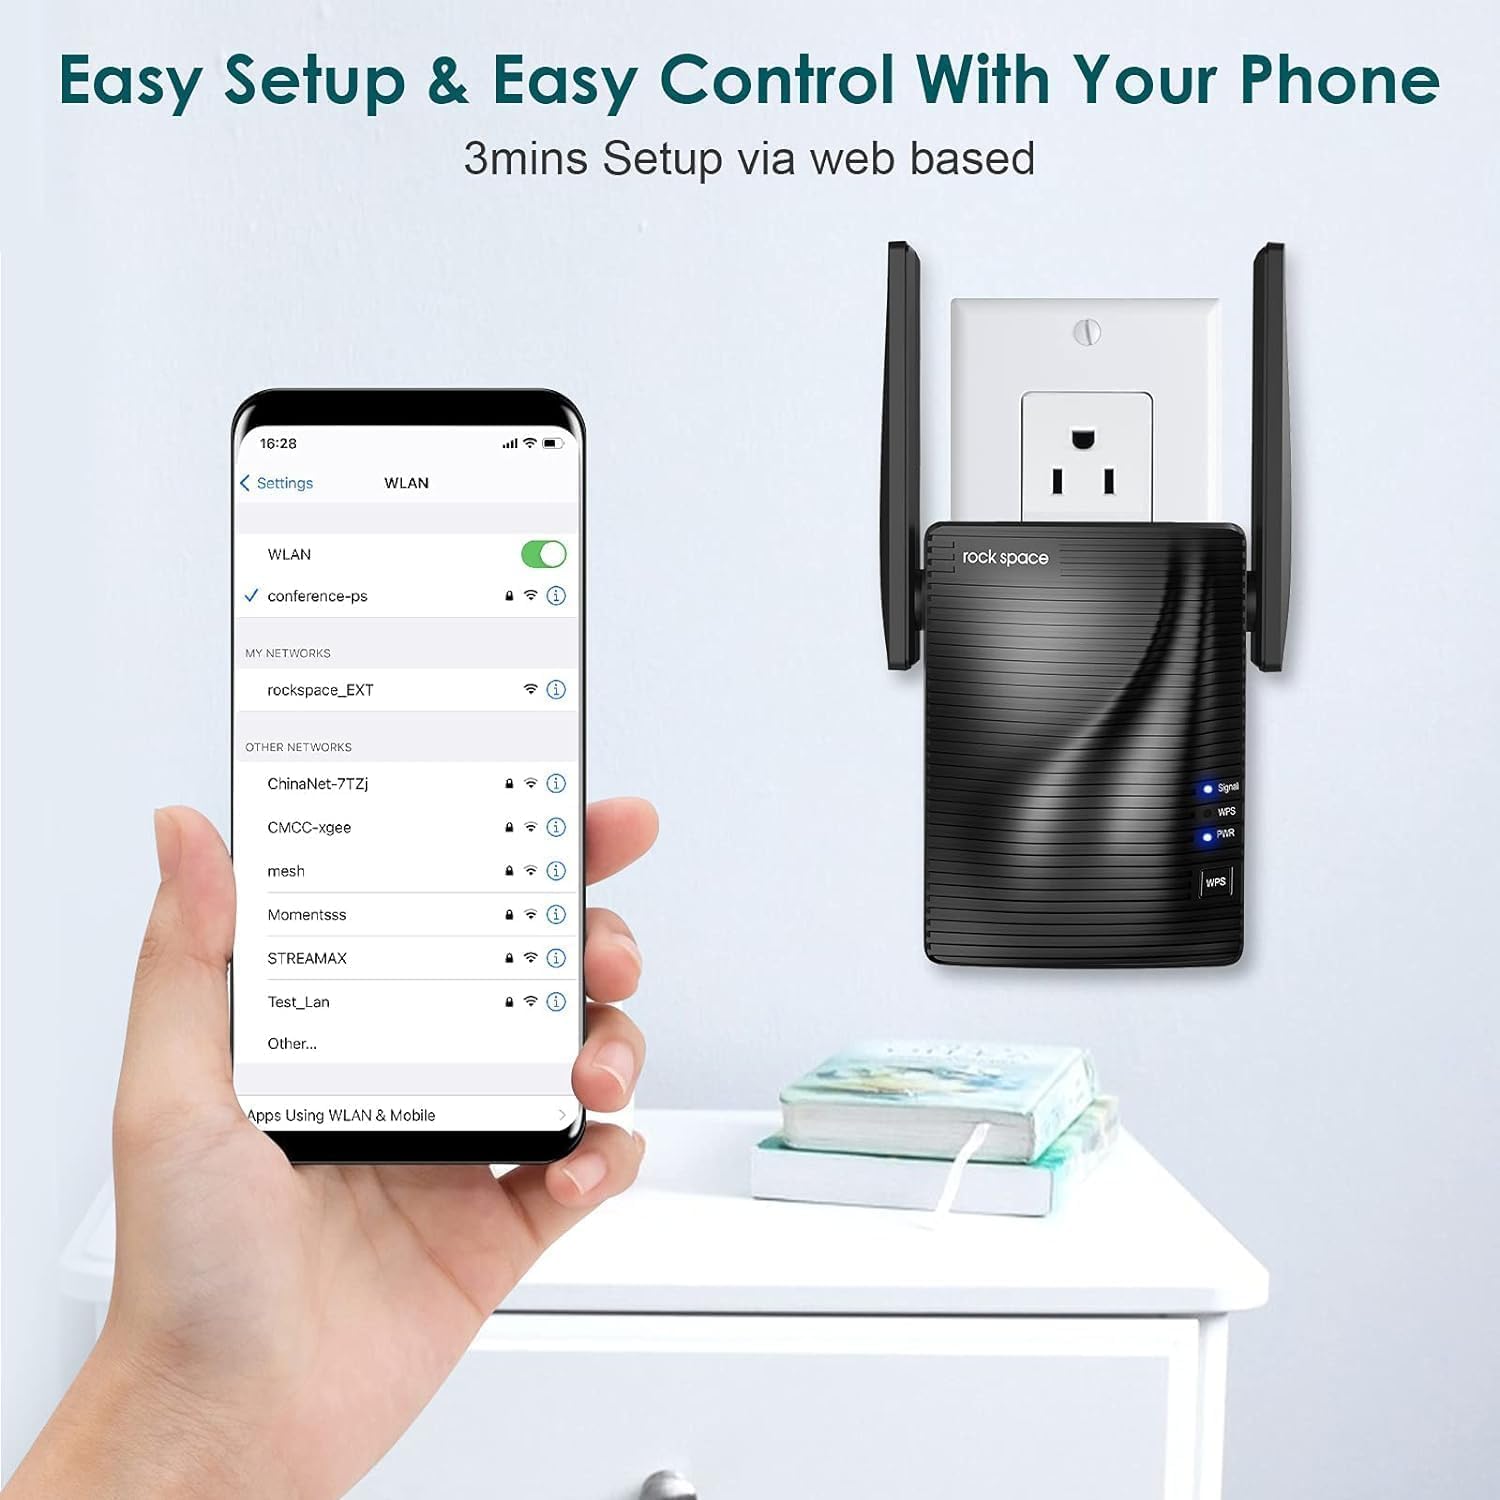
Web-based setup via smartphone.
6. Operating Modes
Repeater Mode (Default)
In Repeater Mode, the extender wirelessly connects to your existing router and amplifies its Wi-Fi signal, extending coverage to areas with weak or no signal. This is ideal for expanding your wireless network without running new cables.
Access Point (AP) Mode
In AP Mode, the extender connects to your router via an Ethernet cable and creates a new wireless network. This is useful for converting a wired network connection into a wireless hotspot, providing Wi-Fi access in areas where only wired connections are available.

Access Point mode provides stable wired-to-wireless conversion.
7. Maintenance
- Optimal Placement: Place the extender halfway between your router and the Wi-Fi dead zone. Avoid physical obstructions like thick walls or large metal objects.
- Firmware Updates: Regularly check the rockspace official website for firmware updates to ensure optimal performance and security.
- Cleaning: Gently wipe the device with a soft, dry cloth. Do not use liquid cleaners or aerosols.
8. Troubleshooting
- No Power: Ensure the extender is securely plugged into a working electrical outlet. Check the PWR LED.
- No Signal/Weak Signal: Relocate the extender closer to your main router. Ensure there are minimal obstructions between the router and the extender.
- Slow Internet Speed: This can be caused by interference, too many connected devices, or improper placement. Try adjusting antenna positions or moving the extender.
- Cannot Access Web Management Page: Ensure your device is connected to the extender's Wi-Fi network. Clear your browser's cache and cookies, or try a different browser.
- Forgotten Password: Perform a factory reset on the extender by pressing and holding the Reset button (usually a small pinhole) for about 8-10 seconds until the LEDs flash. This will revert all settings to factory defaults.
9. Specifications
| Feature | Detail |
|---|---|
| Model Number | 2020 1200RPT |
| Wireless Communication Standard | 802.11a/b/g/n |
| Data Transfer Rate | 1200 Megabytes Per Second (Mbps) |
| Frequency Band Class | Dual-Band (2.4GHz & 5GHz) |
| Connector Type | RJ45 (Ethernet) |
| Item Weight | 10.4 ounces |
| Package Dimensions | 5 x 5 x 4 inches |
10. Warranty and Support
rockspace products typically come with a standard manufacturer's warranty. For specific warranty details, technical support, or to download the latest user guide, please visit the official rockspace website or refer to the included User Guide (PDF).


