1. Introduction
This manual provides essential instructions for the safe and effective operation, maintenance, and troubleshooting of your Orion Motor Tech 4 CFM Single Stage Vacuum Pump. Please read this manual thoroughly before use and retain it for future reference.
2. Safety Information
WARNING: Read all safety warnings and instructions. Failure to follow the warnings and instructions may result in electric shock, fire, and/or serious injury.
- Always operate the vacuum pump in a well-ventilated area.
- Ensure the power supply matches the voltage specified on the pump's label.
- Do not operate the pump with damaged cords or plugs.
- Avoid contact with moving parts.
- Wear appropriate personal protective equipment, including safety glasses and gloves, when handling refrigerants or vacuum pump oil.
- Do not use the pump for flammable or corrosive gases.
- Keep children and bystanders away during operation.
- This product may contain chemicals known to the State of California to cause cancer and birth defects or other reproductive harm. For more information, consult local regulations.
3. Package Contents
Verify that all items listed below are included in your package:
- 1x Orion Motor Tech 4 CFM Single Stage Vacuum Pump
- 1x 1/4" to 3/8" Adapter
- 1x Vacuum Pump Oil (0.26 qt. / 225 mL)
- 1x Teflon Tape
- 1x Pair of Gloves
- 1x Instruction Manual
4. Product Overview
The Orion Motor Tech 4 CFM Single Stage Vacuum Pump is designed for efficient evacuation of HVAC systems, automotive AC systems, and various industrial applications. It features a robust all-copper motor and a durable aluminum alloy casing.

Figure 4.1: Orion Motor Tech 4 CFM Single Stage Vacuum Pump.
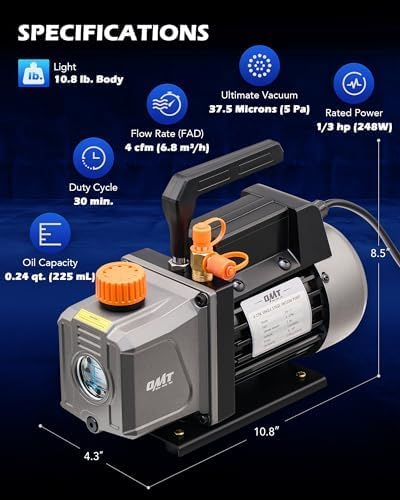
Figure 4.2: Key specifications and dimensions of the vacuum pump, including its light 10.8 lb body, 37.5 microns ultimate vacuum, 4 CFM flow rate, 1/3 hp rated power, 30 min duty cycle, and 0.24 qt oil capacity.

Figure 4.3: Illustration of the powerful all-copper motor, designed for superior conductivity, efficient heat dissipation, minimal noise, high efficiency, fast cooling, and excellent durability.

Figure 4.4: Details of the multipurpose oil cap with pores and filter to minimize noise and simplify oil charging. The image also shows the air outlet and the oil inlet for easy refilling.

Figure 4.5: The vacuum pump's wide compatibility with common HVAC hoses, featuring 1/4" and 1/2" inlets and a 1/4" to 3/8" adapter. The image highlights the different connection types: 1/4" to 3/8" Adapter, 1/4" SAE, 1/2" ACME, and 3/8" SAE.

Figure 4.6: Overview of key features including a transparent window for oil level, a non-slip handle for portability, a built-in fan and vents for heat dissipation, and a shockproof base for stable operation.
5. Setup
5.1 Adding Vacuum Pump Oil
- Ensure the pump is off and unplugged.
- Locate the oil fill cap (typically orange) on top of the pump.
- Unscrew the oil fill cap.
- Carefully pour the provided vacuum pump oil into the oil reservoir until the oil level is between the MIN and MAX marks on the sight glass. Do not overfill.
- Securely replace the oil fill cap.
5.2 Connecting Hoses
- Identify the appropriate inlet port on the vacuum pump (1/4", 1/2", or 3/8"). Use the provided 1/4" to 3/8" adapter if necessary.
- Apply Teflon tape to the threaded connections of your manifold gauge hoses to ensure a tight seal.
- Connect the vacuum hose from your manifold gauge set to the chosen inlet port on the vacuum pump.
- Ensure all connections are hand-tightened to prevent leaks.
6. Operating Instructions
6.1 General Operation
- After completing the setup, ensure the pump is placed on a stable, level surface.
- Plug the pump into a grounded electrical outlet.
- Open the valve on your manifold gauge set connected to the system you wish to evacuate.
- Turn on the vacuum pump. The pump will begin to draw a vacuum.
- Monitor the vacuum level using a micron gauge (recommended for precise readings). The pump is capable of drawing systems down to 37.5 microns (5 Pa).
- Allow the pump to run for the recommended duration based on the system size and desired vacuum level. The duty cycle is approximately 30 minutes for continuous operation.
- Once the desired vacuum is achieved, close the valve on your manifold gauge set to isolate the system.
- Turn off the vacuum pump and unplug it from the power source.
- Slowly disconnect the vacuum hose from the pump.
6.2 Applications
This vacuum pump is suitable for:
- Automotive HVAC servicing (R12, R22, R134a, R410a, R502 refrigerants)
- Resin degassing
- Vacuum packaging
- Wine degassing
- Thermoforming
- Laboratory settings
- Industrial applications

Figure 6.1: Examples of the vacuum pump's wide application, including HVAC servicing, vacuum drying, wood stabilization, vacuum oven use, and vacuum hold-down tables.
7. Maintenance
7.1 Oil Level Monitoring
Regularly check the oil level using the sight glass on the side of the pump. The oil level should always be between the MIN and MAX marks. Low oil levels can damage the pump and reduce its efficiency.
7.2 Oil Changes
Vacuum pump oil should be changed regularly, especially after prolonged use or if the oil appears discolored or cloudy. Dirty oil can reduce pump performance and lifespan.
- Ensure the pump is off and cool.
- Place a suitable container under the oil drain plug.
- Remove the oil drain plug and allow all old oil to drain completely.
- Replace the oil drain plug.
- Remove the oil fill cap and add new vacuum pump oil until the level is between the MIN and MAX marks on the sight glass.
- Securely replace the oil fill cap.
7.3 Cleaning
Keep the exterior of the pump clean and free of dust and debris. Ensure the cooling fins and vents are unobstructed to allow for proper heat dissipation.
8. Troubleshooting
This section addresses common issues you might encounter with your vacuum pump.
8.1 Pump Not Starting or Running
- Check if the pump is properly plugged into a functional power outlet.
- Verify the power switch is in the 'ON' position.
- Inspect the power cord for any damage.
8.2 Poor Vacuum Performance
- Check for leaks in the system, including hose connections, manifold gauges, and the system being evacuated. Use Teflon tape on threaded connections for a better seal.
- Verify the oil level is correct and the oil is clean. Dirty or insufficient oil can significantly impact performance.
- Ensure the pump's intake filter is clean and not obstructed.
8.3 Smoke from Air Outlet

Figure 8.1: Common causes for smoke or mist from the air outlet, including oil vaporization, oil volatilization, oil insufficiency, exhaust gas release, and increased oil viscosity. A small amount of smoke during operation is normal, especially in cold conditions.
A small amount of smoke or oil mist from the air outlet during operation is normal and not necessarily a sign of a problem. This can be more prominent in cold conditions. However, excessive smoke may indicate:
- Oil Vaporization: Normal during operation.
- Oil Volatilization: Occurs when oil heats up.
- Oil Insufficiency: Check and refill oil to the correct level.
- Exhaust Gas Release: Normal function.
- Increased Oil Viscosity: Old or contaminated oil can become thicker. Consider changing the oil.
8.4 Overheating
- Ensure the pump is operating within its specified duty cycle (e.g., 30 minutes continuous).
- Check that the cooling vents are not blocked.
- Allow the pump to cool down if it becomes excessively hot to the touch.
9. Specifications
| Feature | Specification |
|---|---|
| Model Number | FBA-VPHB001OG |
| Flow Rate | 4 CFM (6.8 m³/h) |
| Ultimate Vacuum | 37.5 Microns (5 Pa) |
| Rated Power | 1/3 HP (248W) |
| Voltage | 110V/60Hz |
| Oil Capacity | 0.26 qt. (225 mL) |
| Dimensions (L x W x H) | 10.8 x 4.3 x 8.5 inches |
| Item Weight | 10.78 pounds |
| Refrigerant Compatibility | R12, R22, R134a, R410a, R502 |
| Inlet Ports | 1/4", 1/2", 3/8" (with adapter) |
10. Warranty and Support
10.1 Warranty Information
Orion Motor Tech products are designed for reliability and performance. For specific warranty details regarding your vacuum pump, please refer to the warranty card included with your purchase or visit the official Orion Motor Tech website. Keep your proof of purchase for warranty claims.
10.2 Customer Support
If you have any questions, require technical assistance, or need to report an issue, please contact Orion Motor Tech customer support through their official website or the contact information provided with your product. You can also visit the Orion Motor Tech Store on Amazon for more information and product resources.


