
Theben SYN 161d
Theben SYN 161d Analog Timer User Manual
Model: SYN 161d (Product No. 1610011)
1. Introduction
This user manual provides comprehensive instructions for the installation, operation, and maintenance of your Theben SYN 161d Analog Timer. Please read this manual carefully before using the device to ensure safe and efficient operation. The Theben SYN 161d is a reliable 1-channel analog timer designed for daily programming, suitable for various applications such as lighting control, pump management, and more.

Figure 1: The Theben SYN 161d Analog Timer alongside the Avantrado 64GB Micro SD card and adapter.
2. Key Features
The Theben SYN 161d Analog Timer offers a range of features designed for precise and reliable time control:
- Analog Timer: Simple and intuitive analog interface for setting daily programs.
- 1 Channel: Controls a single circuit.
- Daily Program: Allows for repetitive switching cycles over a 24-hour period.
- 96 Switching Segments: Enables precise programming with a shortest switching time of 15 minutes.
- Network Synchronization: Ensures accurate timekeeping by synchronizing with the power grid frequency.
- 12h/24h Display: Clear time display with hands and 12h/24h detection.
- Easy Time Correction: Simple adjustment for daylight saving time (summer/winter time) and counter-clockwise time correction.
- DuoFix Spring Terminals: Facilitates quick and secure connection for up to two conductors (0.5 to 2.5 mm² wire diameter).
- Manual Switch: Three-position switch for continuous ON, AUTO (programmed operation), or continuous OFF.
- Switching Status Indicator: Provides visual feedback on the current switching state.

Figure 2: Detailed view of the timer's 24-hour dial and programmable segments.
3. Installation and Setup
The Theben SYN 161d timer is designed for DIN rail mounting. Ensure all power is disconnected before proceeding with installation.
3.1 Safety Instructions
- Installation must be performed by a qualified electrician.
- Disconnect power supply before installation or maintenance.
- Observe all local and national electrical codes and regulations.
- Do not operate the device if it is damaged.
3.2 Mounting
The timer is designed for mounting on a standard DIN rail (3 TE width).
- Ensure the DIN rail is securely fastened within the electrical enclosure.
- Align the timer with the DIN rail and press firmly until it clicks into place.
3.3 Wiring
The SYN 161d uses DuoFix spring terminals for secure wiring. These terminals are suitable for solid or stranded wires (with or without ferrules) with a diameter of 0.5 to 2.5 mm².
- Identify the terminals: L (Line/Phase), N (Neutral), and the switching contacts (1, 2, 3).
- Press the release button on the DuoFix terminal to open the connection.
- Insert the stripped wire into the terminal.
- Release the button to secure the wire. Gently pull on the wire to ensure a firm connection.
- Connect the power supply (230V AC, 50Hz) to the L and N terminals.
- Connect the load to the switching contacts (e.g., L to terminal 1, load to terminal 2, and terminal 3 for changeover if needed). Refer to the wiring diagram on the device for specific connections.

Figure 3: Wiring terminals with DuoFix spring connections.
4. Operation
4.1 Setting the Current Time
Rotate the central dial clockwise until the current time aligns with the time marker (usually a small arrow or line on the casing). The dial has 24-hour markings.

Figure 4: Setting dial for time adjustment.
4.2 Programming Switching Times
The outer ring of the dial consists of 96 segments, each representing 15 minutes. To program a switching time:
- For ON periods: Push the segments outwards for the desired duration.
- For OFF periods: Leave the segments pushed inwards.
- Each pushed-out segment will activate the circuit during its corresponding 15-minute interval.
4.3 Manual Override Switch
The manual override switch allows you to temporarily change the timer's state, regardless of the programmed settings. It has three positions:
- Continuous ON (I): The circuit remains continuously active.
- AUTO (Clock symbol): The timer operates according to the programmed switching times.
- Continuous OFF (0): The circuit remains continuously inactive.
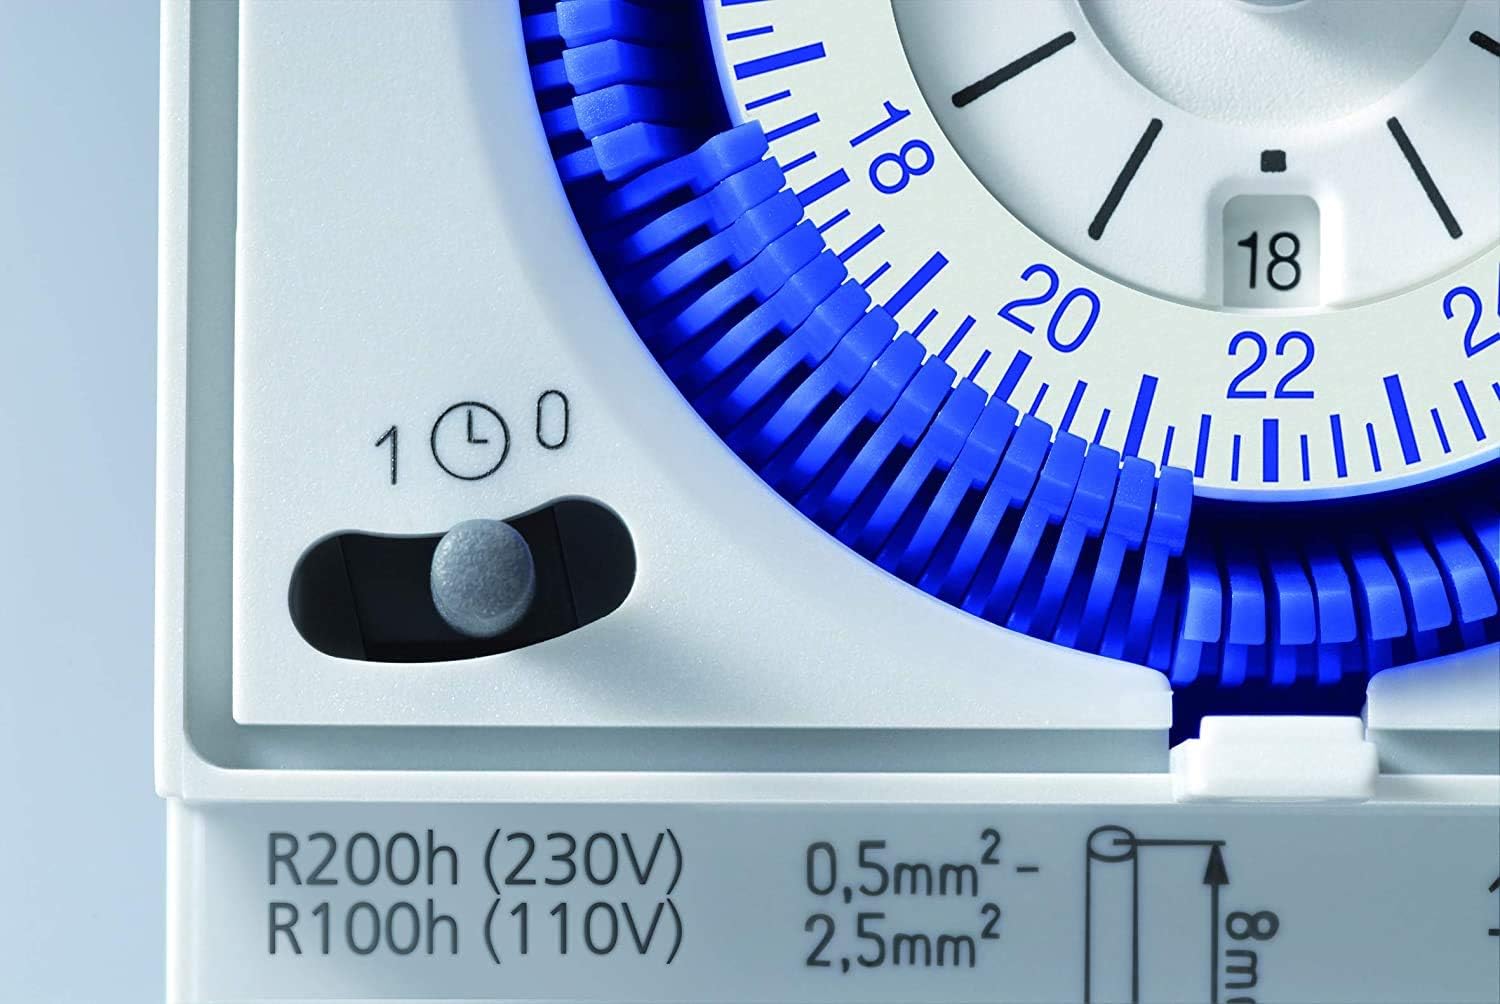
Figure 5: Manual override switch for continuous operation or programmed mode.
5. Maintenance
The Theben SYN 161d Analog Timer is designed for long-term, maintenance-free operation. However, periodic checks can ensure optimal performance.
- Cleaning: Use a dry, soft cloth to clean the exterior of the device. Do not use abrasive cleaners or solvents.
- Connection Check: Periodically check the wiring connections to ensure they remain secure. (Ensure power is disconnected before checking connections).
- Environmental Conditions: Ensure the timer is operated within its specified temperature and humidity ranges to prevent damage.
6. Troubleshooting
| Problem | Possible Cause | Solution |
|---|---|---|
| Timer not switching / Load not turning ON/OFF. |
|
|
| Timer time is inaccurate. |
|
|
| Segments are difficult to push. | Dust or debris accumulation. | Gently clean the segments with a soft brush. Do not force them. |
7. Technical Specifications
| Parameter | Value |
|---|---|
| Supply Voltage | 230 V AC |
| Frequency | 50 Hz |
| Number of Channels | 1 |
| Width | 3 TE (DIN modules) |
| Mounting Type | DIN rail |
| Connection Type | DuoFix spring terminals |
| Drive | Synchronous motor |
| Program | Daily program |
| Switching Capacity (250 V AC, cos φ = 1) | 16 A |
| Switching Capacity (250 V AC, cos φ = 0.6) | 4 A |
| Incandescent/Halogen Load | 1100 W |
| LED Lamp (<2 W) | 180 W |
| LED Lamp (2-8 W) | 20 W |
| LED Lamp (>8 W) | 180 W |
| Shortest Switching Time | 15 minutes |
| Programmable Interval | 15 minutes |
| Accuracy (at 25 °C) | Network synchronous |
| Contact Type | Changeover switch |
| Switching Output | Potential-free and phase-independent |
| Number of Switching Segments | 96 |
| Standby Power | ~ 0.5 W |
| Maximum Power Dissipation | 1.3 W |
| Control Mark | VDE |
| Housing Material | High temperature resistant |
| Dimensions (Package) | 10.9 x 9.1 x 8.7 cm |
| Weight (Item) | 70.02 grams (2.47 Ounces) |
| Color | White |
Note: The included Micro SD card and adapter are an additional product and are not required for the operation of the Theben SYN 161d timer.


Figure 6: The Avantrado 64GB Micro SD card and adapter, included as an accessory.
8. Warranty and Support
For warranty information and technical support, please refer to the official Theben website or contact their customer service. Keep your purchase receipt as proof of purchase.
Theben products are manufactured in Germany, ensuring high quality and durability.

Figure 7: Theben's manufacturing facility, highlighting German quality.
Related documentsSYN 161d


Ask a question about this manual
Ask about setup, troubleshooting, compatibility, parts, safety, or missing instructions. Manuals+ will review the question and use this page’s manual context to help answer it.