
1. Introduction
Product Overview
The CENMING Model HD3 AC8.3.T Universal Thermostatic Ceiling Fan Remote Control Kit is designed to enhance the functionality and convenience of most 110V 3-speed AC ceiling fans. This kit is compatible with popular brands such as Hampton Bay, Harbor Breeze, Hunter, and Home Decorators Collection. It offers advanced features including variable fan speed control, light dimming, timer settings, and a unique thermostatic function for automated comfort.

Figure 1.1: CENMING Universal Thermostatic Ceiling Fan Remote Control Kit components.
Key Features
- Universal Compatibility: Suitable for most 110V 3-speed AC ceiling fans, including major brands. Not compatible with DC motors or hugger style fans.
- Variety Fan Speed Control: Offers High/Medium/Low 3-speed control. Includes a "comfortable breeze" setting that randomly alternates fan speed for a natural effect.
- Thermostatic Feature: Allows setting a desired room temperature. The fan automatically turns on/off when the temperature is 1℃ or 1℉ above/below the set point.
- Light Dimmer & Timer Settings: Provides light on/off/dimming control. Features a "walk away time delay" (30s) and fan/light timers (2, 4, and 8 hours). Compatible with dimmable LED and incandescent bulbs; other LED and all CFL lamps only support ON/OFF.
- Compact Receiver: Small receiver size (3.74*1.89*1.06 in) for easy installation within the ceiling fan canopy.
2. Package Contents
Please verify that all items listed below are included in your package:
- Thermostatic Remote Control × 1
- Ceiling Fan Receiver × 1
- Plastic Wire Connectors × 6
- Luminous Stickers × 2
- User Manual × 1
Note: 2 AAA batteries are required for the remote control and are NOT included in the package. Please purchase them separately.
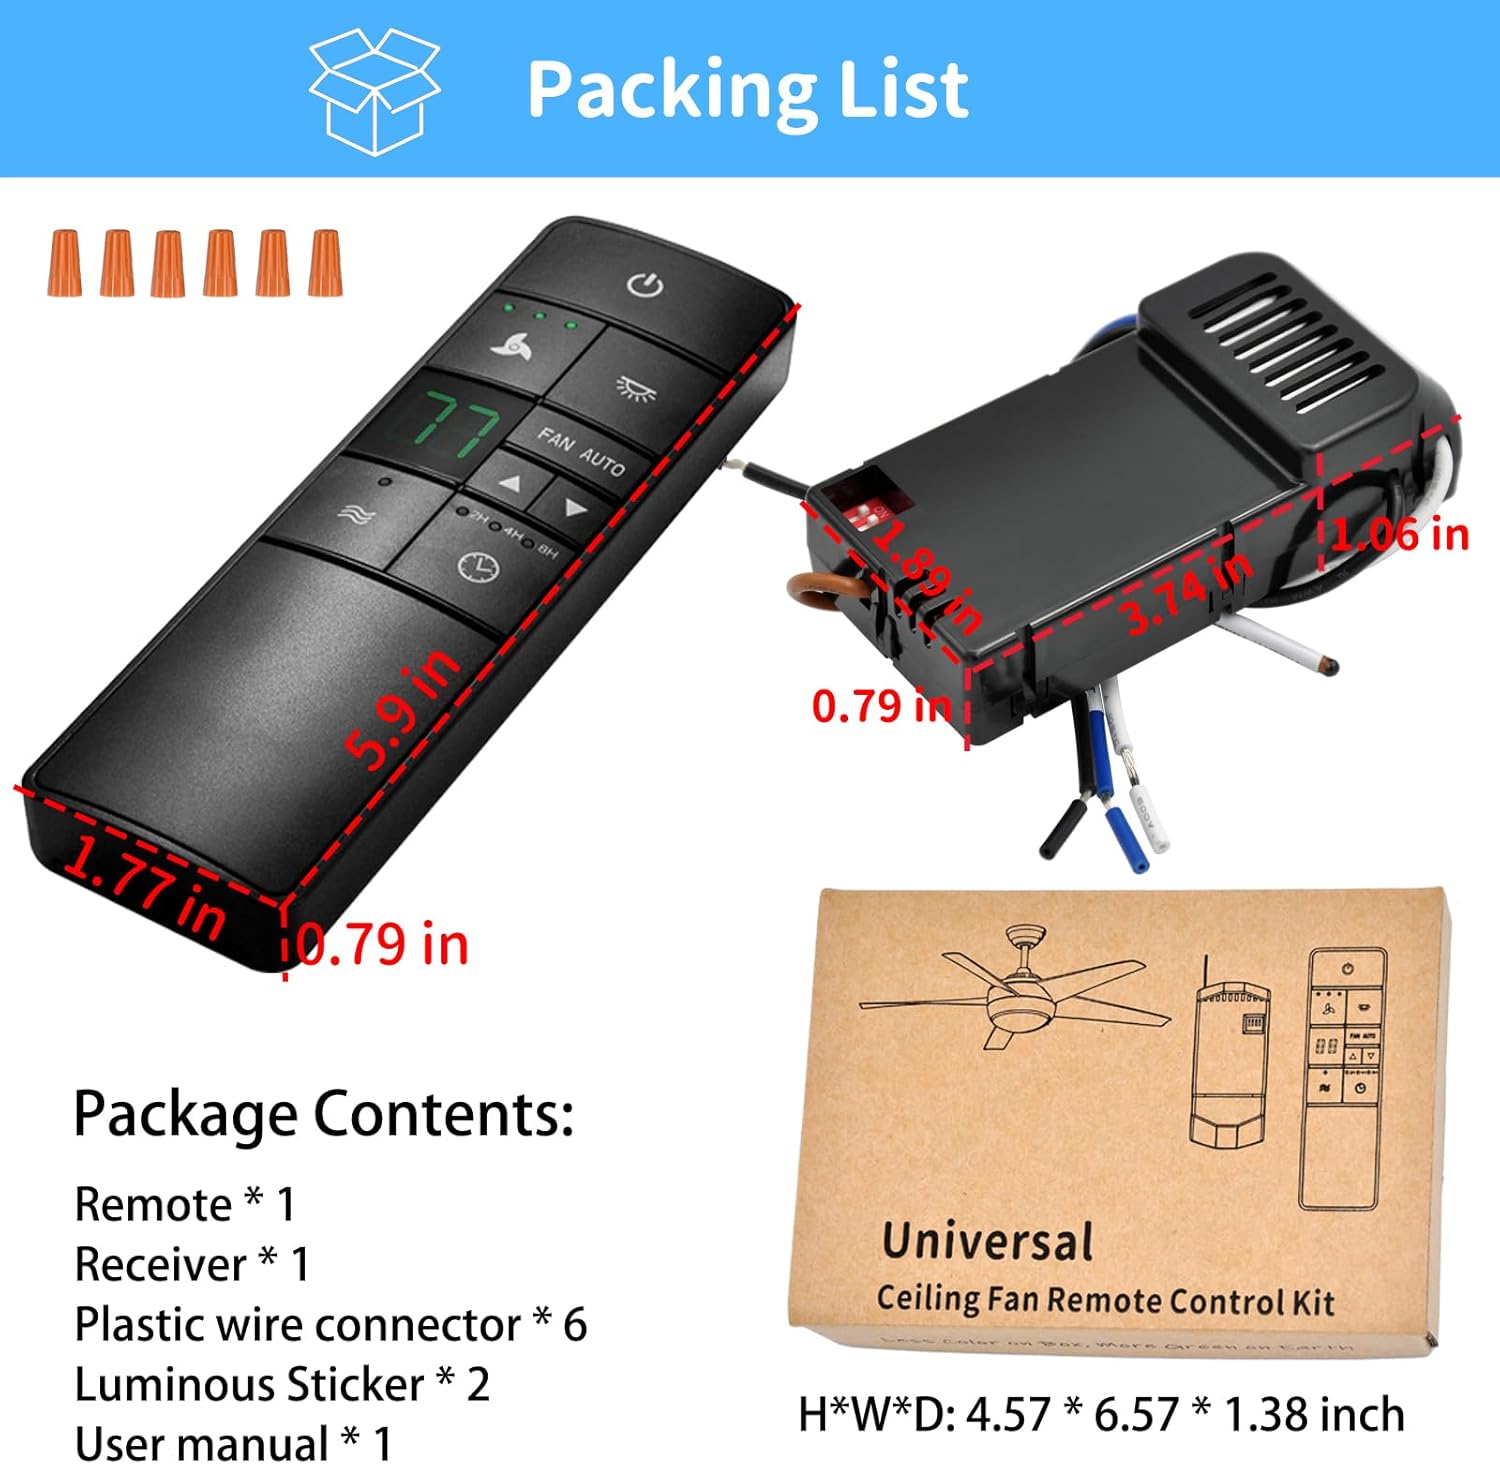
Figure 2.1: Package contents and dimensions of the remote and receiver.
3. Compatibility
This remote control kit is designed for broad compatibility with various ceiling fan and lighting types:
- Ceiling Fans: Compatible with most 110V 3-speed AC ceiling fans. Works well with most downrod style fans.
- Brands: Compatible with Hampton Bay, Harbor Breeze, Hunter, Home Decorators Collection, and other ceiling fan brands.
- Lighting: Compatible with dimmable LED and incandescent light bulbs. Other LED and all CFL lamps only support ON/OFF function.
Important Notes on Compatibility:
- NOT available for DC motors.
- NOT recommended for use with hugger style fans.
- NOT recommended for use with wall-mounted fans or exhaust-type fans.

Figure 3.1: Visual guide to product compatibility.
4. Important Notes Before Installation
Before proceeding with installation, please observe the following critical points:
- Light Dimmer Functionality: The light dimmer is compatible with incandescent bulbs and some dimmable LED lights. Other LED bulbs and all CFL lamps will only support the ON/OFF function.
- Batteries: The item does not include batteries. You will need to purchase two AAA batteries separately for the remote control.
- Wall Mount Holder: The wall mount holder for the remote is not included from the factory.
- Luminous Stickers: Luminous stickers are provided. You can attach them to the remote to help locate it in the dark.

Figure 4.1: Key considerations before installation and use.
5. Setup and Installation
WARNING: Remember to disconnect power at the circuit breaker before beginning any electrical work. The electrical wiring must meet all local and national electrical code requirements. The electrical source and fan must be 110/120V, 60Hz. Incorrect wire connection may damage this receiver. If you do not have enough electrical wiring knowledge or experience, contact a licensed electrician.
5.1 Setting the Codes on the Remote Control and Receiver
Both the remote control and the receiver have DIP switches. Ensure the DIP switch settings on the receiver match the settings on the remote control for proper communication. You can also switch the remote display between Celsius (℃) and Fahrenheit (℉) and dimmable (D) or non-dimmable (O) light settings.
5.2 Receiver Positioning
Position the receiver correctly in the mounting bracket of your ceiling fan. Ensure there is enough space for the receiver (3.74*1.89*1.06 in) within the ceiling fan canopy.
5.3 Connecting the Household Wiring, Receiver, and Fan
Follow the wiring diagram carefully. Connect the household supply wires to the receiver, and then connect the receiver to the fan wires using the provided plastic wire connectors. Ensure all connections are secure.

Figure 5.1: Installation and setup guide for the remote control kit.
5.4 Installation Overview Video
Video 5.1: An overview of CENMING Ceiling Fan Remote Controls, demonstrating features and compatibility. This video provides a general visual guide to the product line.
6. Operating Instructions
Familiarize yourself with the remote control's buttons and their functions for optimal use:

Figure 6.1: Easy operation of the remote control with button descriptions.
- Power Button (⏻): Turns the fan and light on/off. Can also activate the "Walk Away Time Delay" function.
- Fan Speed Control: Cycles through High, Medium, and Low fan speeds.
- Light On/Off/Dimmer: Controls the light. Press to turn on/off. Press and hold to dim the light (for compatible bulbs).
- FAN AUTO: Toggles between manual and automatic fan operation. In automatic state, the fan's built-in temperature sensor will turn the fan on/off within a 1℃/1℉ range of your set temperature.
- Temperature Adjustment (▲/▼): Adjusts the desired temperature for the automatic fan mode.
- Comfortable Breeze (∿): Activates a mode that randomly alternates fan speed to simulate a natural breeze.
- Timer Settings (◷): Sets a run timer for the fan and light for 2, 4, or 8 hours.
6.1 Thermostatic Feature
The thermostatic feature allows you to set a desired room temperature. When the room temperature goes 1℃ or 1℉ above or below this set temperature, the fan will automatically turn on or off to help maintain comfort.

Figure 6.2: Explanation of the thermostatic feature.
6.2 Reverse Function
This kit is suitable for ceiling fans with a reverse switch. The reverse switch is typically located on the motor housing of your ceiling fan. To change the fan's direction, first shut off the fan, wait until the blades have completely stopped, and then flip the switch to reverse the direction.

Figure 6.3: Understanding the fan's reverse function.
7. Maintenance
7.1 Battery Replacement
The remote control requires two 1.5V AAA batteries. When the remote's display becomes dim or unresponsive, it is time to replace the batteries. Open the battery compartment cover on the back of the remote, remove the old batteries, and insert new ones, ensuring correct polarity. Close the cover securely.
7.2 Cleaning
To clean the remote control and receiver, use a soft, dry cloth. Do not use abrasive cleaners, solvents, or harsh chemicals, as these may damage the surfaces or internal components. Keep the remote and receiver dry and away from excessive moisture.
8. Troubleshooting
If you experience issues with your CENMING Universal Thermostatic Ceiling Fan Remote Control Kit, please refer to the following common problems and solutions:
- Fan or Light Not Responding:
- Check if the power to the ceiling fan is turned on at the wall switch or circuit breaker.
- Ensure the batteries in the remote control are fresh and installed with correct polarity.
- Verify that the DIP switch settings on the remote control match those on the receiver.
- Confirm that the receiver is correctly wired and securely connected within the fan canopy.
- Light Dimmer Not Working:
- Ensure you are using dimmable LED or incandescent bulbs. Non-dimmable LED or CFL bulbs will only turn on/off.
- Check the light setting on the remote (D for dimmable, O for on/off only).
- Fan Speed Issues:
- Confirm the fan is a 3-speed AC motor fan. This kit is not compatible with DC motors.
- If the fan is not responding to speed changes, re-check the DIP switch settings.
- Thermostatic Feature Inaccurate:
- Ensure the remote is placed in an area where it can accurately read the room temperature, away from direct sunlight or drafts.
If the problem persists after attempting these solutions, please contact CENMING customer support for further assistance.
9. Specifications
| Model Number | HD3 AC8.3.T |
| Manufacturer | CENMING |
| Power Source | AC & Battery (Remote: 2 AAA batteries, not included) |
| Compatible Devices | 110V 3-Speed AC Ceiling Fan |
| Receiver Dimensions (L×W×H) | 3.74 × 1.89 × 1.06 inches |
| Item Weight | 7 ounces |
| Color | Black |
| Special Features | Universal, Timer, Light Dimmer, Ceiling Fan Speed Remote Control, Thermostatic Feature |
| Country of Origin | China |
10. Warranty and Support
10.1 Warranty Information
This CENMING product comes with a 1-year warranty on parts from the date of purchase. This warranty covers defects in materials and workmanship under normal use. It does not cover damage resulting from misuse, accident, modification, or unauthorized repair.
10.2 Customer Support
For any questions, technical assistance, or warranty claims, please contact CENMING customer support. You can find contact information on the product packaging or by visiting the official CENMING store on Amazon: CENMING Amazon Store.
Our dedicated support team is available to assist you with any issues you may encounter.


