
1. Introduction
The Renkforce USB 3.2 Gen 1 4 Port Hard Drive Copy Station is a versatile device designed for efficient data management. It allows users to connect up to four 2.5-inch or 3.5-inch SATA SSDs or HDDs simultaneously for data transfer to a computer or for offline cloning of one source drive to up to three target drives.
This manual provides detailed instructions for setting up, operating, and maintaining your device, along with troubleshooting tips and technical specifications.
2. Product Features
- Four independent hard drive slots for 2.5-inch / 3.5-inch SSD or HDD hard drives.
- Supports USB 3.2 Gen 1 (USB 3.0) with data transfer rates up to 5Gbps.
- Offline clone function for direct drive-to-drive copying without a computer.
- Maximum hard drive capacity support of 40TB (4 x 10TB).
- LED status display for power, activity, and cloning progress.
- Audible sound signal upon completion of cloning process.
- Tool-free installation for quick and easy drive insertion and removal.
3. Package Contents
Please check the package contents upon unpacking to ensure all items are present and undamaged:
- Renkforce USB 3.2 Gen 1 4 Port Hard Drive Copy Station
- Power Adapter
- USB 3.0 Type-B to Type-A Cable
- User Manual (this document)

Image: Renkforce Hard Drive Copy Station with its power adapter and USB 3.0 cable.
4. Safety Instructions
Please read the following safety instructions carefully before using the device to prevent injury or damage:
- Do not expose the device to moisture, rain, or extreme temperatures.
- Use only the provided power adapter. Using an incompatible adapter may damage the device.
- Do not open the device casing. Refer all servicing to qualified personnel.
- Keep the device away from strong magnetic fields.
- Ensure proper ventilation around the device during operation.
- Handle hard drives with care to avoid damage.
5. Product Overview
Front View

Image: Front view of the Renkforce Hard Drive Copy Station.
- Drive Bays (1-4): Slots for inserting 2.5-inch or 3.5-inch SATA hard drives. Bay 1 is designated as the 'Source' drive for cloning. Bays 2, 3, and 4 are 'Target' drives.
- Power Button: Turns the device on or off.
- LED Indicators: Indicate power status, drive activity, and cloning progress for each bay.
Rear View

Image: Rear view of the Renkforce Hard Drive Copy Station.
- USB 3.0 Port: Connects the docking station to your computer.
- Clone/PC Switch: Selects between offline cloning mode and PC connection mode.
- START Button: Initiates the cloning process when in Clone mode.
- RESET Button: Resets the device or cancels the cloning process.
- DC IN Port: Connects the power adapter.
6. Setup
Follow these steps to set up your Renkforce Hard Drive Copy Station:
- Connect Power: Plug the provided power adapter into the DC IN port on the back of the docking station, then plug the adapter into a power outlet.
- Connect to PC (Optional): If you intend to use the device as an external hard drive dock, connect the USB 3.0 cable from the docking station's USB 3.0 port to an available USB port on your computer.
- Insert Hard Drives: Gently slide your 2.5-inch or 3.5-inch SATA SSDs or HDDs into the drive bays until they are securely seated. Ensure the SATA connectors align correctly.
- Power On: Press the Power button on the front of the docking station. The power LED will illuminate.
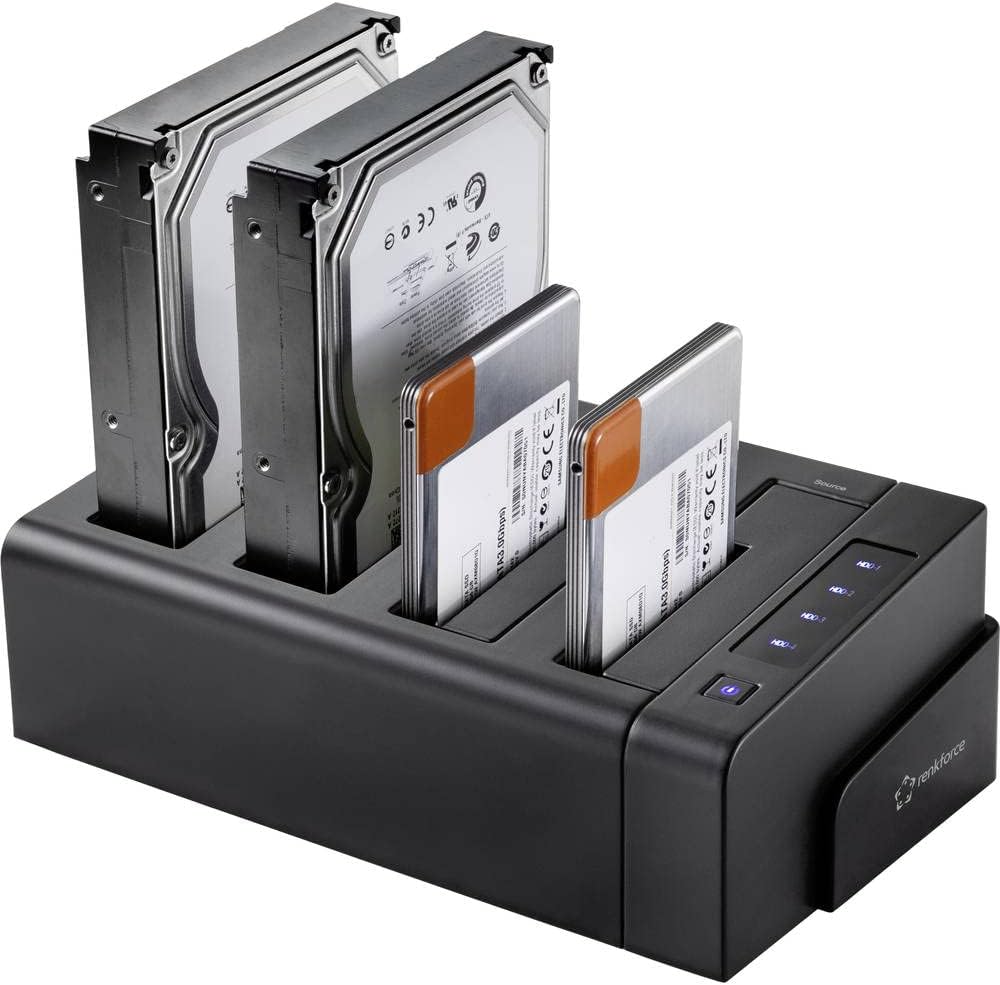
Image: Hard drives inserted into the docking station bays.
7. Operating Instructions
7.1. Data Transfer Mode (PC Mode)
In this mode, the docking station functions as an external multi-bay enclosure for your computer.
- Ensure the Clone/PC switch on the rear is set to PC.
- Connect the USB 3.0 cable from the docking station to your computer.
- Insert the desired hard drives into any of the four bays.
- Power on the docking station.
- Your computer will detect the drives as external storage devices. You can now access, transfer, and manage files as you would with any external drive.
7.2. Offline Clone Function
The offline clone function allows you to duplicate a source hard drive to up to three target hard drives without needing a computer connection.
Important Considerations:
- Ensure the target drive(s) have a capacity equal to or greater than the source drive.
- All data on the target drive(s) will be erased during the cloning process. Back up any important data before proceeding.
- Do not disconnect drives or power during the cloning process.
Steps for Offline Cloning:
- Ensure the docking station is powered off and disconnected from any computer.
- Insert the Source hard drive into Bay 1 (Source).
- Insert one, two, or three Target hard drives into Bays 2, 3, and/or 4 (Target).
- Ensure the Clone/PC switch on the rear is set to Clone.
- Power on the docking station.
- Press and hold the START button for approximately 3-5 seconds until the cloning progress LEDs begin to flash.
- The cloning process will begin. The progress LEDs (25%, 50%, 75%, 100%) will illuminate sequentially to indicate completion percentage.
- Once the cloning is complete, all progress LEDs will be solid, and the device will emit three short beeps.
- Power off the docking station before removing the drives.
8. Maintenance
Proper maintenance ensures the longevity and optimal performance of your device:
- Cleaning: Use a soft, dry cloth to clean the exterior of the device. Do not use liquid cleaners or aerosols.
- Storage: When not in use, store the device in a cool, dry place away from direct sunlight and extreme temperatures.
- Ventilation: Ensure the ventilation slots are not blocked during operation to prevent overheating.
- Handling: Avoid dropping or subjecting the device to strong impacts.
9. Troubleshooting
If you encounter issues with your Renkforce Hard Drive Copy Station, refer to the table below for common problems and solutions:
| Problem | Possible Cause | Solution |
|---|---|---|
| Device not powering on. | Power adapter not connected or faulty; power outlet issue. | Check power adapter connection; try a different power outlet; ensure power button is pressed. |
| Drives not recognized by computer. | USB cable not connected properly; Clone/PC switch in wrong position; drive not initialized/formatted. | Ensure USB cable is securely connected; set switch to PC mode; check Disk Management (Windows) or Disk Utility (macOS) to initialize/format new drives. |
| Cloning fails or does not start. | Target drive capacity is smaller than source; drives not seated correctly; switch not in Clone mode. | Ensure target drive(s) are equal or larger than source; re-insert drives firmly; set switch to Clone mode; press START button firmly. |
| Slow data transfer speeds. | Connected to a USB 2.0 port; faulty USB cable. | Connect to a USB 3.0 (blue port) or higher port on your computer; try a different USB 3.0 cable. |
| Cloning process stops unexpectedly. | Power interruption; faulty drive; overheating. | Ensure stable power supply; check drives for errors; ensure adequate ventilation. |
10. Technical Specifications
| Feature | Specification |
|---|---|
| Model Number | RF-4528332 |
| Compatible Drives | 2.5" / 3.5" SATA I/II/III SSD & HDD |
| Number of Bays | 4 (1 Source, 3 Target) |
| Max Capacity per Drive | Up to 10TB (40TB total) |
| Interface | USB 3.2 Gen 1 (USB 3.0) |
| Data Transfer Rate | Up to 5Gbps |
| Offline Clone | Yes (1-to-1, 1-to-2, 1-to-3) |
| Compatible Operating Systems | Windows, macOS, Linux |
| Power Supply | External Power Adapter |
| Dimensions (L x W x H) | Approx. 9.13 x 6.1 x 5.67 inches |
| Weight | Approx. 2.17 pounds (983 grams) |
11. Warranty and Support
Renkforce products are designed and manufactured to the highest quality standards. This product is covered by a limited warranty against defects in materials and workmanship. For specific warranty terms and conditions, please refer to the warranty card included with your purchase or visit the official Renkforce website.
For technical support, troubleshooting assistance, or to inquire about replacement parts, please contact Renkforce customer service through the contact information provided on the official Renkforce website or your retailer's support channels. Please have your model number (RF-4528332) and purchase details ready when contacting support.