1. Product Overview
The Dripex LED Vanity Bathroom Mirror is designed to enhance your bathroom experience with its advanced features and modern design. This mirror includes an automatic anti-fog function, integrated LED lighting, and a user-friendly touch button for control. It can be mounted horizontally or vertically to suit various spaces.
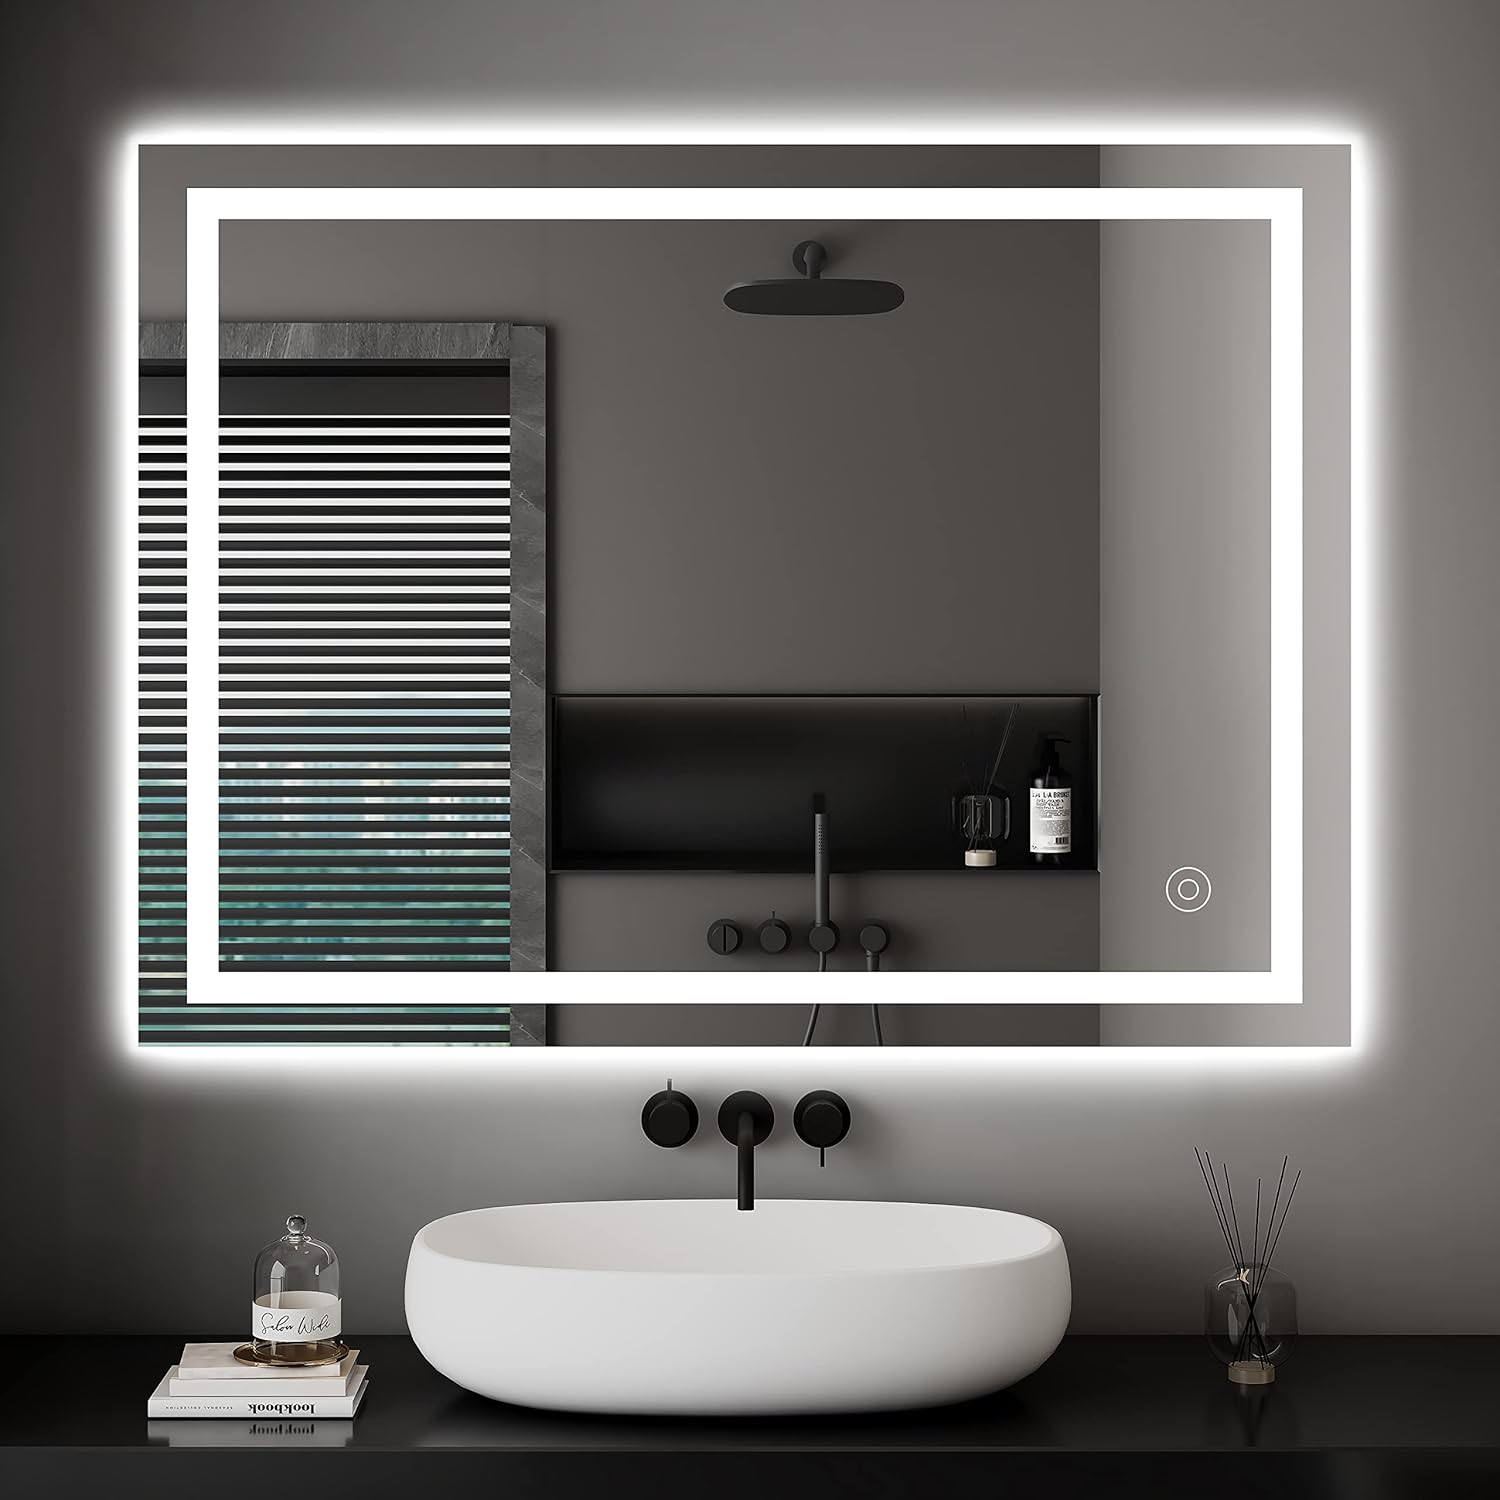
Image: The Dripex LED Vanity Bathroom Mirror showcasing its illuminated frame and sleek design in a bathroom setting.
Key Features:
- Automatic Anti-Fog Function: Ensures a clear reflection even in steamy environments.
- High-Quality LED Lighting: 6000K white light with a Color Rendering Index (CRI) of ≥90Ra for true color reflection.
- 2-in-1 Touch Button: Controls both the anti-fog function and LED light simultaneously.
- Flexible Power Options: Supports direct plug-in or hardwired connection to a wall switch.
- Versatile Mounting: Can be installed horizontally or vertically.
- Durable and Safe Design: Features a copper-free, silver-plated mirror, UL certification, and IP44 waterproof rating. Made with explosion-proof glass.

Image: An infographic highlighting the mirror's main features, including the 2-in-1 touch button, LED lamp strip, anti-fog function, horizontal/vertical mounting, wall switch support, easy installation, IP44 waterproof rating, and plug/hardwired options.
2. Safety Information
Please read all instructions carefully before installation and use. Keep this manual for future reference.
- Ensure the power supply is disconnected before installation or maintenance.
- The mirror is designed for bathroom use with an IP44 waterproof rating, but it should not be submerged in water.
- The light on the mirror is for ambient and task lighting and cannot replace the main room light.
- Handle the mirror with care to prevent damage. Although made with explosion-proof glass, excessive force can still cause breakage.
- If using the plug-in option, ensure the outlet is properly grounded and located in a safe area away from direct water spray.

Image: A visual representation of the safety mirror made from explosion-proof glass, showing how it breaks into larger, safer pieces without splashing.
3. Installation Guide
The Dripex LED Vanity Bathroom Mirror can be installed either horizontally or vertically. Please follow these steps carefully.
3.1. Before You Begin:
- Inspect the mirror for any damage before installation.
- Gather necessary tools: drill, measuring tape, level, pencil, screwdriver.
- Ensure the wall is suitable for mounting and can support the mirror's weight (approximately 19.26 lbs).
- Turn off the main power supply at the circuit breaker if hardwiring.
3.2. Mounting Options:
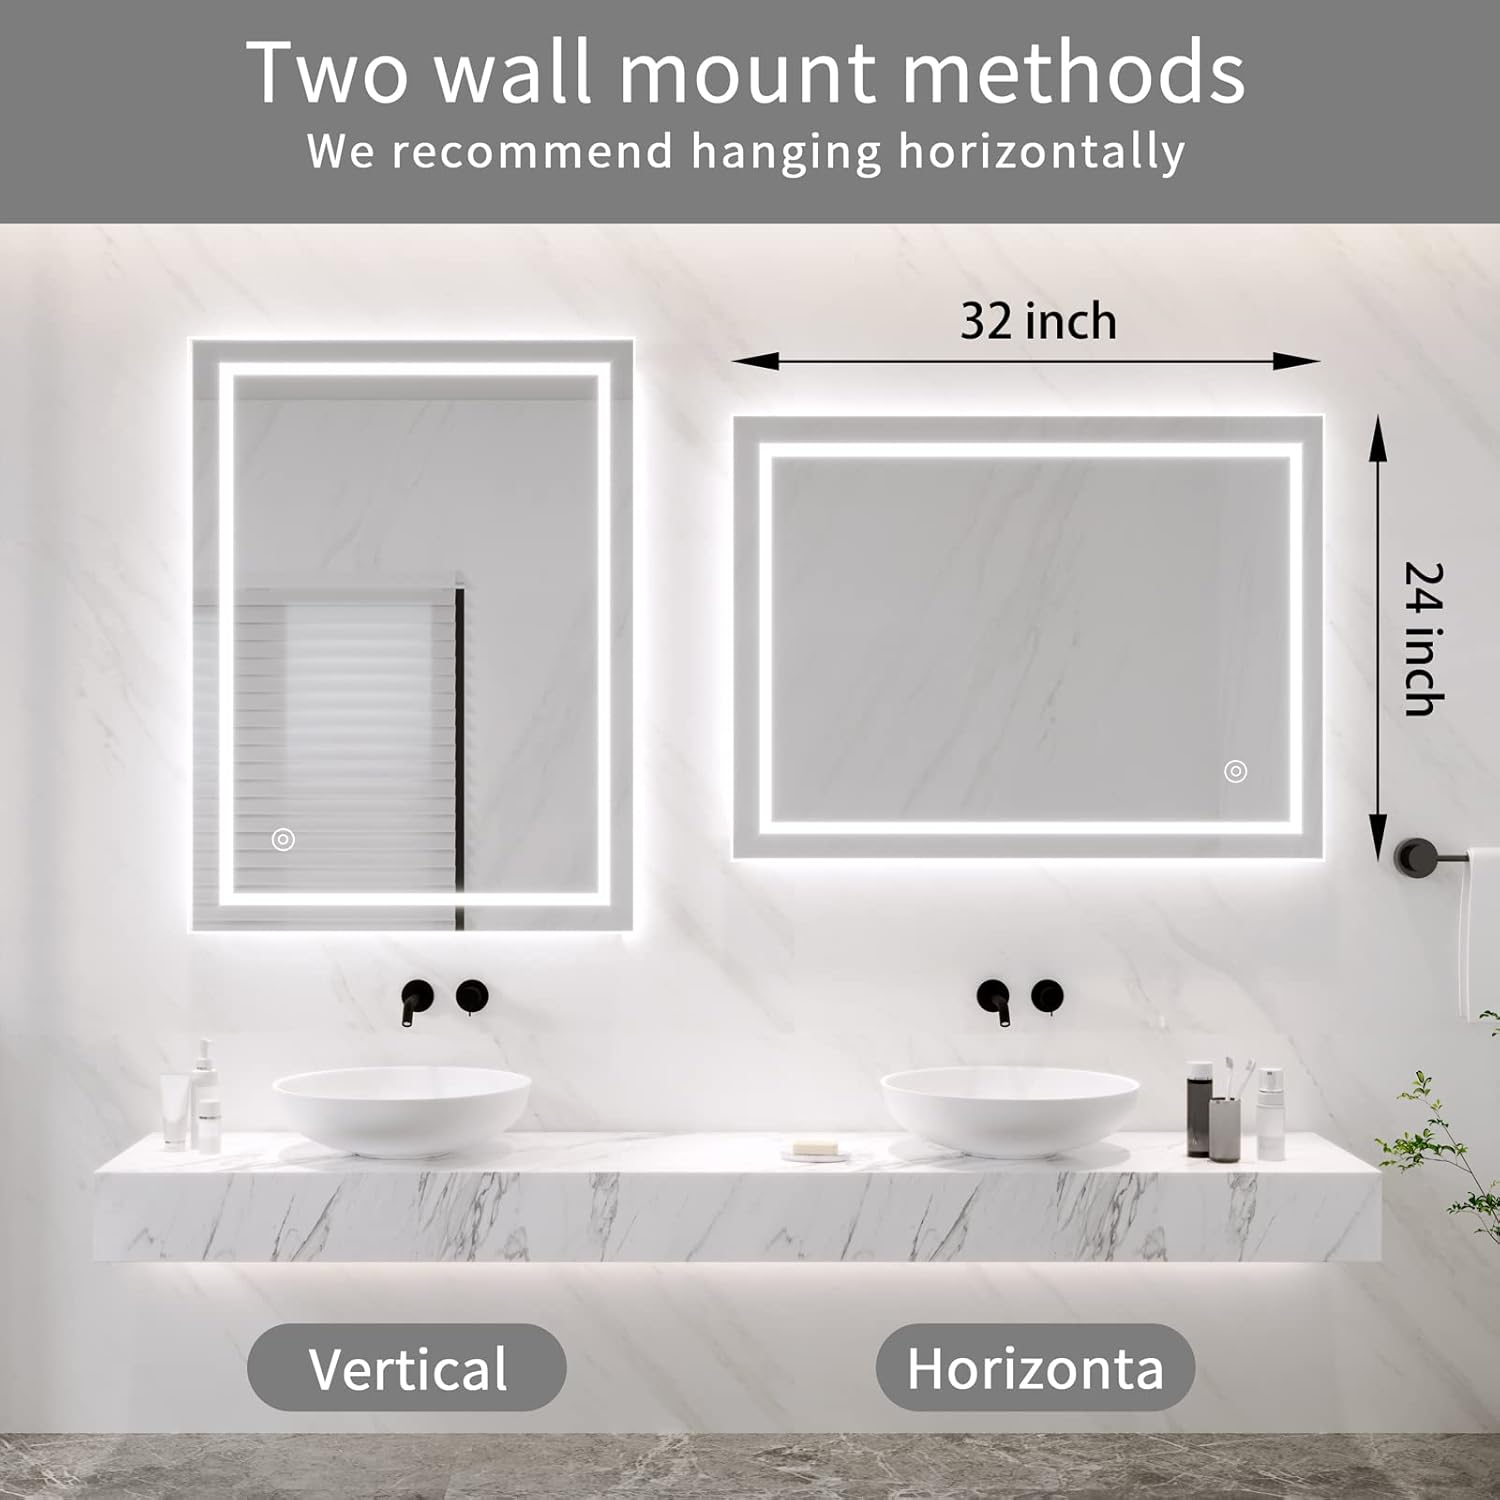
Image: A diagram illustrating the two wall mount methods: vertical and horizontal, with dimensions indicating the mirror's size.
3.3. Installation Steps:
- Measure and Mark: Determine the desired mounting height and position. Use a level to mark the drilling points for the mounting screws. For horizontal mounting, the screw holes are approximately 45 inches apart.
- Drill Holes: Drill holes at the marked points. Insert the wall anchors (if not drilling into studs).
- Install Screws: Insert the mounting screws into the anchors/studs, leaving a small portion protruding to hang the mirror.
- Connect Power:
- Plug-in: Simply plug the mirror's power cord into a suitable wall outlet. Ensure the outlet is behind the mirror or in an inconspicuous location.
- Hardwire: If hardwiring, cut the plug from the power cord. Connect the mirror's wires to your home's electrical wiring (live, neutral, ground) using appropriate wire connectors. Consult a qualified electrician if unsure. Ensure all connections are secure and insulated.

Image: A diagram illustrating the two power connection methods: direct plug-in for external flexibility and hardwiring to a wall switch for a cleaner, integrated look.
- Hang Mirror: Carefully lift the mirror and align the mounting slots on the back with the screws on the wall. Gently lower the mirror until it is securely seated.
- Restore Power: Turn on the main power supply at the circuit breaker.

Image: A technical drawing of the mirror with its dimensions (80cm x 60cm, 3.5cm thickness) and a depiction of the included installation hardware: screws, wall anchors, and the 1-meter power cord.
4. Operating Instructions
The mirror features a single touch button for easy operation of its primary functions.
4.1. Touch Button Functions:
- Power On/Off & Anti-Fog: A short press of the touch button will turn the LED light and the anti-fog function on or off simultaneously. The button indicator light will change color (e.g., blue when off, white when on) to show status.
- Brightness Adjustment: When the light is on, press and hold the touch button to adjust the brightness. The light will cycle through its dimming range. Release the button when the desired brightness is reached.

Image: A visual guide to the touch button's indicator light, showing blue when the demister and LED are off, and white when they are on.
4.2. Anti-Fog Function:
The anti-fog function activates automatically when the mirror is turned on. It uses a heating element to gently warm the mirror surface, preventing condensation and ensuring a clear view. Heat is released from the center outwards to effectively remove water vapor.

Image: A visual representation of the anti-fog function, showing a clear mirror surface after defogging compared to a fogged surface before, with arrows indicating heat distribution.
5. Maintenance and Care
Proper care will ensure the longevity and optimal performance of your Dripex LED Vanity Bathroom Mirror.
- Cleaning the Mirror Surface: Use a soft, lint-free cloth and a non-abrasive glass cleaner. Spray the cleaner onto the cloth, not directly onto the mirror, to avoid liquid seeping into the electrical components.
- Cleaning the Frame: Wipe the frame with a soft, damp cloth. Avoid harsh chemicals or abrasive cleaners.
- Avoid Excessive Moisture: While the mirror is IP44 rated, avoid direct and prolonged exposure to excessive water spray.
- Power Off for Cleaning: Always turn off the mirror and disconnect power before cleaning.
6. Troubleshooting
If you encounter any issues with your mirror, please refer to the following common problems and solutions.
| Problem | Possible Cause | Solution |
|---|---|---|
| Mirror light does not turn on. | No power supply; loose connection; faulty touch button. | Check if the power cord is securely plugged in or if the hardwire connection is secure. Ensure the wall switch (if used) is on. Check the circuit breaker. Try pressing the touch button firmly. |
| Anti-fog function is not working. | Anti-fog function not activated; power issue. | Ensure the mirror is powered on via the touch button, as the anti-fog function activates simultaneously with the light. Verify power supply. |
| Light is too dim or too bright. | Brightness setting needs adjustment. | Press and hold the touch button to cycle through brightness levels until the desired intensity is reached. |
| Mirror surface is scratched or damaged. | Improper cleaning; physical impact. | Use only soft cloths and non-abrasive cleaners. Avoid sharp objects. If damage is significant, contact customer support. |
If the problem persists after trying these solutions, please contact Dripex customer support for assistance.
7. Specifications
| Feature | Detail |
|---|---|
| Brand | Dripex |
| Model | 32"L x 24"W 1 Color Light |
| Product Dimensions | 32"L x 24"W (80cm x 60cm) |
| Thickness | 35mm |
| Light Color Temperature | 6000K (White Light) |
| Color Rendering Index (CRI) | ≥90Ra |
| Waterproof Rating | IP44 |
| Frame Material | Glass |
| Mirror Material | Copper-free, silver-plated mirror, explosion-proof glass |
| Mounting Type | Wall Mount (Horizontal or Vertical) |
| Power Supply | Corded (Plug-in or Hardwire) |
| Certifications | UL Certified LED light strip |
| Item Weight | 19.26 pounds |
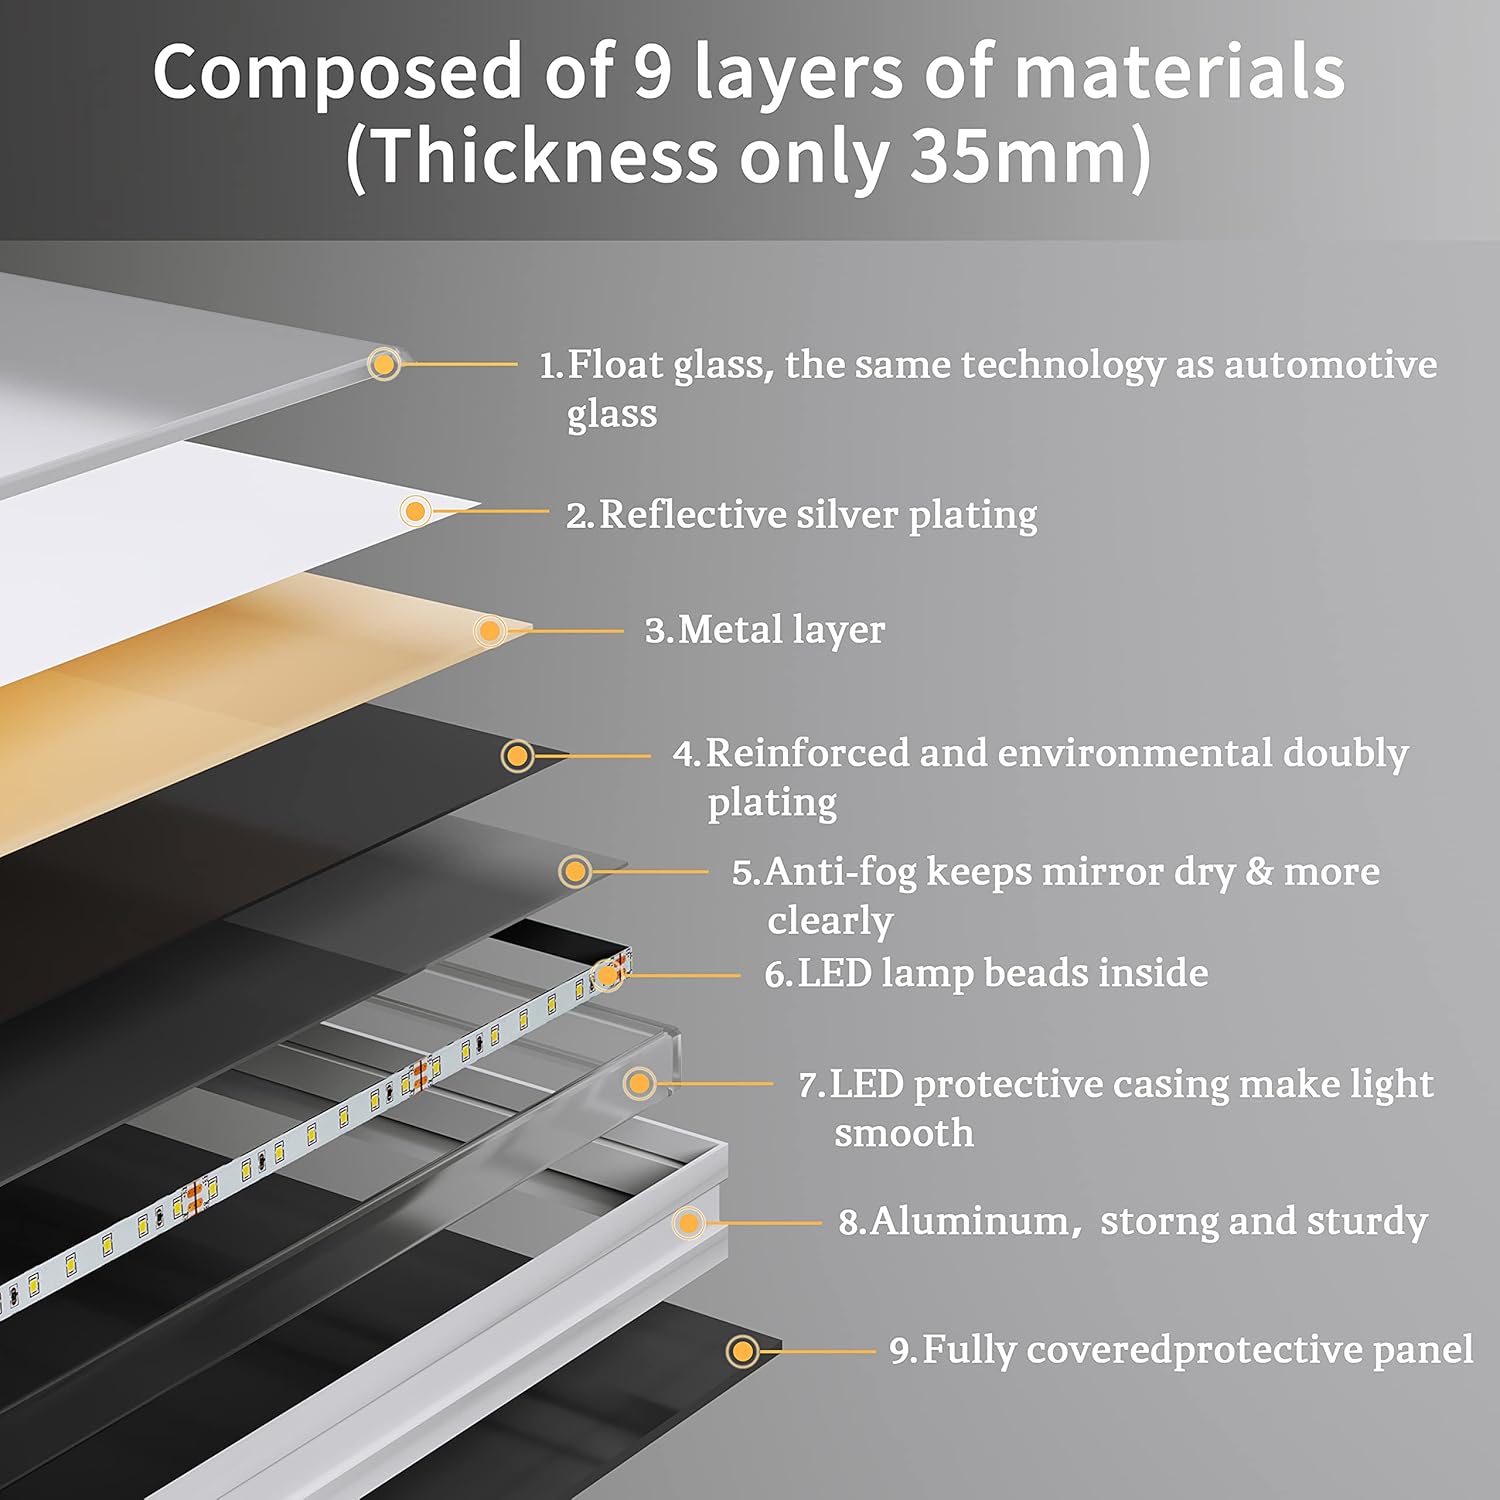
Image: A cross-section diagram illustrating the nine layers of materials composing the mirror, including float glass, reflective silver plating, metal layer, reinforced plating, anti-fog layer, LED lamp beads, LED protective casing, aluminum frame, and fully covered protective panel.
8. Warranty and Support
Dripex is committed to providing high-quality products and excellent customer service.
8.1. Warranty Information:
While specific warranty terms are not detailed in this manual, Dripex products typically come with a manufacturer's warranty covering defects in materials and workmanship. Please retain your proof of purchase for warranty claims.
8.2. Customer Support:
If you have any questions, require technical assistance, or experience issues not covered in the troubleshooting section, please contact Dripex customer service. Refer to the contact information provided with your purchase or visit the official Dripex website for support details.
Dripex aims to ensure customer satisfaction and will assist with any product-related inquiries.


