
1. Introduction
Welcome to the user manual for your kimire 10-inch WiFi Digital Photo Frame, Model P102B. This device allows you to display your cherished photos and videos with ease, connect to WiFi for remote sharing, and enjoy additional features like a calendar, alarm clock, and music player. Please read this manual carefully to ensure proper setup and operation of your new digital photo frame.
2. Product Overview
Key Features:
- 10-inch IPS Touch Screen with 1920x1080 Full HD Display.
- WiFi Connectivity (2.4 GHz only) for wireless photo and video sharing.
- Support for "OurPhoto" Frame App, Email, Facebook, and Twitter for sharing.
- Supports Thumb USB Drives and SD/MMC Cards up to 128GB (not included).
- Built-in 8GB internal storage.
- Automatic photo rotation function.
- Multimedia playback: JPEG/PNG photos, MOV/MP4/AVI/MKV videos (up to 1920x1080 30FPS), WAV/MP3 audio.
- Integrated functions: Calendar, Weather, Alarm Clock, Clock.
- Detachable bracket for landscape orientation or wall mounting.
Package Contents:
- kimire 10-inch WiFi Digital Photo Frame
- Power Adapter
- Detachable Stand
- User Manual (this document)
Component Identification:
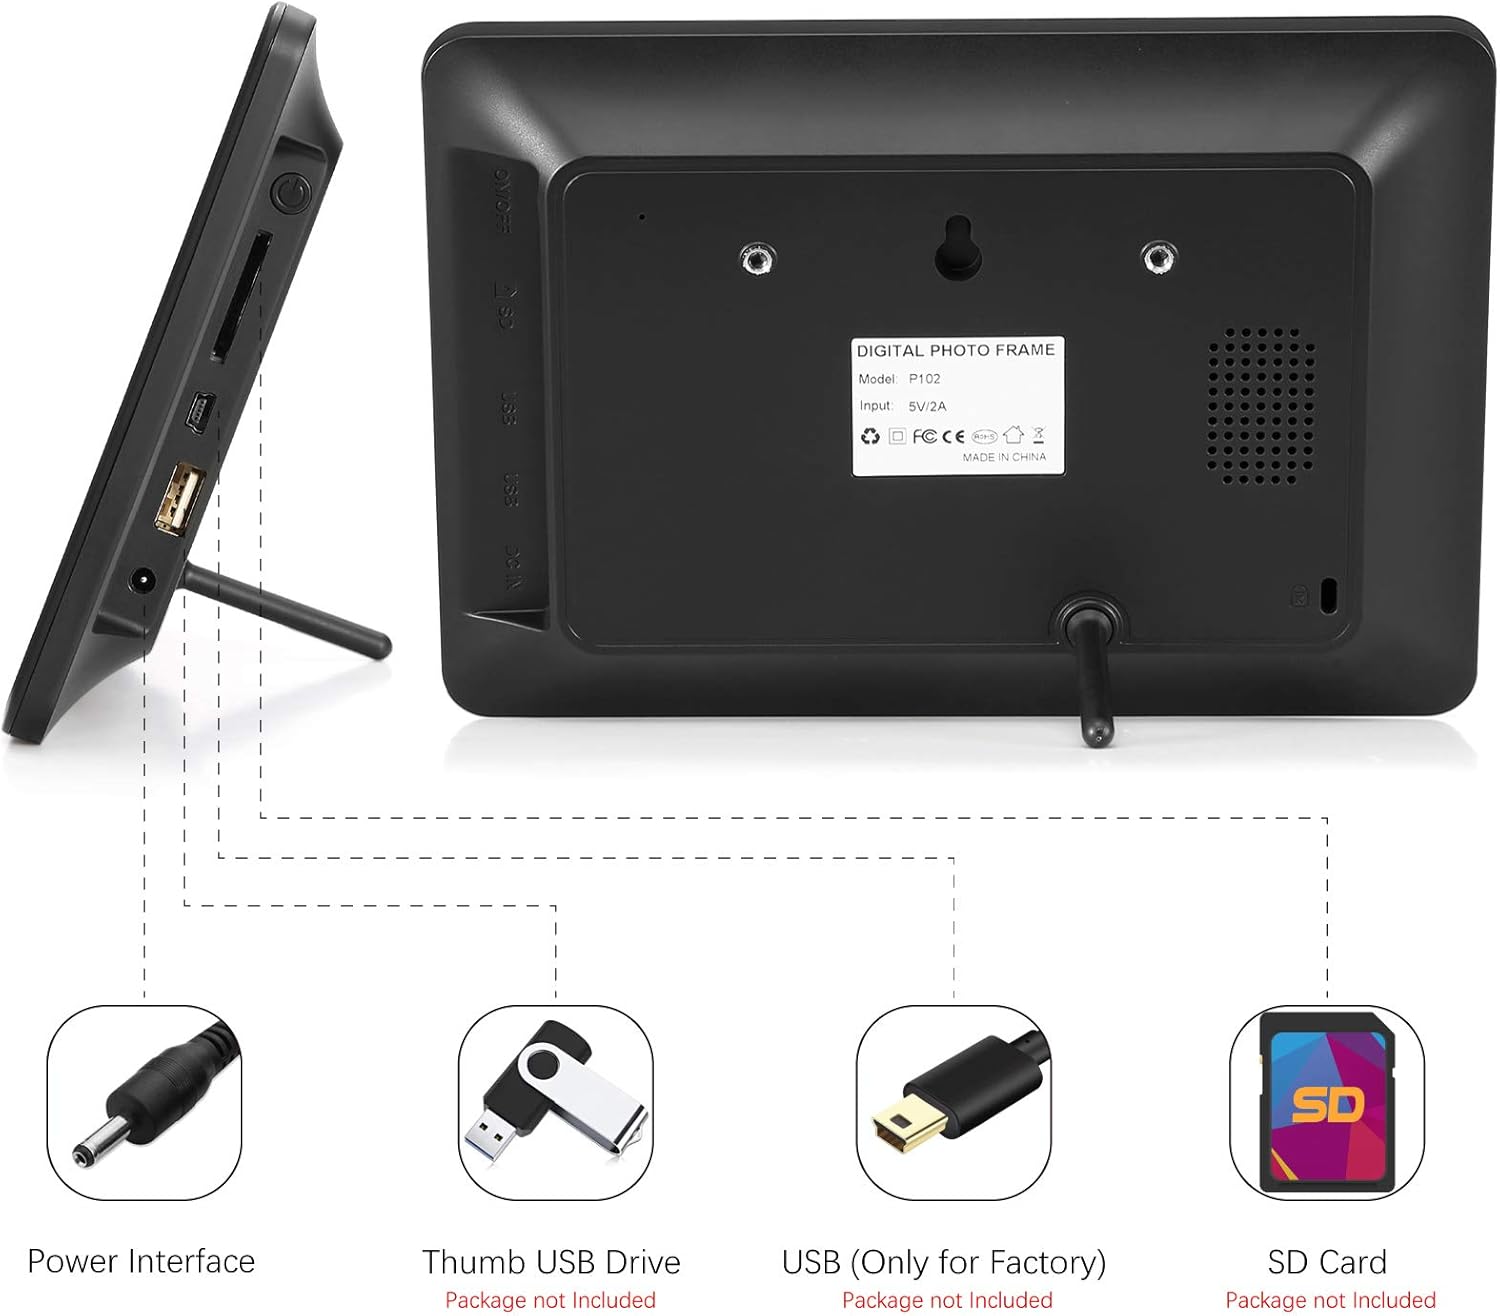
Image 2.1: Rear Panel and Ports. This image displays the back of the digital photo frame, highlighting the power interface, USB port for thumb drives, a USB port for factory use, and an SD card slot. It also shows the model number P102 and input specifications.
- Power Interface: Connect the provided power adapter here.
- Thumb USB Drive Port: Insert a USB flash drive to import photos/videos.
- SD Card Slot: Insert an SD or MMC card to import photos/videos.
- USB (Only for Factory): This port is for manufacturer use only.
- Wall Mount Holes: For mounting the frame on a wall.
- Detachable Stand Slot: Insert the stand for tabletop use.
3. Setup Guide
3.1 Initial Power On and WiFi Connection:
- Connect Power: Plug the power adapter into the frame's power interface and then into a wall outlet. The frame will automatically power on.
- Follow On-Screen Prompts: The frame will guide you through initial setup steps, including language selection and time zone.
- Connect to WiFi: Select your 2.4 GHz WiFi network from the list and enter the password. Note: This frame does not support 5 GHz networks.
If you encounter issues with WiFi connection, ensure your WiFi is enabled on the frame. Navigate to Settings > WiFi and ensure the toggle is on. If problems persist, try restarting your router and the photo frame.
3.2 Installing the Stand:
The frame comes with a detachable stand. Insert the stand rod into the designated slot on the back of the frame to position it for tabletop display in landscape mode. The frame also supports wall mounting using the pre-drilled holes.

Image 3.1: Frame with Stand. This image shows the digital photo frame positioned on a surface using its detachable stand, displaying a family photo.
3.3 "OurPhoto" App Setup:
The "OurPhoto" app is essential for sharing photos and videos wirelessly to your frame.
- Download the App: Search for "OurPhoto" in the Apple App Store (for iOS devices) or Google Play Store (for Android devices) and install it on your smartphone.
- Create an Account: Open the "OurPhoto" app and create a new account using your phone number or email address.
- Connect to Frame: In the app, locate the option to add a new device. You will need the unique Frame ID displayed on your digital photo frame (usually found in Settings > Device Info). Enter this ID into the app to link your account to the frame.

Image 3.2: OurPhoto App Interface. This image illustrates the "How OurPhoto Works" on a smartphone, showing the steps to connect to the digital photo frame: plug in and connect to Wi-Fi, create an account, and add photos via app, email, Facebook, or Twitter.
4. Operating Instructions
4.1 Touch Screen Navigation:
The kimire digital photo frame features an intuitive touch screen interface. Tap icons to select options, swipe to navigate through photos, and use pinch-to-zoom gestures where applicable.
4.2 Basic Settings:
Access the main menu by tapping the screen. From here, you can adjust various settings:
- Brightness: Adjust screen brightness for optimal viewing.
- Date & Time: Set the correct date and time.
- Auto On/Off: Schedule specific times for the frame to power on and off automatically.
- Album Settings: Configure slideshow intervals, transition effects, and background music.
- Description On/Off: Toggle display of photo descriptions.
- Language: Change the system language.
4.3 Automatic Photo Rotation:
The frame automatically adjusts the orientation of photos to display them correctly, regardless of how the frame is positioned (landscape or portrait, if wall-mounted).

Image 4.1: Auto-Rotate Function. This image shows the digital photo frame seamlessly adapting its display orientation, whether placed horizontally on a desk or mounted vertically on a wall, ensuring photos are always viewed correctly.
5. Media Management
5.1 Sharing Photos and Videos Wirelessly:
Once your frame is connected to WiFi and linked with the "OurPhoto" app, you can share media from various sources:
- Via "OurPhoto" App: Open the app, select photos or videos from your phone's gallery, and send them directly to your frame. You can also invite family and friends to share their memories by providing them with your frame's ID.
- Via Email: Send photos and videos as attachments to the unique email address assigned to your frame (found in the frame's settings).
- Via Social Media: The frame supports sharing from Facebook and Twitter. Refer to the frame's settings for specific instructions on linking these accounts.

Image 5.1: Wireless Photo Sharing. This image demonstrates various methods to share photos to the digital frame, including the "OurPhoto" app, email, Facebook, Twitter, and cloud services, all managed from a smartphone.
5.2 Importing from USB Drive or SD Card:
You can also transfer media directly using external storage:
- Insert Storage: Insert a Thumb USB Drive into the designated USB port or an SD/MMC card into the SD card slot on the back of the frame.
- Access Files: The frame will detect the external storage. Navigate to the "Files" or "Storage" section on the frame's menu.
- Copy Files: Select the photos or videos you wish to import and copy them to the frame's internal 8GB storage.
The frame supports SD cards up to 128GB. USB drives and SD cards are not included and must be purchased separately.
6. Advanced Features
6.1 Calendar and Clock:
The frame includes a built-in calendar and clock function. You can display the current date and time alongside your photos or access them as a standalone feature.
6.2 Weather Forecast:
When connected to WiFi, the frame can display local weather forecasts. Ensure your location settings are correctly configured for accurate information.
6.3 Alarm Clock:
Set alarms directly from the frame's menu. You can customize alarm times and sounds.
6.4 Music Player:
The frame supports WAV/MP3 audio playback. You can play music as background for your slideshows or as a standalone music player. Transfer music files to the frame's internal storage or play directly from a connected USB drive/SD card.

Image 6.1: Multi-function Display. This image highlights the various functions of the digital photo frame, including video playback, Wi-Fi connectivity, photo display, weather forecast, alarm clock, caption display, calendar, and music playback. It also shows the frame's 10-inch screen size and approximate dimensions.
7. Maintenance
- Cleaning: Use a soft, dry, lint-free cloth to clean the screen and frame. Do not use liquid cleaners or abrasive materials.
- Placement: Place the frame on a stable surface, away from direct sunlight, heat sources, and excessive moisture.
- Power: Always use the original power adapter provided with the frame.
- Software Updates: Periodically check for software updates in the frame's settings to ensure optimal performance and new features.
8. Troubleshooting
- Frame not powering on:
Ensure the power adapter is securely connected to both the frame and a working power outlet. Try a different outlet if necessary.
- Cannot connect to WiFi:
Verify that your WiFi network is 2.4 GHz. The frame does not support 5 GHz networks. Double-check the WiFi password. Restart your router and the photo frame, then attempt to connect again. Ensure WiFi is enabled in the frame's settings.
- Photos/Videos not displaying:
Check the file format. The frame supports JPEG/PNG for photos and MOV/MP4/AVI/MKV (up to 1920x1080 30FPS) for videos. Ensure files are not corrupted. If using an SD card or USB drive, ensure it is properly inserted and recognized by the frame.
- "OurPhoto" app not connecting:
Ensure both your phone and the frame are connected to the internet. Verify that you have entered the correct Frame ID in the app. Try restarting both the app and the frame.
- Screen is black but frame is on:
This could indicate a display issue. Try restarting the frame by unplugging and re-plugging the power. If the issue persists, contact customer support.
9. Specifications
- Model Number: P102B
- Screen Size: 10 Inches
- Resolution: 1920x1080P
- Internal Storage: 8GB
- External Storage Support: SD/MMC Card (up to 128GB), Thumb USB Drive
- WiFi: 2.4 GHz only
- Supported Photo Formats: JPEG, PNG
- Supported Video Formats: MOV, MP4, AVI, MKV (up to 1920x1080 30FPS)
- Supported Audio Formats: WAV, MP3
- Product Dimensions: 9.69 x 6.73 x 0.87 inches
- Item Weight: 2.39 ounces
- Manufacturer: kimire
10. Warranty and Support
For warranty information and technical support, please refer to the documentation included with your purchase or contact kimire customer service directly. You can often find support contact details on the manufacturer's official website or through your retailer.
Please retain your proof of purchase for any warranty claims.