1. Introduction
This manual provides essential instructions for the safe operation, setup, and maintenance of your Amewi RC Tank T-72 1:16 Professional Line. Please read this manual thoroughly before operating the tank to ensure proper function and longevity of the product. Keep this manual for future reference.
2. Safety Information
- Always operate the RC tank in open areas, away from people, pets, and obstacles.
- Do not operate near water or in wet conditions to prevent electrical damage.
- Keep fingers and loose clothing away from moving parts, such as tracks and turret.
- Ensure batteries are charged correctly and handled with care. Do not short-circuit or puncture batteries.
- Adult supervision is recommended for younger users.
- This product is not suitable for children under 3 years due to small parts.
3. Package Contents
Verify that all items listed below are present in your package:
- Amewi RC Tank T-72 1:16
- Remote Control (2.4 GHz)
- Rechargeable Lithium-ion Polymer Battery (Note: Batteries may not be included and must be purchased separately)
- Battery Charger
- BB Pellets (6mm)
- Smoke Oil (if applicable)
- Instruction Manual

Figure 3.1: Included accessories for the Amewi RC Tank T-72, showing the battery, charger, BB pellets, and smoke oil bottle.
4. Setup
4.1 Charging the Battery
- Connect the battery charger to a power outlet.
- Connect the tank's battery to the charger. Ensure correct polarity.
- Allow the battery to charge fully. Refer to the charger's indicator lights for charging status.
- Disconnect the battery once fully charged. Do not overcharge.
4.2 Installing the Tank Battery
- Locate the battery compartment on the underside or rear of the tank. It may be secured with screws or a latch.
- Open the compartment and carefully connect the charged battery to the tank's power connector.
- Place the battery securely inside the compartment and close the cover.

Figure 4.1: Internal view of the tank, illustrating the battery connection point and general wiring layout.
4.3 Remote Control Battery Installation
- Open the battery compartment on the back of the remote control.
- Insert the required batteries (e.g., AA batteries, not included) according to the polarity markings.
- Close the battery compartment securely.

Figure 4.2: The 2.4 GHz remote control for the Amewi RC Tank T-72, showing its various controls and switches.
4.4 Pairing the Remote Control
- Turn on the RC tank using its power switch.
- Turn on the remote control.
- The remote control and tank should automatically pair. An indicator light on the remote or tank may confirm successful pairing. If not, refer to the specific pairing instructions on the remote control or tank.
5. Operating Instructions
Familiarize yourself with the remote control layout (Figure 4.2) before operating the tank.

Figure 5.1: The Amewi RC Tank T-72 1:16 Professional Line, ready for operation.
5.1 Basic Movement
- Forward/Backward: Use the left joystick (or designated control) to move the tank forward or backward.
- Turning: Use the right joystick (or designated control) to steer the tank left or right. Differential steering allows for realistic tank maneuvers.

Figure 5.2: The tank's tracks demonstrating their ability to traverse small obstacles.
5.2 Turret Control
- Turret Rotation: Use the designated buttons or joystick on the remote to rotate the turret left or right.
- Barrel Elevation: Use the designated buttons to raise or lower the main gun barrel.
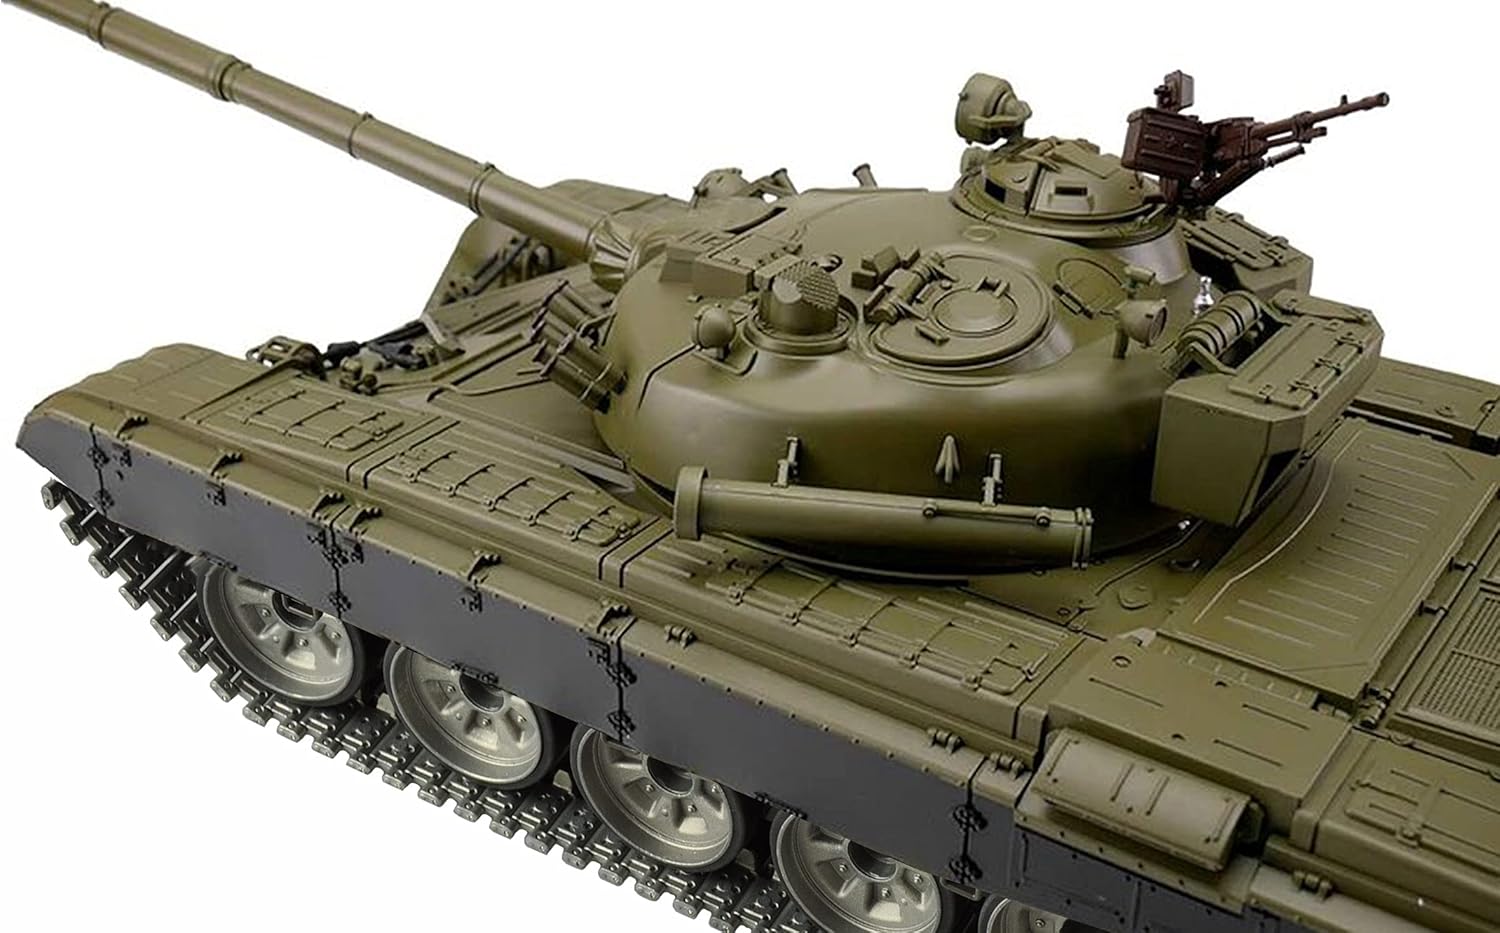
Figure 5.3: Top-down view of the tank, highlighting the rotatable turret and main gun.
5.3 Firing Mechanism (BB and IR)
- Loading BBs: Open the BB loading hatch (usually on the turret) and carefully load 6mm BB pellets. Do not overfill.
- Firing BBs: Press the designated 'Fire' button on the remote control to launch BB pellets. Ensure no one is in the line of fire.
- Infrared (IR) Battle System: The tank is equipped with an IR battle system. Refer to specific instructions for engaging in IR battles with compatible tanks.
5.4 Smoke Function
- If your model includes a smoke generator, add a few drops of smoke oil into the designated reservoir.
- Activate the smoke function using the corresponding button on the remote control.
6. Maintenance
6.1 Cleaning
- After each use, gently wipe down the tank with a dry, soft cloth to remove dust and debris.
- Avoid using water or chemical cleaners, as these can damage electronic components.
- Clean the tracks regularly to ensure smooth operation.
6.2 Battery Care and Storage
- Always remove the battery from the tank and remote control when not in use.
- Store batteries in a cool, dry place, away from direct sunlight and extreme temperatures.
- For long-term storage, charge Lithium-ion Polymer batteries to approximately 50% capacity.
7. Troubleshooting
| Problem | Possible Cause | Solution |
|---|---|---|
| Tank does not respond to remote. | Low battery in tank or remote; Not paired; Power switch off. | Charge/replace batteries; Re-pair tank and remote; Ensure power switches are ON. |
| Tank moves slowly or erratically. | Low tank battery; Obstruction in tracks. | Charge tank battery; Clear any debris from tracks. |
| BBs do not fire. | No BBs loaded; Jammed firing mechanism. | Load BBs; Clear any jams (refer to specific instructions for clearing jams). |
| Smoke function not working. | No smoke oil; Smoke generator malfunction. | Add smoke oil; Contact support if issue persists. |
8. Specifications
| Feature | Detail |
|---|---|
| Model Number | RC Panzer T-72 1:16 |
| Scale | 1:16 |
| Main Material | Acrylonitrile Butadiene Styrene (ABS) |
| Color | Green |
| Power Source | Battery Powered |
| Battery Type | Lithium-ion Polymer (LiPo) |
| Remote Control | 2.4 GHz, Proportional |
| Special Features | Remote Control, IR Battle System, BB Firing, Smoke Function |
9. Warranty and Support
Amewi products are designed for quality and performance. For warranty information, please refer to the documentation provided at the time of purchase or visit the official Amewi website. If you encounter any issues not covered in this manual, or require further assistance, please contact Amewi customer support.
Please retain your proof of purchase for warranty claims.


